
User's Manual


Installing the Software
Issue 1 June 2005 41
3. Based on whether the database is installed on this server or another server, go to one of the
following sections:
● If the database is installed on this machine, go to Database is Installed on This
Machine on page 41.
● If the database is installed on another machine, go to Database is Installed on Another
Machine on page 44.
Database is Installed on This Machine
Use this procedure if the database you are using is installed on this server.
1. See Installing VoIP Monitoring Manager With a Database Already Installed
on page 40 and
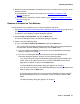
perform Steps 1 and 2. At Step 2, the following dialog box appears:
The Where is Your Database Located? dialog box appears.
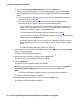
2. Select Locally, on this machine, and click the Next button.
The Does the Database Need to be Initialized? dialog box appears.
3. Perform one of the following steps:
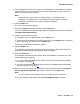
● If yes, select Yes, it needs to be initialized, and click the Next button.
The Configure Existing Database dialog box appears. Back up the existing database as
recommended. After the database is backed up, click the Next button.
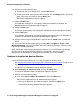
● If you are installing the WebLM License Server, the Enter WebLM Port Information
dialog box appears. Go to Step 4
.
● If you are not installing the WebLM License Server, the Enter WebLM Server
Information dialog box appears. Perform one of the following steps:
- If you have licenses to activate VoIP Monitoring Manager beyond the 90-day trial
period, enter the IP address of the server on which the WebLM License Server
application is installed, and then click the Next button.
The Enter WebLM Port Information dialog box appears. Go to Step 4
.
- If you do not have licenses for VoIP Monitoring Manager, leave the IP address field
blank, and then click the Next button.
A message appears stating you have not entered a WebLM IP address and VoIP
Monitoring Manager will run as an evaluation version for 90 days. Click the OK
button.
The Setup Summary dialog box appears. Go to Step 5
.