Avaya Integrated Management Release 3.
© 2006 Avaya Inc. All Rights Reserved. Notice While reasonable efforts were made to ensure that the information in this document was complete and accurate at the time of printing, Avaya Inc. can assume no liability for any errors. Changes and corrections to the information in this document may be incorporated in future releases. For full legal page information, please see the complete document, Avaya Legal Page for Software Documentation, Document number 03-600758.
Contents Chapter 1: Introduction . . . . . . . . . . . . . . . . . . . . . . . . . . . 5 Purpose. . . . . . . . . . . . . . . . . . . . . . . . . . . . . . . . . . . . . . . . . 5 Prerequisites . . . . . . . . . . . . . . . . . . . . . . . . . . . . . . . . . . . . . . 5 Intended Audience. . . . . . . . . . . . . . . . . . . . . . . . . . . . . . . . . . . 5 Conventions Used in This Book . . . . . . . . . . . . . . . . . . . . . . . . . . . 5 Support Resources . . . . . . . . . . . . . . . . . .
Contents Avaya VoIP Monitoring Manager Web Client . . . . . . . . . . . . . . . . . . WebLM License Server . . . . . . . . . . . . . . . . . . . . . . . . . . . . . . 23 23 Pre-Installation Tasks . . . . . . . . . . . . . . . . . . . . . . . . . . . . . . . . . 24 Ensuring Windows SNMP Service is Installed . . . . . . . . . . . . . . . . . . . . 25 VoIP Monitoring Manager CD . . . . . . . . . . . . . . . . . . . . . . . . . . . . . 26 Avaya VoIP Monitoring Manager License Key . . . . . . . . . . .
Chapter 1: Introduction Purpose The purpose of this book is to provide the following information: ● Hardware and software requirements for Microsoft® Windows® servers and Windows client PCs. ● Pre-installation tasks that must be completed prior to installation. ● Procedures to install the products in the Avaya Integrated Management, Administration Tools offer. If any of the products included in this offer are already installed on your system, those products will be upgraded during this installation.
Introduction Support Resources Avaya provides a variety of planning, consulting, and technical services. The following sections describe the resources and services that are available. Avaya Technology and Consulting (ATAC) Avaya Technology and Consulting (ATAC) works with client teams to develop detailed solutions for connectivity to Avaya Communication Manager solutions. The ATAC also designs network configurations.
Support Resources The CSI Group provides support on a contract basis. You can purchase various implementation offers from the CSI Group in Tampa, Florida. See Table 1: Customer-Accessible Resources on page 9 for contact information. Avaya Technical Service Organization (TSO) The Avaya Technical Service Organization (TSO) provides support to the Avaya Integrated Management client teams, field technicians, and customers.
Introduction Customized Management Solutions for Avaya Integrated Management The Integrated Management Product Team understands customer’s needs and is focused on customer satisfaction. See Table 1: Customer-Accessible Resources on page 9 for contact information.
Support Resources Avaya Contact Information Table 1 and Table 2 provide contact information that you may use if you need assistance during the process of installing and setting up Avaya Integrated Management. To access the links in Table 2, you must be able to access the Avaya intranet. Table 1: Customer-Accessible Resources Resource Contact Information Avaya Support Center http://www.avaya.
Introduction Product Documentation The latest version of Avaya Integrated Management product documentation, including this book, is available from the Avaya Support Web Site. To view or download these books from the Web, you must have access to the Internet, an Internet browser, and Adobe Acrobat Reader, version 5.0 or later. Adobe Acrobat Reader is provided on the Avaya Integrated Management CDs and is also available from http://www.adobe.com.
Chapter 2: Overview Administration Tools Administration Tools is a Windows solution for Avaya Integrated Management. It is designed for small-to-medium size networks that run Windows platforms. With this offer, you receive the following management tools: ● Avaya Site Administration Avaya Site Administration enables you to administer and manage Avaya voice systems and Avaya converged devices.
Overview Administration Tools CDs The Administration Tools offer is provided on the following CDs: ● Administration Tools (See Chapter 3: Administration Tools Installation on page 13.) ● VoIP Monitoring Manager (90-day trial) (See Chapter 4: VoIP Monitoring Manager Installation on page 21.
Chapter 3: Administration Tools Installation Overview of Administration Tools CD The Administration Tools CD contains products that you install directly onto a Windows PC. See PC Requirements on page 15 for the minimum PC requirements. Before installing this CD, also see Pre-Installation Tasks on page 14.
Administration Tools Installation ● OpenSSH SCP Server In Integrated Management Release 3.1, Avaya Voice Announcement Manager enables you to use an SCP server for secure file transfer to G250 and G350 media gateways. These media gateways have an SCP client. You can either use an existing SCP server or install OpenSSH SCP Server from the Administration Tools CD.
PC Requirements PC Requirements Table 3 provides the requirements for the PC. Table 3: Windows Client PC Requirements Component Required Comments Operating system Microsoft Windows 2000, Windows XP Professional, or Windows 2003 Processor 600 MHz Pentium® Hard Drive 1 GB Memory 256 MB RAM Monitor SVGA 1024 X 768 display Network Connectivity TCP/IP 10/100 Network Card Modem 56K Modem May be required for remote access to the PC. Internet Explorer 6.
Administration Tools Installation Installing the Administration Tools This section describes how to install Avaya Site Administration and Avaya Voice Announcement Manager. The procedure to install or upgrade these applications is generally the same. 1. Close all open windows and applications. 2. Insert the Avaya Integrated Management, Administration Tools 3.1 CD into the CD-ROM drive. The Avaya Integrated Management Administration Tools 3.1 window appears. It provides a main menu.
Installing OpenSSH SCP Server Note: Note: You are not required to enter the IP address of the Avaya Integrated Management Launch Page Server. However, if you leave this blank and click the Next button, no link to the Launch Page will be provided on the PC. The Start Copying Files dialog box appears. 9. Click the Next button. The Setup Status message box appears showing the status of the installation. When the installation is complete, the InstallShield Wizard Complete dialog box appears. 10.
Administration Tools Installation 3. From the left side of the SCP User Management dialog box, select the appropriate users you want to add to the SCP Server, and click the right arrow button. 4. Click the Next button. The Ready to Install the Program dialog box appears. 5. Click the Install button. The Setup Status message box appears showing the status of the installation. When the installation is complete, the InstallShield Wizard Complete dialog box appears. 6. Remove the CD from the CD-ROM drive. 7.
Uninstalling the Administration Tools Uninstalling the Administration Tools This section describes how to uninstall Avaya Site Administration and Avaya Voice Announcement Manager. 1. Select Start > Control Panel. The Control Panel window appears. 2. Double-click on Add or Remove Programs. The Add or Remove Programs window appears. 3. Click on Avaya Integrated Management Administration Tools 3.1. 4. Click the Remove button.
Administration Tools Installation 20 Avaya Integrated Management Administration Tools Installation and Upgrade
Chapter 4: VoIP Monitoring Manager Installation What is Avaya VoIP Monitoring Manager? Avaya Voice Over IP (VoIP) Monitoring Manager is a VoIP Quality of Service (QoS) monitoring tool. It enables you to monitor and review the quality of a call on an Avaya VoIP Network. Avaya VoIP Monitoring Manager allows you to view QoS data (such as jitter, round trip time (RTT), and packet loss) experienced at the endpoints and during a session. This data displays in real-time or for previously active endpoints.
VoIP Monitoring Manager Installation Avaya VoIP Monitoring Manager Components The Avaya VoIP Monitoring Manager incorporates the Avaya VoIP Monitoring Manager Real-time Transport Control Protocol (RTCP) Monitor and the Avaya VoIP Monitoring Manager Server, which accepts connections from the Avaya VoIP Monitoring Manager Client. The server software must be installed on the network to work correctly. A Windows SNMP Agent must also be installed on the server. VoIP Monitoring Manager also uses a database.
Avaya VoIP Monitoring Manager Components Avaya VoIP Monitoring Manager Web Client The Avaya VoIP Monitoring Manager Client can run as a Web application in a browser. This is useful if you only have the Avaya VoIP Monitoring Manager Server installed. To run the Avaya VoIP Monitoring Manager Client as a Web application, the following requirements must be met: ● The PC on which Avaya VoIP Monitoring Manager Server is installed must be running a Web server.
VoIP Monitoring Manager Installation Pre-Installation Tasks Before installing Avaya VoIP Monitoring Manager, you must complete the following pre-installation tasks. 1. Check the minimum hardware and software requirements for the server. (See VoIP Monitoring Manager System Requirements on page 27.) Note: Note: The client and server software communicate using Java Remote Method Invocation (RMI), and use port 1099 on the machine on which the server is running.
Ensuring Windows SNMP Service is Installed 6. Complete the Ready Reckoner form. This form is available in the Avaya Integrated Management Implementation Guidelines, document number 555-233-163. Completing this form will help you predict the size of your database and therefore help you determine if the MSDE database will meet your needs. If not, a larger database such as Microsoft SQL 2000 can be installed.
VoIP Monitoring Manager Installation VoIP Monitoring Manager CD The VoIP Monitoring Manager CD contains the following components: Note: ● VoIP Monitoring Manager Client (90-day trial version) ● VoIP Monitoring Manager Server (90-day trial version) ● WebLM License Server (optional component required to fully activate VoIP Monitoring Manager beyond the 90-day trial period; not required for the 90-day trial version) ● Adobe Acrobat Reader (required to view documents) Note: The VoIP Monitoring Manager
VoIP Monitoring Manager System Requirements VoIP Monitoring Manager System Requirements Table 4 and Table 5 provide the minimum system requirements to install and operate the VoIP Monitoring Manager Server and Client software.
VoIP Monitoring Manager Installation Table 4: VoIP Monitoring Manager Server Requirements (continued) Component Required Comments Web Browser Internet Explorer 6.0 Required for access to the Integrated Management Launch Page and web-based clients. Integration with HP OpenView Network Node Manager HP OpenView 7.0.1 or HP OpenView 7.5. HP OpenView is not included on any Avaya Integrated Management CD. Customers must purchase, install, and maintain HP OpenView.
VoIP Monitoring Manager System Requirements Table 5: VoIP Monitoring Manager Client Requirements Component Required Comments Operating System Microsoft Windows 2000, Windows XP Professional, or Windows 2003. Only English operating systems are supported. Processor 600 MHz Pentium® Hard Drive 1 GB Memory 256 MB RAM Monitor SVGA 1024 X 768 display Network Connectivity TCP/IP 10/100 Network Card Modem 56K Modem CD-ROM Drive Web Browser May be required for remote access to the client PC.
VoIP Monitoring Manager Installation Installing the Software Use this procedure to install VoIP Monitoring Manager Server, VoIP Monitoring Manager Client, and WebLM Server on the Windows server. The procedure to install or upgrade Avaya VoIP Monitoring Manager is generally the same.
Installing the Software 7. Perform one of the following steps: ● To install the applications in the default folder, click the Next button. ● To change the folder where the applications will be installed, click the Change button, specify the folder you want to use, and then click the Next button. The Select Features dialog box appears. This dialog box displays the applications you can install. See WebLM License Server on page 23 for information about the WebLM application. 8.
VoIP Monitoring Manager Installation 13. Based on whether you are installing the MSDE database that is included on the VoIP Monitoring Manager CD, or using a database already installed, do one of the following: ● If you want to install the MSDE database that is included on the VoIP Monitoring Manager CD, continue with Step 14. ● If you want to use a database that is already installed, go to Installing VoIP Monitoring Manager With a Database Already Installed on page 33. 14.
Installing the Software - If you do not have licenses for VoIP Monitoring Manager, leave the IP address field blank, and then click the Next button. A message appears stating you have not entered a WebLM IP address and VoIP Monitoring Manager will run as an evaluation version. Click the OK button. The Start Copying Files dialog box appears. Go to Step 20. 19. Enter the port number on which the WebLM License Server should run, and then click the Next button. The default port is 3999.
VoIP Monitoring Manager Installation ● If the database is installed on another machine, select Remotely, on another machine, and click the Next button. The Database Server IP Address dialog box appears. Enter the IP Address of the database location, and click the Next button. The Does the Database Need to be Initialized? dialog box appears. Go to Step 4. 4. Perform one of the following steps: ● If yes, select Yes, it needs to be initialized, and click the Next button.
Installing the Software A message appears stating you have not entered a WebLM IP address and VoIP Monitoring Manager will run as an evaluation version. Click the OK button. The Start Copying Files dialog box appears. Go to Step 6. 5. Enter the port number on which the WebLM License Server should run, and click the Next button. The default is 3999. The Start Copying Files dialog box appears. 6. Review the setup information, and then click the Next button.
VoIP Monitoring Manager Installation Installing the Client Software Use this procedure to install or upgrade the VoIP Monitoring Manager Client. The VoIP Monitoring Manager Client may be installed on the same PC as the VoIP Monitoring Manager Server, or it may be installed on another PC on the network. 1. Ask all users to log off the system. 2. Close all open windows and applications. 3. Insert the Avaya Integrated Management, VoIP Monitoring Manager 3.1 CD into the CD-ROM drive.
Installing VoIP Monitoring Manager Licenses 10. Enter the IP address of your VoIP Monitoring Manager Server, and click the Next button. The Start Copying Files dialog box appears. 11. Review the setup information and then click the Next button. The installation status bar appears while files are configured and installed. When the installation is complete, the InstallShield Wizard Complete dialog box appears. 12. Remove the CD from the CD-ROM drive. 13. Click the Finish button to restart the computer.
VoIP Monitoring Manager Installation Post-Installation Tasks After installing Avaya VoIP Monitoring Manager, you must complete the following post-installation tasks. 1. Check for a valid community name. (See Checking for a Valid Community Name on page 38.) 2. Configure two Avaya Communication Manager administration forms—the IP Network Region form and the System Parameters IP-Options form. (See Configuring the Avaya Communication Manager Administration Forms on page 39.) 3.
Post-Installation Tasks Note: Avaya VoIP Monitoring Manager will attempt to initially connect using the community name private. For security reasons, it is recommended that you choose a different community name.
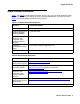
VoIP Monitoring Manager Installation Configuring the IP Network Region Form Figure 1 shows an IP Network Region form. To configure this form, follow these steps: 1. Set the RTCP Reporting Enabled? field to y (yes). 2. Set the Use Default Server Parameters? field to y (yes). This indicates that this network region uses the default values specified on the System Parameters IP-Options form. Figure 1: IP Network Region Form In some cases, you may not want to set the Default Parameters to yes.
Post-Installation Tasks Configuring the System Parameters IP-Options Form Figure 2 shows a Systems Parameters IP-Options form. To configure this form, locate the heading RTCP MONITOR SERVER and follow these steps: 1. Set the Default Server IP Address to the address of the Windows PC running the VoIP Monitoring Manager Server. 2. Set the Default RTCP Report Period (secs) to 10.
VoIP Monitoring Manager Installation Configuring the RTCP Listen Port The RTCP Listen Port administered in the Avaya VoIP Monitoring Manager Server must match the default RTCP monitor server port administered on the Avaya Communication Manager Server. Use this procedure to change the RTCP Listen Port on the VoIP Monitoring Manager Server to match the port number administered on the Avaya Communication Manager Server.
Uninstalling the Software Uninstalling the Software Use this procedure to uninstall VoIP Monitoring Manager server and client software. 1. Select Start > Control Panel. The Control Panel window appears. 2. Click on Add or Remove Programs. The Add or Remove Programs window appears. 3. Click on Avaya Integrated Management VoIP Monitoring Manager 3.1. 4. Click the Remove button. A dialog box appears prompting you to confirm that you want to remove the application. 5. Click the Yes button.
VoIP Monitoring Manager Installation 44 Avaya Integrated Management Administration Tools Installation and Upgrade
Chapter 5: Avaya Mailbox Manager About Mailbox Manager Mailbox Manager for the Avaya S3400 Message server is a Windows interface for performing moves, adds, and changes on the Message Storage Server (MSS) component. The software maintains an off-line database of your subscriber and class of service data. You make your changes to subscribers and classes of service in this interface, and it sends the changes to your MSS.
Avaya Mailbox Manager Licensing Mailbox Manager When you install Avaya Mailbox Manager, a single-user license is created. If your organization also manages other Avaya legacy message servers that are supported by Mailbox Manager (for example, Octel 250/350, Octel 200/300, or Intuity AUDIX), you may already have Mailbox Manager licenses for those as well. You can combine the licenses for these systems into one license and manage them from one interface if you upgrade those licenses to Mailbox Manager 5.0.
Index Index Symbols M >, meaning of in text . . . . . . . . . . . . . . . . . 5 Mailbox Manager defined . . . . . . . . . . launching . . . . . . . . . licensing . . . . . . . . . Microsoft SQL 2000 Database . A Administration Tools defined . . . . . . . . . . . . . . . . . . . . . .11 pre-installation tasks . . . . . . . . . . . . . . 14 Administration Tools CDs defined . . . . . . . . . . . . . . . . . . . . . 12 Avaya support resources . . . . . . . . . . . . . . . . 6 support web site . . . . . .
Index V VoIP Monitoring Manager defined . . . . . . . . . . . . . . . . . . . . . 21 pre-installation tasks . . . . . . . . . . . . . 24, 38 VoIP Monitoring Manager CD . . . . . . . . . . . . 26 W Web Client . . . . . . . . . . . . . . . . . . . . 23 WebLM License Server . . . . . . . . . . . . .