IP Phone 1120E User Guide BCM Business Communications Manager Document Status: Standard Document Version: 03.
Copyright © Nortel Networks Limited 2006, All rights reserved. The information in this document is subject to change without notice. The statements, configurations, technical data, and recommendations in this document are believed to be accurate and reliable, but are presented without express or implied warranty. Users must take full responsibility for their applications of any products specified in this document. The information in this document is proprietary to Nortel Networks.
Contents 3 Contents Chapter 1 About the Nortel IP Phone 1120E . . . . . . . . . . . . . . . . . . . . . . . . . . . . . . . . . . 5 Basic Features . . . . . . . . . . . . . . . . . . . . . . . . . . . . . . . . . . . . . . . . . . . . . . . . . . . . . . . . 5 Telephone Controls . . . . . . . . . . . . . . . . . . . . . . . . . . . . . . . . . . . . . . . . . . . . . . . . . . . . 7 Telephone Display . . . . . . . . . . . . . . . . . . . . . . . . . . . . . . . . . . . . . . . . . . . . . . . . . . . .
Contents Using a headset . . . . . . . . . . . . . . . . . . . . . . . . . . . . . . . . . . . . . . . . . . . . . . . . . . . . . . 22 Muting the Microphone . . . . . . . . . . . . . . . . . . . . . . . . . . . . . . . . . . . . . . . . . . . . . . . . 22 Accessing External Server Applications . . . . . . . . . . . . . . . . . . . . . . . . . . . . . . . . . . .
Chapter 1 About the Nortel IP Phone 1120E The Nortel IP Phone 1120E brings voice and data to the desktop by connecting directly to a Local Area Network (LAN) through an Ethernet connection. Note: In this guide, user-defined feature key labels appear beside the keys, and soft key labels appear directly above the keys.
Chapter 1 About the Nortel IP Phone 1120E • USB port to support a keyboard or mouse Note: Powered downstream 1.1-complaint USB hubs are supported, including USB 2.0 hubs, if they offer USB 1.1 backwards compliancy. • • automatic network configuration hearing-aid compatibility Caution: Do not plug the IP Phone 1120E into a regular telephone jack. This results in severe damage to the IP Phone.
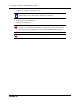
Chapter 1 About the Nortel IP Phone 1120E 7 Figure 1 shows the IP Phone 1120E.
Chapter 1 About the Nortel IP Phone 1120E The keys on either side of the display area are user-defined feature keys, with labels on the LCD display. A steady LCD light beside a line (DN) key indicates that the line is active. A flashing LCD light indicates the line is on hold or the feature is being programmed. GrpCl Z (Volume +) (Volume -) (Mute) A steady LCD light beside a feature key indicates that the feature is active. A flashing LCD light indicates that the feature is being programmed.
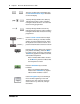
Chapter 1 About the Nortel IP Phone 1120E 9 Use the Send/Enter key, at the center of the Navigation key cluster, to confirm menu selections. In most menus, you can use the Send/Enter key instead of the Select soft key. (Hold) Press the Hold key to put an active call on hold. Tap the flashing line (DN) soft key to return to the caller on hold. Use the Expand to PC key to access external server applications.
Chapter 1 About the Nortel IP Phone 1120E (Services) (Services) (Services) Press the Services key to access the scrollable Feature Display menu (FEATURE *900), including the hot desking feature (programmable memory button). Press the Services key twice to access the Local Tools menu, and use the navigation keys to access the following items: • 1. Preferences • 2. Local Diagnostics • 3. Network Configuration • 4.
Chapter 1 About the Nortel IP Phone 1120E 11 Telephone Display Your IP Phone 1120E has three display areas: • • • The upper display area provides labels for the four user-defined feature keys. The middle display area contains single-line information for items such as caller number, caller name, feature prompt string, user-entered digits, date and time information, and telephone information. The lower display area provides labels for the four soft keys. Figure 2 shows an idle LCD screen.
Chapter 1 About the Nortel IP Phone 1120E NN40050-104
Chapter 2 Entering and editing text You can enter and edit text on your IP Phone 1120E using the following methods. Which method you use for text entry or editing depends on the application. Table 1 shows the applications and input devices that you can use for text entry.
Chapter 2 Entering and editing text f6 f7 f8 NN40050-104 Volume down Copy Quit
Chapter 3 Configuring options Note: Many of the options discussed in this section are for administrator use only. Do not make any changes unless instructed by an administrator. Your IP Phone 1120E has both local and server-based options. Two methods are available to navigate in the Local Tools menu: • • Follow the prompts on screen. Where a menu entry has a number in front of it, you can select that entry by pressing the associated key on the dialpad.
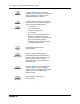
Chapter 3 Configuring options • • Press the Select soft key to save the desired language and return to the Telephone Options menu. Press the Cancel soft key to keep existing configurations. 5 Press the Exit soft key. Changes are saved automatically. 2. Local Diagnostics 1. IP Set&DHCP Information The Network Configuration tool is used to view reports about IP set and DHCP operation. This tool is for administrator use only. 2.
Chapter 3 Configuring options 17 3. Network Configuration The Network Configuration tool displays information that was configured when the telephone was installed. This tool is for administrator use only. 4. Lock Menu The lock menu tool is used by the system administrator to protect the Local Tools menu items from accidental or unwanted changes. The lock menu tool is not available on all systems. If the menu entry appears dimmed, it is not enabled on your phone.
Chapter 3 Configuring options NN40050-104
Chapter 4 Telephone setup Note: For more information about the features available to your telephone and how to use them, refer to the Telephones Feature Card. Language choice Select the Primary Language for the telephone display. Choose one of the following three options: • • • Press Feature *501. Select the Alternate Language for the telephone display. Press Feature *502. Select the Alternate Language 2 for the telephone display. Press Feature *503.
Chapter 4 Telephone setup 4 Using the dialpad, enter the number of hours between local time and system time. Note: Press # to enter half-hour increments. 5 Press OK. Note: It may take up to 1 minute for the change to appear on the display. About your programmable buttons Your System Administrator assigns the four programmable buttons as line, intercom, or memory buttons. The label for each button appears on the display next to the button. For more information, see your System Administrator.
Chapter 4 Telephone setup 21 Features 1 Press Feature *3. 2 Press a memory button. 3 Press Feature and enter the feature code. 4 Press OK to store the feature code. Erase memory buttons 1 Press Feature *1. 2 Press a memory button. 3 Press OK to erase the phone number saved on the button. Making a call There are many ways to place a call depending on your telephone programming and the type of call. Making external calls using line soft keys 1 Lift the handset. 2 Tap a line soft key.
Chapter 4 Telephone setup Answering a call When your telephone rings and the light flashes, or when an intercom or line soft key indicator flashes: • Lift the handset. OR • Press the line or intercom soft key with the flashing S indicator before you lift the handset. While on an active call Placing a call on hold Calls are put on hold automatically when you switch from one line to another. • • While on a call, press (Hold). TheSindicator for the line on hold flashes.
Chapter 4 Telephone setup • • While on a call, press (Mute) to turn the microphone off. The lights when the microphone is off. Press (Mute) again to turn the microphone on. 23 (Mute) button Accessing External Server Applications Use External Server Applications to access a variety of applications directly from your IP Phone 1120E. To find out what features and services are available, contact your system administrator.
Chapter 4 Telephone setup NN40050-104
Index 25 Index C Copy Key 9 copyright 2 E Expand to PC key 9 G Goodbye key 9 H Handsfree / Speaker key 8 Headset key 9 Hold key 9 L Line (DN) key 8 M Message waiting indicator 9 Mute key 8 N Navigation keys 8 P Programmable line/feature keys 8 R regulatory information 2 S Soft keys 7 T trademarks 2 V Volume control 8 Volume control bar 8 IP Phone 1120E User Guide