
User's Manual


Manually configure the IP Deskphone for UDP and TCP
After
you enable the administration user interface, you can manually change network settings
on the IP Deskphone. You can manually configure the IP Deskphone through the Server
Settings menu.
Note:
To meet security requirements, the local administration user interface of the IP Deskphone
can be disabled for deployed IP Deskphones. If this is the case then you must manually
configure the parameters during initial IP Deskphone configuration or through the
provisioning server.
Note:
Disabling
the local administration user interface drastically reduces the ability to view or edit
the configuration of the IP Deskphone, and almost completely removes the ability to
diagnose any communication or configuration errors in the field. However, disabling the local
administration user interface increases the security of the IP Deskphone because the user
is not able to view the configurations or make changes.
Configuring the domain protocol
1. Press the Globe key twice.
2. Using the Navigation key cluster, select Server Settings..
3. Select a domain.
4. Enter the admin password (if the UI and password are enabled).
5. Use the Navigation key cluster to scroll through the Domain List screen and select
the required configured SIP domain.
6. Press the Edit context-sensitive soft key.
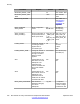
Table 82: Listening port parameters
Parameter name Description Default value Boundaries
SIP UDP Port The listening port on
the
IP Deskphone for
incoming UDP
requests.
5060 Min: 1024
Max: 65535
Disabled: 0 (must be
non-zero for a TLS-
only option)
SIP TCP Port The listening port on
the IP Deskphone for
incoming TCP
requests.
5060 Min: 1024
Max: 65535
Disabled: 0 (must be
non-zero for a TLS-
only option)
SIP TLS Port The listening port on
the IP Deskphone for
0 Min: 1024
Max: 65535
TCP/TLS operation overview
SIP Software for Avaya 1200 Series IP Deskphones-Administration September 2013 279