DVD/DIVX PLAYER Model: DXP-1000 INSTRUCTION MANUAL COMPACT DIGITAL AUDIO DVD / DivX / CD-DA / MP3 / CD / CD-R / CD-RW compatible Read this manual before installation and use
TABLE OF CONTENTS Warning & Importance General Information 1. Disc information 2. Select a DVD disc 3. Care of disc Preparation 1. Unpack the unit 2. Loading batteries into the Remote Control System Connections 1. Connecting to TV set 2. Connecting to TV & Stereo Amplifier 3. Connecting to 5.1 channels Amplifier 4. Connecting to a AC3 or DTS Decoding Amplifier Panel Description 1. Front Panel 2. Rear Panel 3. Remote Control Getting Start 1. Play a Disc 2. Picture Setup 3. General Setup 4. Speaker Setup 5.
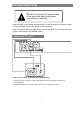
WARNING TO REDUCE THE RISK OF FIRES AND ELECTRIC SHOCKS, DO NOT EXPOSE THIS UNIT TO RAIN OR MOISTURE CAUTION RISK OF ELECTRIC SHOCK DO NOT OPEN CAUTION: To reduce the risk of fires and electric shock, do not remove the cover of the unit.
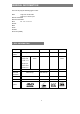
GENERAL INFORMATION This unit can play the following types of disc: DVD single side / double sides single layer / double layers DVD-R / DVD-RW DVD+R / DVD+RW DivX Ver. 3.11 / 4.xx / 5.xx CD-DA MP3 CD-R CD-RW Photo CD (JPEG) 1. DISC INFORMATION Disc types DVD VCD DIVX CD Recording method Digital / MPEG II Digital / MPEG I MPEG 4 Digital Capacity 650MB 74min Single layer Single side 650MB 650MB 74min 4.7GB = 2 hr Single layer Double sides 8.
2. SELECT A DVD DISC DVD discs and DVD players are manufactured under the worldwide agreed DVD Regional Code System that the player will operate only with corresponding disc of the same Regional Code. DVD Regional Code: Regional Code 1 2 3 Region Canada, USA Europe (incl. Poland, Romania, The Czech republic), Japan, Middle East (incl. Saudi Arabia, Egypt, Iran, South Africa) East Asia (incl.
REMARK Some features of this unit are related to the DVD disc’s software. Some features of this unit cannot be preformed if the disc does not support the features, or required special settings. Check the features of the disc before playing it, or follow the instruction on screen menu of the disc. 3. CARE OF DISC Video disc contains high density compressed data that needs proper handling. Hold the disc with fingers, holding the hole at center and the edge do not touch the disc surface.
PREPARATION 1. UNPACK THE UNIT The standard packing contains the following items: The DVD player unit. Infra red remote controller AV Cables Two AAA batteries User’s instruction manual Warranty Registration Card 2. LOADING BATTERIES INTO THE REMOTE CONTROL Remove the battery compartment cover. Load two AAA batteries into the battery compartment. Make sure that the batteries have been inserted in the right polarities matching to the symbols +, - as indicated in the battery compartment.
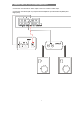
SYSTEM CONNECTIONS DO NOT connect the AC power socket to the wall outlet before the system connection is completed Before turning on the power standby button on the front panel or remote control, you should switch on the main power in the rear panel. Note: The light in the front panel will be red in color when it is in power off mode; green in color when it is in standby mode. 1.
2. CONNECTING TO TV & STEREO AMPLIFIER Connect the unit’s S-Video or Video output to the TV’s S-Video or Video input. Connect the unit’s Audio (FR / FL) output to stereo amplifier’s input terminals Left (White) and Right (Red).
3. CONNECTING TO 5.1 CHANNELS AMPLIFIER Connect the unit’s ‘S-Video’ or ‘Video’ output to the TV’s S-Video or Video input. Connect the unit’s 5.1 channels surround audio output (FL, FR, SL, SR, CEN, SW) to the 5.1 channels amplifier’s audio input terminals, Front Left, Front Right, Surround Left, Surround Right, Center and Sub-Woofer. (An amplifier with 6 channels input and output is required, AC3 decoder is NOT required.
4. CONNECTING TO AC3 OR DTS DECODING AMPLIFIER Connect the unit’s S-Video or Video output to the TV’s S-Video or Video input. Connect the digital output (optical or coaxial) to the TV’s S-Video or Video input.
PANEL DESCRIPTION 1. FRONT PANEL The items 1-4 are Karaoke function, simply put the DVD or VCD karaoke and getting start playing, then connect the microphone into the MIC1,2 and adjust between Microphone volume and Echo volume for the best effect on sound. Please note that the Volume and MIC buttons need to be pushed so that they pop out and allow for easy tuning. 2. REAR PANEL 1. 2. 3. 4. 5. 6. 7. 8. 9. 10. 11. 12. 13. 14. 5.1 channels Audio output Sub-woofer 5.
3.
GETTING STARTED Read through this instruction manual. Unpack the unit. Load batteries into the remote control. Connect the unit, make sure the connections are correct. Connect the power socket to wall outlet, power on the system via switch on rear of unit. Check the setting of the unit, TV and amplifier are correct and match each other. 1. PLAY A DISC Switch on the power Switch on the main power switch on the unit’s front panel, and switch on the TV set, and the amplifier if connected.
2. PICTURE SETUP The unit’s TV output color is selectable to PAL or NTSC IMPORTANT If the TV set is NOT multi-video system, and the following is observed on the TV screen it could be a result of wrong color system matching with the TV set: Picture is distorted Picture is black and white, no color. Picture is not full screen, or border part of picture bas been blocked. The DVD Player is set to NTSC system output as default, if you are not playing in the U.S.A.
3. GENERAL SETUP 1. Pressing the SETUP button on remote control during STOP or PLAY mode to SETUP MENU. 2. Using Cursor to select GENERAL SETUP. Press ENTER to enter GENERAL SETUP page. SETUP MENU - -- GENERAL PAGE -- MAIN PAGE TV DISPLAY PIC M ODE ANGLE M ARK OSD LANG CAPTIONS SCR SAVER M AIN PAGE GENERAL SETUP SPEAKER SETUP AUDIO SETUP PREFERENCE EXIT SETUP TV DISPLAY -- GENERAL PAGE -- Using cursor to move to desired setting and press ENTER to confirm.
OSD LANG (ON SCREEN DISPLAY LANGUAGE) -- GENERAL PAGE -TV DISPLAY PIC M ODE ANGLE M ARK OSD LANG CAPTIONS SCR SAVER M AIN PAGE ENGLISH ENGLISH CAPTIONS -- GENERAL PAGE -TV DISPLAY PIC M ODE ANGLE M ARK OSD LANG CAPTIONS SCR SAVER M AIN PAGE The hidden subtitle is shown during ON The hidden subtitle is closed during OFF ON OFF SCR SAVER (SCREEN SAVER) There is a formatting problem here that needs to be fixed -- GENERAL PAGE -TV DISPLAY PIC M ODE ANGLE M ARK OSD LANG CAPTIONS SCR SAVER M AIN
4. SPEAKER SETUP SETUP MENU - -- SPEAKER SETUP PAGE -- MAIN PAGE DOW NM IX CENTER REAR SUBW OOFER CNTR DELAY REAR DELAY TEST TONE GENERAL SETUP SPEAKER SETUP AUDIO SETUP PREFERENCE LT/RT STEREO OFF EXIT SETUP M AIN PAGE DOWNMIX LT/RT : Left and Right output mode ( Either Left or Right channel Audio output while playing ) STEREO : Stereo output mode OFF : Turn off the Downmix mode. 5.1 channels can be enabled only if Downmix is set OFF and the rest of other speaker setup is activated.
CNTER DELAY -- SPEAKER SETUP PAG E -- Adjust the audio delay from center channel from 0 to 5MS. DO WNM IX CENTER REAR SUBWO O FER CNTR DELAY REAR DELAY TEST TO NE This is used in the surround sound mode, the sounds come out from center speaker will be 5M S delayed rather than real time. This delay time will 3M S depends on the distance from the center speaker to 1M S O FF M AIN PAG E the place you receive the sound.
5. AUDIO SETUP SETUP MENU - -- AUDIO SETUP PAGE -- MAIN PAGE SPDIF OUTPUT OP M ODE DUAL M ONO COM PRESSION PRO LOGIC LPCM OUTPUT GENERAL SETUP SPEAKER SETUP AUDIO SETUP PREFERENCE OFF SPDIF/RAW SPDIF/PCM EXIT SETUP M AIN PAGE OFF: Audio signal is out from (FL/FR) AUDIO OUT (RCA) jacks. SPDIF/RAW: The player is connected to a Dolby Digital amplifier through DIGITAL OUT Coaxial or Optical jack.
COMPRESSION -- AUDIO SETUP -SPDIF OUTPUT OP M ODE DUAL M ONO COM PRESSION PRO LOGIC LPCM OUTPUT M AIN PAGE - - FULL 6/8 4/8 2/8 OFF To adjust linear compression rate to obtain the different compression results of the signals only if the OP MODE is set to LINE OUT. The data from ‘2/8 to Full’ that will reflect the “dynamic range” compress of Dolby sounds output.
6.
PARENTAL CONTROL - - PREFERENCE PAGE -TV TYPE VIDEO OUTPUT AUDIO SUBTITLE DISC M ENU LOCALE PARENTAL PASSW ORD 1 2 3 4 5 6 7 8 G grade of the disc and your desired. The disc cannot PG PG 13 PG-R NC-17 ADULT To select an age control grade according to the be played for the rate higher than the grade set. Go to the PASSWORD VERIFY PAGE to input password after selection of Parental grade.
JPEG, MP3 & DivX Format When disc with JPEG, MP3 and DivX Format is placed in the machine, one of the following screens will appear. The column ‘Root’ in the left of the SMART NAVI is showing the directory of the disc ; The column in the right will show the files under the directory that you choose.
MP3 Format SM ART NAVI ROOT M P3 M P3 M P3 M P3 M P3 M P3 M P3 M P3 1 2 3 4 5 6 7 8 MP3 Files listing Press to select the “ROOT” on the left columns & the “FILE” on the right side, press “ENTER”/”PLAY” to play the MP3 Music. Then press “STOP” stop playing and go back to the menu of “SMART NAVI”. FUNCTION KEYS Forward/ Backward Press the icons to playing fast forward ans fast backward. Next/ Previous Press Mute Press “MUTE” button to turn the audio off. Press it again to resume.
DivX/MPEG4 FORMAT SM ART NAVI ROOT M P4 M P4 M P4 M P4 M P4 M P4 M P4 M P4 1 3 3 4 5 6 7 8 DivX/MPEG4 Files listing Press to select the “ROOT” on the left columns & the “FILE” on the right side, press “ENTER”/”PLAY” to play the DivX. Then press “STOP” stop playing and go back to the menu of “SMART NAVI”. FUNCTION KEYS Forward/ Backward Press the icons to playing fast forward and fast backward. Continuously pressing and back to normal.
BASIC OPERATION (see page 11) Function Key POWER Description POWER STANDBY ON / OFF (Always Switch Off the Main Power in the back of the unit if you don’t plan to use the player for a long period of time) OPEN / CLOSE DISC TRAY OPEN If you open the disc tray when a DVD is playing (do not press the STOP button memorize the stopping position. ), the unit will When the same disc is loaded again, the unit will continue playing from the position that it stopped.
(see page 10/11) Function Key Description SKIP FORWARD SKIP BACKWARD Skip to the next or previous chapter / track. STOP / PRE-STOP Press once to stop the unit, memorizing the stopping position. a. Press to continue playing from the position that it stopped b. Press again to completely STOP the unit.
FUNCTION BUTTONS (see page 11) Function Key Description DISPLAY MENU BAR ON SCREEN DISPLAY Activate the Menu Bar On Screen Display, displaying the current status. Repeat pressing the button to activate the first page, the second page of Menu and clear the Menu display. PBC PLAYBACK CONTROL (only for VCD playback) When it is set to ‘ON’, there will be a ‘Play list’ on the screen for title choosing When it is turn to ‘OFF’, the VCD will be playing automatically after you insert the Disc.
(see page 11) Function Key Description GOTO GOTO SEARCH Press the button to enter the SEARCH mode, to select playing at a desired section.
(see page 11) Function Key Description A–B REPEAT SECTION A Æ B Repeat playing back a selected section A Æ B A Æ Start Press the button at the beginning of the desired section, A Æ B End Press the button at the end of the desired section, B Cancel the setting Press the button again to switch Off the setting, back to normal play To clear the menu bar display, press DISPLAY button PROG PROGRAM SETTING Programming a disc playing (VCD, DVD and MP3) in a desired sequence.
(see page 11) Function Key Description MUTE TURN OFF THE VOLUME ZOOM ZOOM PICTURE Enlarge the picture to 4 times In the ZOOM mode, press SLOW to adjust the position of zooming position.
(see page 11) Function Key Description L/R TO CHANGE THE AUDIO TRACK SETUP GO TO SETUP MENU VIDEO SYSTEM SELECTION (NTSC/PAL) ( For Progressive Scan Model ) PROGRESSIVE SCAN TV AND INTERLACED TV SELECTION VIDEO - + Press “+” and “-“ to increase or decrease the audio volume.
TROUBLESHOOTING When having a problem with this unit, check this list for a possible solution before asking for service: Symptom No Power Check and Action 1. Check the power cord has been properly connected to the wall outlet 2. Check the main power has been switched on in back of unit. Does not play 1. No disc, load a disc 2. Disc has been loaded upside down. Place the disc with the label side up 3. Disc’s region code does not match to the unit 4. Disc is not correct type to be played 5.
TROUBLESHOOTING (continue) Symptom Check and Action No surround sound 1. Check if the audio output has been changed to Analog. MP3 disc no sound or noise 1. When program files or other data files mixed with MP3 files in the same disc, the unit may play the non-MP3 files with noise or no sound 2. Check the disc, if all the files on disc are MP3 files 3. Skip the file, or try the other file Remote control does no function 1. Remove the obstacles between the remote and the unit 2.
SPECIFICATION Type of Disc DVD DVD-R / DVD-RW DVD+R / DVD+RW DIVX Version 3.11 / 4.xx / 5.xx CD-DA CD MP3 CD-R / CD-RW PHOTO CD (JPEG) Video Format MPEG 1, MPEG 2, MPEG 4 Audio Format MPEG 1, LAYER 1, LAYER 2 Signal Output Color System : NTSC / PAL Audio System : AC3 decoded 5.1 channels output / digital output / DTS digital output Video Output : 1Vpp (at 75 ohm) Audio Output : (Stereo): 2Vpp Audio Output : (5.1 channels): 0.
CUSTOMER SUPPORT AND WARRANTY 1. CUSTOMER SUPPORT For installation, usage and repair assistance for both the Warranty and Post Warranty periods, go to www.avayon.com/support to access customer support. 35 .
2. WARRANTY AVAYON Technologies Inc.’s DVD/DivX Player One-Year Limited Warranty BEFORE YOU CONTACT AVAYON FOR WARRANTY SUPPORT, READ YOUR USER MANUAL Players purchased from AVAYON in the United States are warranted to be free from defects in materials or workmanship for a period of one (1) year (“Warranty Period”) from the date of their original retail purchase (“Effective Date”).
NOT COVERED BY THIS ONE-YEAR LIMITED WARRANTY This warranty does not cover defects, malfunctions or failures resulting from shipping or transit accidents, abuse, misuse, operation contrary to furnished instructions, operation on incorrect power supplies, operation with faulty associated equipment, modification, alteration, improper servicing from anyone other than an AVAYON authorized service center, tampering, normal wear and tear, if the serial number has been removed/defaced or deterioration of the exter