
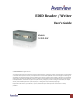
Corp. EDID Reader / Writer User's Guide


www.avenview.com
7
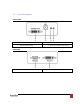
1.9 Hardware Installation
To setup Avenview C-EDID-RW follow these steps for connecting to a device:
1.9.1 Read the EDID from a Display
1. Before connecting the Power and other devices to C-EDID-RW, set the DIP switches at the bottom of
C-EDID-RW at 1-OFF 2-ON
2. Connect your monitor to the C-EDID-RW and plug in 5V DC Power cord
3. Remove 5V DC power cord when the green LED turns off
4. Connect the C-EDID-RW to your computer by a DVI cable and boot up your computer
1.9.2 Recall the default Universal EDID
1. Before connecting the Power and other devices to C-EDID-RW, set the DIP switches at the bottom of
C-EDID-RW at 1-ON 2-ON
2. Plug in 5V DC power cord and remove the power when the green LED turns off
3. Connect your monitor to C-EDID-RW
4. Connect the C-EDID-RW to your computer by a DVI cable and boot up your computer
1.9.3 Write EDID to Display
1. Before connecting the Power and other devices to C-EDID-RW, set the DIP switches at the bottom of
C-EDID-RW at 1-ON 2-OFF
2. Plug in 5V DC power cord
3. Connect your monitor (DVI cable) and computer’s RS232 cable to C-EDID-RW
4. Boot up your computer and install the software
5. Refer to software installation below.
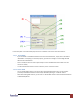
1.10 Software Installation
Before launching the software installation, please make sure:
1. The power supply is well connected
2. DIP switches are at the right position as shown below