Remote Screen/Print Sharing Extender over WIFI / LAN with KVM Model #: HDM-SHAREPRO-IP © 2012 Avenview Inc. All rights reserved. The contents of this document are provided in connection with Avenview Inc. (“Avenview”) products. Avenview makes no representations or warranties with respect to the accuracy or completeness of the contents of this publication and reserves the right to make changes to specifications and product deLCriptions at any time without notice.
products including, but not limited to, the implied warranty of merchantability, fitness for a particular purpose, or infringement of any intellectual property right. Reproduction of this manual, or parts thereof, in any form, without the express written permission of Avenview Inc. is strictly prohibited. Table of Contents Section 1: Getting Started ...................................................................................................................... 3 1.1 Important Safeguards ............
Section 1: Getting Started 1.1 Important Safeguards Please read all of these instructions carefully before you use the device. Save this manual for future reference. What the warranty does not cover Any product, on which the serial number has been defaced, modified or removed.
1.3 Regulatory Notices Federal Communications Commission (FCC) This equipment has been tested and found to comply with Part 15 of the FCC rules. These limits are designed to provide reasonable protection against harmful interference in a residential installation. Any changes or modifications made to this equipment may void the user’s authority to operate this equipment. 1.
1.6 Before Installation Put the product in an even and stable location. If the product falls down or drops, it may cause an injury or malfunction. Don’t place the product in too high temperature (over 50°C), too low temperature (under 0°C) or high humidity. Use the DC power adapter with correct specifications. If inappropriate power supply is used then it may cause a fire. 1.
1.8 Installation A Please ensure all the package contents are all received. To setup Avenview HDM-SHAREPRO-IP follow these steps for connecting directly to a Monitor as a CONVERTER: 1. Connect Converter to CPU with RJ45 cable; follow the standards of TIA-568BLAN 2. Connect your HDMI OR VGA display (such as a LCD TV/PLASMA) to the HDMI OR VGA Port on the HDM-SHAREPRO-IP. 3. Make sure CAT-5E/6 LAN cable is tightly connected and not loose. 5.
1.9 Installation B Please ensure all the package contents are all received. To setup Avenview HDM-SHAREPRO-IP follow these steps for connecting to a Remote Monitor. 1. Connect HDM-SHAREPRO-IP to Wireless or Wired Router with RJ45 cable at the desired Monitor; follow the standards of TIA-568BLAN 2. Connect your HDMI OR VGA display (such as a LCD TV/PLASMA) to the HDMI OR VGA Port on the HDM-SHAREPRO-IP. 3. Make sure CAT-5E/6 LAN cable is tightly connected and not loose. 5.
1.10 Installation of Driver and Control Software. Insert Disk and run the Driver.exe file Select your preferred Language. From Disk run the Software.exe file Accept and wait for install to be completed automatically When completed restart the computer. You will experience brief periods of dark screens and /or resolution changes during this time. www.avenview.
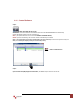
1.11 Control Software Step 1. Double-click ICON USB Server file: On first use, click search and then the software will search the HDM-SHAREPRO-IP automatically. System will display video converter searched out Click : (The preferred device to be connected-DISPLAY or MEDIA DEVICE) Click B: (connect the device), the converter will be automatically connected. Note :( The system will set up the driver automatically for the first connection) connect the required one by one.
Take Windows 7 as example: A. Select the display that needs to adapt. 1 Display is input computer and 2 Display is output device by default. B. Set up the resolution C. Set up the display direction D. Set up the display mode Note: Short-cut Function: Press”Win+P” to see the following images. From left to right, Computer only, Duplicate, Extend and Projector only. You can easily switch display mode. From left to right, Computer only, Duplicate, Extend and Projector only. You can easily switch display mode.
If the software refuses to disconnect, please power off the converter. Make sure to store all files before power off. Section 3: General Troubleshooting Problem No video output No Audio or Mouse Response Display will show “Be sure to disconnect the device and exit?” when USB server is closed. Connect VGA and HDMI output simultaneously, but VGA no display Possible Solution Please make sure that all cables properly connected.
Section 4: Specifications Item Description Units Unit Description HDMI Compliance HDM-SHAREPRO-IP RJ45 TO HDMI CONVERTER Full HD HDCP Compliance Yes 480i@60Hz, 480p@60Hz, 576i@50Hz, 576p@50Hz, 720p@50/60Hz, 1080i@50/60Hz, 1080p@50/60Hz Stereo Audio Supported Resolutions Audio Support USB Support USB Support Input Output HDMI Connector RJ45 Connector Multi-Function Print (MFP) over a network from any networked computer; Wired or Wireless Keyboard Mouse/Supports 500mA electric current 2x USB 1 x 3.
4.1 PIN & Wiring Standard Definition Type A (Receptacle) HDMI Pin 1 TMDS Data2+ Pin 11 TMDS Clock Shield Pin 2 TMDS Data2 Shield Pin 12 TMDS Clock– Pin 3 TMDS Data2– Pin 13 CEC Pin 4 TMDS Data1+ Pin 14 Reserved (N.C. on device) Pin 5 TMDS Data1 Shield Pin 15 SCL Pin 6 TMDS Data1– Pin 16 SDA Pin 7 TMDS Data0+ Pin 17 DDC/CEC Ground Pin 8 TMDS Data0 Shield Pin 18 +5V Power Pin 9 TMDS Data0– Pin 19 Hot Plug Detect Pin 10 TMDS Clock+ www.avenview.
Disclaimer While every precaution has been taken in the preparation of this document, Avenview Inc.