
User guide


Avenview HDM-C6VWIP
Control4 Driver User Guide
Janus Technology Ltd
Copyright © 2014
3
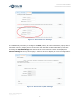
You can edit the device name in the Alias field, clicking Apply when done. Note that the
name must comply with the following conventions:
For Transmitter (input) devices: IN[number]-[name]
For Receiver (output) devices: OUT[number]-[name]
It is important that each name begins with “IN” or “OUT”, which is then followed by the
input or output number. You can then optionally add a hyphen (-) followed by an
appropriate description for the device (note that no spaces are allowed). For example, in
the screenshot above, the first input is named IN1-BluRayPlayer, equally valid is just IN1.
Driver Installation & Configuration
Copy the .c4i files from the zip package to My Documents\Control4\Driver and then open
Composer. The drivers can be found under:
Device Type: A/V Switch, Manufacturer: Avenview, Model: nxm HDM-C6VWIP
where “nxm” is the number of inputs and outputs. Choose the version that most closely
matches your needs. The drivers are all effectively the same; differently sized versions are
provided to avoid cluttering your project with unwanted inputs and outputs.
The installed driver will appear as Avenview nxm HDM-C6VWIP as below:
Figure 3: Installed Driver
To configure the driver’s access to the Avenview system, go to the Connections section and
set up your input and output connections as usual. There are also serial connections
representing the serial ports on the transmitters and receivers; these can be linked to any
equipment that is going to be controlled via the unit’s serial port. Then go to the Network
tab and select the driver from the list. Add the IP address of your Avenview Control
Interface. The driver should now automatically connect to the Avenview system and initialize
itself.