
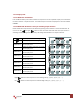
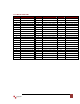
Specifications

www.avenview.com
13
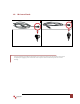
1.9 Installation (SW-HDM3D-C5-8X8)
To setup Avenview SW-HDM3D-C5-8X8 follow these steps for connecting to a device:
Matrix Switch
1. Connect all sources to HDMI Inputs on the 8X8 HDMI over CAT5 Matrix Switch (SW-HDM3D-C5-8X8)
2. Connect each HDMI CAT 5/6 output on the SW-HDM3D-C5-8X8 to respective CAT 5/6 input on the
remote receiver HDM3D-C5SW-R
3. Connect each IR CAT 5/6 output on the SW-HDM3D-C5-8X8 to respective CAT 5/6 input on the
remote receiver HDM3D-C5SW-R
4. Connect IR emitter cable to the SW-HDM3D-C5-8X8 and direct the IR emitter to the build-in IR
receiver of the sources
5. Connect the +5V 6A DC power supply to the SW-HDM3D-C5-8X8
6. Power on all HDMI sources
7. Power on the SW-HDM3D-C5-8X8
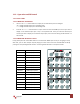
Receiver
1. Connect each HDMI output to HDMI displays.
2. Connect the HDMI SIGNAL port with CAT6 on the HDM3D-C5SW-R to the HDMI SIGNAL port on the
SW-HDM3D-C5-8X8.
3. Connect the IR CONTROL port on the HDM3D-C5SW-8 to the IR CONTROL port on the
SW-HDM3D-C5-8X8.
4. Connect IR receiver and place the IR receiver at the appropriate position that can receive the IR
command signals sent from the users.
5. Dial the 8-level rotary control switch to adjust the HDMI signal level until the picture and sound are
clear. It is recommended to dial from 7 to 0 to find the optimal visual experience.