AVerLife ExtremeVision Media Player O272 English Deutsch Francais Italiano Espanol Portugue Quick Guide
EUROPEAN COMMUNITY COMPLIANCE STATEMENT Class B (EMC) This product is herewith confirmed to comply with the requirements set out in the Council Directives on the Approximation of the laws of the Member States relating to Electromagnetic Compatibility Directive 2004/108/EC. Safety- Low Voltage Directive 2006/95/EC ErP Directive 2009/125/EC FCC NOTICE (Class B) This device complies with Part 15 of the FCC Rules.
BATTERY SAFETY INFORMATION - Store the batteries in a cool dry place. - Do not dispose of used batteries in domestic waste. Dispose of batteries at special collection points or return to point of sale if applies. - Remove the batteries during long periods of non-use. Always remove exhausted batteries from the remote control. Battery leakage and corrosion can damage this remote control, dispose of batteries safely. - Do not mix old and new batteries.
PACKAGE CONTENTS .....................................................................................2 English Table of Contents PERIPHERAL CONNECTIONS .........................................................................4 USING REMOTE CONTROL .............................................................................5 Deutsch HARDWARE OVERVIEW ..................................................................................3 5.1 SETUP FOR TV MODE ..............................................
About This Guide This Quick Guide gives you the fastest way for hand-on procedure to enjoy multimedia with AVerLife ExtremeVision Media Player. For more details how to use this device, please refer to the User’s Manual available on AVerMedia website: www.avermedia.
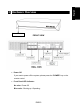
FRONT VIEW • Power Off If you want to power off the system, please press the “POWER” key on the remote control.
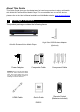
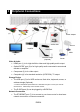
3 Peripheral Connections (7) (5) (2) (3) (6) (1) (4) Power Adapter eSATA HDD Internet Amplifier USB Flash ADSL TV *Wireless dongle (Optional) Router Video & Audio • HDMI port (1) is for high-definition video and high-quality audio output. • Optical S/PDIF port (2) is for high-quality audio connected to an external decoder or amplifier. • Component (3) is for video output. • Composite (4) is for standard resolution (NTSC/PAL) TV output.
Русский Português Español Italiano Français Deutsch Use the remote control to navigate the menu, and to select and watch videos, listen to music, or view photos on your television. For more details about how to use the remote control, please refer to the User’s Manual. English 4 Using Remote Control No. KEYPAD 1 POWER 2 HOME 3 MULTIMEDIA FUNCTION DESCRIPTION Turn On/Standby Return to Main Menu. Enter Multimedia page.
4 IMEDIA 5 NEWS Enter to iMedia page. Enter to News page. 6 WEB Enter to Web page. 7 SORT 8 INFO 9 REPEAT 10 ZOOM Sorting all the files in one folder and re-arrange them in alphabetical order. Display media info. When pressing twice, it will show more details about the video. Video & Music: repeat the current file or all files in this folder or cancel repeat function.
English 5 Setup and Upgrade 5.1 Setup for TV Mode Deutsch Please set the video source selector of your TV to match the connection from your AVerLife ExtremeVision Media Player For example, if you use HDMI, set the TV to use the correspondent HDMI input port. Check the TV display by going to “Setup” → “System Setup” → “TV Mode Setup”→ “Video Output”. The default display of AVerLife ExtremeVision Media Player is Composite (CVBS).
5.3 Wireless Network Setup (Optional) AVerLife ExtremeVision Media Player supports wireless Ethernet with a USB Wi-Fi dongle supplied by AVerMedia. To enable wireless function, please make sure you plug the Wi-Fi dongle into the USB port before Powering on AVerLife ExtremeVision Media Player. And please be noted that a USB Wi-Fi dongle not authorized by AVerMedia is NOT supported.
WEP64(ASCII) 5 digits WEP64(HEX) 10 digits WEP128(ASCII) 13 digits WEP128(HEX) 26 digits WPA‐PSK/WPA2‐PSK 8 digits or more English Key Length Deutsch Key Format There’re two ways to upgrade the firmware. Go to ”Setup” in the main menu and select ‘Version’. The first way to upgrade the firmware is by “Internet Upgrade”, which in convenient without the necessity of a PC. Make sure AVerLife ExtremeVision Media Player is connected to the Internet beforehand.Follow the steps below: 1. Français 5.
NOT be turned off during the process. 8. When the process is successfully finished, AVerLife ExtremeVision Media Player will reboot automatically. 6 Media Sources 6.1 UPnP & AVerMedia DMS The AVerLife ExtremeVision Media Player will automatically detect all available UPnP AV compliant content severs on boot-up and list them on UPnP column of the main menu. No additional setup is necessary on the AVerLife ExtremeVision Media Player itself.
1. Go to “MultiMedia” at the Main Page. 2. Select the name of your storage device from the list and press “COPY” button. 3. Select the origin and destination. Press English Deutsch Note: The number of USB ports can be extended by a USB hub, please be careful of the extra power consumption for the extra devices. AVerLife ExtremeVision Media Player itself supplies limited power (1.1A) for the USB port. Français AVerLife ExtremeVision Media Player supports USB flash disk, USB HDD and eSATA HDD.
7 Enjoy MultiMedia 7.1 Playing Music, Photo and Video files For the supported file format and container in detail, please refer to the user manual. Some frequent usage of functions is highlighted as follows: 1. Viewing Video Information: Press “INFO” button to get video information; press again to see more info. 2.
English 7.2 Web Browser & RSS The homepage of the web browser will be displayed, then you can surf the web using the remote control or keyboard and mouse. An USB keyboard and mouse can be plugged to facilitate the web surfing. Make sure you plug it before you enter the Web Browser.
Press “ok” to confirm or “Cancel” to skip. Go into the RSS page from the main page, and select the one you like to view. There’re already some built-in feeds. 7.3 Play Internet Radio- Live 365™ Live365™ is an Internet radio service that provides unlimited on-demand access to thousands of radio stations. The audio is streamed directly over the Internet. Follow below steps to access the radio stations: 1. Make sure your network setting is correct and be able to access internet. 2.
“OK”, “Play” button to play it. Note1: English Select a radio station from list, and press stands for a radio station. Note2: Press “BGM” hotkey on the remote control to add the station into Deutsch 5. 7.4 SHOUTcast™ You can use the AVerLife ExtremeVision Media Player to listen to ShoutCast station without the need for a PC. Français background music list. Español 1. Select “iMedia” from main menu or choose “ShoutCast”. Italiano Follow these steps: 7.
2. Surfing the photos and press ”OK” button,you can see the full size photo. Press “OK” again, the playback will be repeated。 3. Press “Search” button will allow you to search your favorite photos from Flickr。 FAQ Q: Why can’t I see anything on TV screen? Answer: Please select the correct signal input on your TV set. If you connect the player to TV via HDMI, please select the right HDMI port no. on your TV set; if you connect the player to TV via A/V port, please select the right A/V port no.
INHALT DER PACKUNG ...................................................................................2 English INHALTSVERZEICHNIS ANSCHLÜSSE ...................................................................................................4 VERWENDUNG DER FERNBEDIENUNG ........................................................5 Deutsch ÜBERSICHT ÜBER DIE HARDWARE ..............................................................3 5.1 SETUP FÜR DEN TV MODUS .................................................
Über diesen Leitfaden Diese Kurzanleitung bietet Ihnen die schnellste Möglichkeit MultiMedia mit dem AVerLife ExtremeVision Media Player zu geniesen. Für weitere Einzelheiten über die Verwendung dieses Gerätes beziehen Sie sich bitte auf das Benutzerhandbuch, das auf der AVerMedia Webseite zu finden ist www.avermedia.com.
English Deutsch 2 Übersicht über die Hardware Français VORDERANSICHT Italiano Power Ein/Aus USB Port Composite- HDMI S/PDIF Port Netzteil Ethernet-Schnit USB Port / eSATA Español Component-A • Power Aus Wenn Sie das Gerät ausschalten wollen, drücken Sie bitte auf "Power" auf der Português TATSÄCHLICHE ANSICHT • LED Anzeige auf der Vorderseite: Keine Farbe - Ausgeschaltet Blaue Farbe - Hochfahren/Betrieb DEU-3 Русский Fernbedienung.
3 Anschlüsse (7) (5) (2) (3) (6) (1) (4) Netzteil eSATA HDD Internet Verstärker USB Stick ADSL TV * Drahtloser Dongle (Optional) Video & Audio Router • Die HDMI-Schnittstelle (1) ist für HD-Video und qualitativ hochwertige Audioausgabe • Der optische S/PDIF Anschluss (2) ist für qualitativ hochwertige Audioverbindung mit einen externen Decoder oder Verstärker. • Component (3) ist der Videoausgang • Composite (4) ist für Standartauflösung (NTSC/PAL) TV Ausgang.
Nr. KEYPAD 1 POWER Funktionsbeschreibung Einschalten/Standby Zurück zum Hauptmenü 2 HOME 3 MULTIMEDIA Eingabe Multimedia Seite. 4 IMEDIA Eingang zur iMedia-Seite DEU-5 Русский Português Español Italiano Français Deutsch Verwenden Sie die Fernbedienung um im Menü zu navigieren, und um Videos auszuwählen, anzuschauen, Musik zu hören oder um Fotos auf Ihrem Fernsehgerät zu betrachten.
5 News/Nachrichte n Eingang zur Nachrichtenseite 10 ZOOM Eingang zur Webseite Sortieren aller Dateien in einem Verzeichnis und Ausgabe in alphabetischer Reihenfolge Anzeige der Mediainformation. Bei zweimaligen Drücken werden weitere Einzelheiten über das Video angezeigt.
English 5 Setup und Aufrüsten 5.1 Setup für den TV Modus Wenn Sie HDMI verwenden, verwenden Sie die Fernbedienung und drücken Sie die "OUTPUT" Taste. Sie können durch die TV-Modi blättern, um zum richtigen TV Anzeigemodus zu gelangen. 5.2 Setup für kabelgebundenes Netzwerk 1. Drücken Sie "Setup" auf der Fernbedienung oder wählen Sie "Setup" aus dem Hauptmenü 2.
5.3 Setup für ein drahtloses Netzwerk (WLAN) (Optional) AVerLife ExtremeVision Media Player unterstützt ein drahtloses Ethernet über einen USB Wi-Fi Dongle von AVerMedia. Um die Funktion "drahtlos (wireless)“ einzuschalten, stellen Sie bitte sicher, dass Sie den Wi-Fi Dongle vor dem Einschalten des AVerLife ExtremeVision Media Player in die USB Schnittstelle steckten. Und beachten Sie, dass ein USB Wi-Fi, der nicht von AVerMedia stammt, NICHT unterstützt wird.
5 Stellen WEP64(HEX) 10 Stellen WEP128(ASCII) 13 Stellen WEP128(HEX) 26 Stellen WPA‐PSK/WPA2‐PSK 8 oder mehr Stellen (aktualisieren der Firmware). 2. Wählen Sie "Internet Upgrade"; das System sucht im Internet automatisch nach verfügbarer Firmware 3. Wählen Sie "Yes"(ja) falls Sie weitermachen wollen.
6. Stecken Sie den USB Stick in die USB-Schnittstelle des AVerLife ExtremeVision Media Players. Gehen Sie zu "Set Up" → “Version” → “Firmware upgrade” → “USB Upgrade”. 7. Wählen Sie "Yes" zum fortfahren oder "No" zum Abbrechen. Bitte achten Sie darauf, dass die Stromversorgung, während des Vorgangs, nicht unterbrochen wird. 8. Ist der Vorgang erfolgreich abgeschlossen, bootet der AVerLife ExtremeVision Media Player automatisch. 6 Mediaquellen 6.
eine Zielmaschine, navigieren Sie dann auf die English 2. Drücken Sie die Down-Taste und wählen Sie gewünschten Dateien, die Sie abspielen Der AVerLife ExtremeVision Media Player unterstützt USB-Sticks, USB-Festplatten und eSATA-Festplatten. Wählen Sie einfach im Hauptmenü “MultiMedia” und navigiere zu den Dateien, die Sie abspielen wollen. Hinweis: Die Anzahl der USB-Schnittstellen kann über eine USB-Hub erweitert werden.
7 Genießen Sie MultiMedia 7.1 Abspielen von Musik-, Foto- und Videodateien Für weitere Einzelheiten über die unterstüzten Dateiformate und Behälter beziehen Sie sich bitte auf das Benutzerhandbuch. Einige der häufig benutzten Funktionen sind im folgenden herausgestellt. 1. Zum Anschauen der Video-Informationen drücken Sie "INFO", drücken Sie INFO erneut um weitere Informationen zu erhalten. 2.
Wenn Sie die Fernbedienung zum Surfen verwenden möchten, drücken Sie INFO, um eine URL Leiste, wie unten dargestellt, zu erhalten. zur leichteren Auch eine virtuelle Tastatur steht zur Verfügung wenn Sie Dateneingabe drücken. Drücken die HELP Taste für Hilfe und Sie bekommen Anweisungen für alle Kurzbefehle wie im Folgenden: bedeutet Gibt es auf einer Internetseite ein RRS (Really Simple Syndicatin) symbol dies die Seite kann im RRS Format betrachtet werden.
sowie Metadata wie Veröffentlichungsdatum und Autor. Der Vorteil der Web feeds, aus Sicht der Herausgeber, ist das automatische Syndizieren des Inhalts. Um, im AVerLife ExtremeVision Media Player einen Feed zur Liste der RSS hinzuzufügen, klicken Sie auf das Symbol auf der Seite. Drücken Sie "OK" zum Bestätigen oder "Cancel" zum Abbrechen. Gehen Sie von der Hauptseite aus auf die RSS Seite und wählen Sie den RSS, den Sie betrachten wollen. Es gibt bereits eingetragene Feeds. 7.
Wählen Sie einen Sender aus der Liste und drücken Sie "OK", "Play" zum Abspielen Hinweis 1: English 5. steht für einen Hinweis 2: Drücken Sie “BGM” auf der Deutsch Radiosender. der Hintergrundmusik hinzuzufügen 7.4 SHOUTcast™ Français Fernbedienung um den Sender zur Liste Verfahren Sie folgendermaßen: 2. Wählen Sie die Station die Sie hören möchten. Da der Inhalt direkt über das Internet gestreamt wird, braucht es etwas Geduld, bis der Inhalt geladen ist. Português Español 1.
"Aktualisierungen" werden wie unten dargestellt gezeigt: 2. Durchblättern der Fotos und drücken von "OK" zeigt die Bilder in voller Bildschirmgröße. Drücken Sie "OK" erneut und das Abspielen wird wiederholt. 3. Drücken Sie "Search" (Suche). Dies ermöglicht es Ihnen Ihre Lieblingsfotos von Flickr zu durchsuchen. FAQ (Häufig gestellte Fragen) F: Warum sehe ich nichts auf dem Fernseher? Antwort: Bitte wählen Sie den richtigen Signaleingang auf Ihrem Fernsehgerät.
CONTENU DE L’EMBALLAGE .........................................................................2 English Table des matières CONNEXIONS POUR PERIPHERIQUES..........................................................4 UTILISATION DE LA TELECOMMANDE ..........................................................5 Deutsch DESCRIPTION DU MATERIEL ..........................................................................3 PROFITEZ DU MULTIMEDIA.......................................................................
À PROPOS DE CE GUIDE Ce guide rapide vous explique la procédure d’acquisition la plus rapide pour profiter du multimédia avec AVerLife ExtremeVision Media Player. Pour plus de détails sur la manière d’utiliser cet appareil, voyez le Mode d’emploi disponible sur le site Web d’AverMedia : www.avermedia.
English Deutsch 2 Description du matériel Français VUE FRONTALE Italiano Marche/Arrêt Port USB Composite Sortie HDMI Port S/PDIF Bloc secteur Port Ethernet Port USB / eSATA Español Composant • Extinction Pour éteindre l'appareil, appuyer sur la touche « POWER » de la Português VUE ARRIERE • Signaux LED du panneau frontal : Aucune couleur- Arrêt/Off Couleur bleue - Démarrage / En marche FRA-3 Русский télécommande.
3 Connexions pour périphériques (7) (5) (2) (3) (6) (1) (4) Bloc secteur eSATA HDD Internet Ampli Flash USB ADSL TV *Sans fil enfichable (en option) Vidéo et Audio Routeur • Le port HDMI (1) sert de sortie vidéo haute définition et audio haute qualité. • Le port optique S/PDIF connecté à un décodeur ou à un ampli externe permet une haute qualité audio. • Le composant (3) est une sortie vidéo.
Русский Português Español Italiano Français Deutsch Utilisez la télécommande pour vous déplacer dans les menus, sélectionner et regarder des vidéos, écouter de la musique ou visionner des photos sur votre téléviseur. Pour plus de détails sur l’utilisation de la télécommande, voyez le Mode d’emploi.
4 IMEDIA 5 NOUVELLES 6 WEB 7 TRIER 8 INFO 9 REPEAT (répéter) 10 ZOOM 11 13 ROTATE (pivoter) NUMBERS (chiffres) MUTE (silence) 14 GO TO (aller à) 15 BACK (retour) 16 Volume ADJ. (réglage volume) 17 MENU 12 21 SET UP (installation) DIRECTIONS (flèches directionnelles) FAST FORWARD / REWIND (avance/retour rapides) OK/PLAY PAUSE (OK/lecture pause) 24 PREV/NEXT (préc./suiv.
NB : Vous pouvez appuyer sur le bouton « SETUP » (installation) de la télécommande pour entrer au menu principal d’installation. Et sélectionner un élément à l’aide des boutons puis appuyer sur le bouton « OK » pour confirmer la sélection. Si vous utilisez l’HDMI, appuyez sur le bouton « OUTPUT » (sortie) de la télécommande. Vous pouvez vous déplacer parmi les modes TV jusqu’à trouver le bon mode d’affichage. 5.2 Installation pour réseau câblé 1.
5.3 Installation pour réseau sans fil (en option) L’l’AVerLife ExtremeVision Media Player prend en charge Ethernet sans fil avec un Wi-Fi enfichable USB fourni par AverMedia. Pour activer la fonction sans fil, assurez-vous brancher votre Wi-Fi enfichable avant d’allumer l’ AVerLife Extreme Vision Media Player. Et notez bien qu’un Wi-Fi enfichable USB non autorisé par AverMedia NE SERA PAS pris en charge.
WEP64(ASCII) 5 chiffres WEP64(HEX) 10 chiffres WEP128(ASCII) 13 chiffres WEP128(HEX) 26 chiffres WPA‐PSK/WPA2‐PSK 8 chiffres ou plus English Longueur du code Deutsch Format de code Choisissez « Internet Upgrade » (mise à jour par Internet) ; le système cherchera automatiquement un code de firmware disponible sur Internet. 3. Sélectionnez OUI si vous souhaitez continuer.
enregistré dans le répertoire racine pour que l’AverLife Extreme Vision puisse le détecter. 6. Insérez le disque USB dans le port USB de l’AVerLife Extreme Vision Media Player. Allez à « Set Up » (Installation) → « Version » → « Firmware upgrade » (mise à jour logiciel) → « USB Upgrade » (Mise à jour USB). 7. Sélectionnez OUI pour continuer ou NON pour annuler. Faites bien attention à NE PAS ÉTEINDRE l’appareil pendant le processus. 8.
NB : Le nombre de ports USB peut être augmenté à l’aide d’un concentrateur USB ; attention à la puissance additionnelle consommée par les périphériques supplémentaires. L’AVerLife ExtremeVision Media Player fournit lui-même une puissance limitée (1,1A) au port USB. 1. Allez à « MultiMedia » dans la page principale. 2. Sélectionnez le nom de votre périphérique de stockage dans la liste, et appuyez sur le bouton « COPY » (copier). 3. Sélectionnez l’origine et la destination.
7 Profitez du multimédia 7.1 Lire des fichiers musique, photo ou vidéo Pour les détails des formats et des conteneurs de fichiers pris en charge, voyez le mode d’emploi. Certaines fonctions utilisées fréquemment sont mises en évidence comme ceci : 1. Affichage d’information sur la vidéo : Appuyez sur le bouton « INFO »`pour voir l’information vidéo ; appuyez de nouveau pour plus d’information. 2.
On peut brancher un clavier et une souris USB pour faciliter la navigation sur le Web. Veillez à les brancher avant d’entrer au navigateur Web. Si vous voulez naviguer à l’aide de la télécommande, appuyez sur le bouton « INFO » pour obtenir la barre URL (voir ci-dessous) : , pour faciliter la saisie.
Appuyez sur « ok » pour confirmer ou sur « Cancel » (annuler) pour passer à la suite. Entrez à la page RSS depuis la page principale, et sélectionnez celle que vous voulez voir. Quelques flux sont déjà intégrés. 7.3 Écoutez Internet Radio- Live 365™ Live365™ est un service radio sur Internet qui offre un accès sur demande illimité à des milliers de stations radio. Le son est diffusé en continu sur Internet. Appliquez la procédure suivante pour accéder aux stations radio : 1.
Note 1 : représente une station radio. Note 2 : Appuyez sur la touche de raccourci « BGM » (musique de fond) de la télécommande pour ajouter la station à la liste de musiques de fond. 7.4 SHOUTcast™ English Deutsch Sélectionnez une station radio dans la liste, et appuyez sur « OK » puis sur le bouton « Play » pour l’écouter. Français 5. Faites les pas suivants : 2. Naviguez pour choisir d’écouter un fichier.
(morceaux récents) s’afficheront sur l’écran comme dans la figure : 2. Parcourez les photos et appuyez sur le bouton « OK » pour voir la photo en taille réelle. Si vous appuyez de nouveau sur « OK » la lecture recommence。 3. En appuyant sur le bouton « Search » (chercher) vous pourrez rechercher vos photos préférées dans Flickr。 FAQ Q : Pourquoi ne vois-je rien sur l’écran TV ? Réponse : Sélectionnez le bon type de signal d’entrée (input) dans votre téléviseur.
CONTENUTO DELLA CONFEZIONE ................................................................2 English Indice COLLEGAMENTO PERIFERICHE.....................................................................4 UTILIZZO DEL TELECOMANDO .......................................................................5 Deutsch PANORAMICA HARDWARE ..............................................................................3 5.1 CONFIGURAZIONE DELLA MODALITÀ TV ........................................................7 5.
Informazioni su questa guida Questa guida rapida è il modo più rapido per iniziare a utilizzare il dispositivo e gustarvi i vostri contenuti multimediali grazia al Lettore Multimediale AVerLife ExtremeVision. Per ulteriori dettagli su come utilizzare il dispositivo si prega di consultare il Manuale dell’Utente sul sito web: www.avermedia.
English Deutsch 2 Panoramica Hardware Français VISTA ANTERIORE Italiano Power On/Off USB Port Composite HDMI Output S/PDIF Port Power Adapter Ethernet Port USB Port / eSATA Español Component • Spegnimento Per spegnere il dispositivo, premere il tasto “POWER” sul telecomando.
3 Collegamento periferiche (7) (5) (2) (3) (6) (1) (4) Power Adapter eSATA HDD Internet Amplifier USB Flash ADSL TV *Wireless dongle (optional) Router Video & Audio • La porta HDMI (1) è per video in uscita ad alta definizione e audio in uscita di elevata qualità. • La porta ottica S/PDIF (2) serve per audio di elevata qualità se collegata a un decoder o a un amplificatore esterno. • Component (3) è per l’uscita video. • Composita (4) è per un’uscita TV a risoluzione standard (NTSC / PAL).
N. TASTIERA 1 POWER 2 HOME 3 MULTIMEDIA 4 IMEDIA DESCRIZIONE FUNZIONE Accensione/Standby. Tornare al Menu Principale. Accedere alla pagina Multimedia. Accedere alla pagina iMedia. ITA-5 Русский Português Español Italiano Français Deutsch Utilizzare il telecomando per spostarsi all’interno del menu, per selezionare e guardare video, ascoltare musica o ancora guardare le foto in TV. Per ulteriori dettagli su come usare il telecomando è possibile consultare il Manuale dell’Utente.
Accedere alla pagina delle News. 5 NEWS 6 WEB Accedere alla pagina Web. 7 SORT Ordinare tutti i file in una cartella e ri-disporli in ordine alfabetico. 8 INFO 9 REPEAT Visualizzare le informazioni multimediali. Premendo due volte vengono visualizzate ulteriori informazioni sul video. Video & Music: ripetere il file attuale o tutti i file in questa cartella o annullare la funzione di ripetizione. Eseguire lo zoom su video o foto 10 ZOOM 11 ROTATE Ruotare la foto.
English 5 Installazione e aggiornamento 5.1 Configurazione della modalità TV Fare clic sul display TV accedendo a “Setup” → “System Setup” → “TV Mode Setup”→ “Video Output” (“Configurazione” → “Configurazione di sistema” → “Configurazione modalità TV”→ “Uscita video”). Il display preimpostato del Lettore Multimediale AVerLife ExtremeVision è composito (CVBS). NOTA: È possibile premere il tasto “SETUP” del telecomando per accedere alla schermata principale di configurazione.
5.3 Configurazione rete wireless (optional) Il Lettore Multimediale AVerLife ExtremeVision supporta Ethernet wireless con un dongle USB Wi-Fi fornito da AVerMedia. Per attivare la funzione wireless, verificare di collegare il dongle Wi-Fi nella porta USB prima di accendere il Lettore Multimediale AVerLife ExtremeVision. Si prega di notare che NON sono supportati dongle USB Wi-Fi non autorizzati da AVerMedia.
5 cifre 10 cifre WEP128(ASCII) 13 cifre WEP128(HEX) 26 cifre WPA-PSK/WPA2-PSK 8 cifre o più 5.4 Aggiornamento firmware Accedere al “Setup Main Manu” (Menu principale di configurazione) e selezionare “Firmware upgrade” (Aggiornamento firmware). 2. Scegliere “Internet Upgrade” (Aggiornamento Internet): il sistema ricercherà in modo automatico i codici firmware disponibili su Internet. 3. Selezionare “Yes” (Sì) nel caso in cui si desideri proseguire.
7. Selezionare "Yes” per procedere oppure “No” per annullare. Si prega di fare attenzione. L'alimentazione NON deve essere scollegata durante il processo. 8. Dopo il completamento del processo, il Lettore Multimediale AVerLife ExtremeVision verrà riavviato in modo automatico. 6 Sorgenti multimediali 6.
Nota: Il numero di porte USB può essere esteso servendosi di un hub USB. Si prega di fare attenzione al consumo energetico che i dispositivi aggiuntivi comportano. Il Lettore Multimediale AVerLife ExtremeVision fornisce una corrente limitata (1.1 A) per la porta USB. Accedere a “Multimedia” dalla Pagina Principale. 2. Selezionare il nome del dispositivo di archiviazione dall’elenco e premere il tasto “COPY” (Copia). 3. 3. Selezionare l’origine e la destinazione.
7 Godetevi i vostri contenuti multimediali 7.1 Riproduzione di musica, foto e file video Per il formato di file supportato e container in dettaglio sarà possibile consultare il manuale d’istruzioni. Alcuni funzioni usate più di frequente vengono indicate come segue: 1. Visualizzazione delle informazioni sul video: Premere il tasto “INFO” per recuperare informazioni sul video; premere nuovamente per recuperare ulteriori informazioni. 2.
English premere sempre tasti come ad esempio “HOME”, “SETUP” sull’unità telecomando invece che limitarsi a premere più volte il tasto “BACK”. Quindi, sarà più semplice tornare al punto in cui ci si trovava in un percorso cartelle lungo premendo i tasti “MULTIMEDIA”. 7.2 Browser Web & RSS Verrà visualizzata la homepage del browser web, quindi sarà possibile navigare sul web utilizzando il telecomando oppure la tastiera e il mouse.
Un documento RSS (chiamato “feed”, “web feed” o “canale”) comprende del testo in versione integrale o riassunta oltre a metadati, come ad esempio date di pubblicazione e autorizzazioni. I Feed web vanno a beneficio di chi li pubblica: è in effetti possibile vagliare immediatamente il contenuto. Per aggiungere il feed all’elenco RSS del Lettore Multimediale AVerLife ExtremeVision si prega di fare clic sull’icona sulla pagina. Fare clic su “OK” per confermare oppure su “Annulla” per saltare.
Selezionare “Live 365”, quindi premere il tasto “OK” sul telecomando. 4. Selezionare il catalogo che si preferisce dall’elenco, oppure selezionare "Tutte le trasmissioni” per sfogliare tutte le stazioni radio. 5. Selezionare una stazione radio dall’elenco, English 3. indica una stazione radio. Nota2: Premere il tasto “BGM” sul telecomando per aggiungere la stazione all’elenco delle musiche da sottofondo. 7.
Si prega di attenersi alla seguente procedura: 1. Premere il tasto “iMedia”, scegliere “Flickr”, le foto interessanti e recenti verranno visualizzate sullo schermo come di seguito indicato: 2. Spostandosi fra le foto e premendo il tasto “OK” sarà possibile vedere le foto a tutto schermo. Premere nuovamente “OK”. La riproduzione verrà ripetuta. 3. Premendo il tasto “Search” sarà possibile cercare le proprie foto preferite da Flickr.
CONTENIDO DEL PAQUETE ............................................................................2 English Índice CONEXIONES DE EQUIPOS PERIFÉRICOS ...................................................4 USO DEL CONTROL REMOTO ........................................................................5 Deutsch VISIÓN GENERAL DEL HARDWARE...............................................................3 5.1 CONFIGURACIÓN DEL MODO DE TV ..............................................................7 5.
Sobre esta guía Esta guía rápida le dará la forma más rápida de seguir los procedimientos para disfrutar su multimedia con el AVerLife ExtremeVision Media Player. Para obtener más detalles sobre cómo usar este dispositivo, por favor consulte el manual del usuario disponible en el sitio web de AVerMedia: www.avermedia.
English Deutsch 2 Visión general del hardware Français VISTA FRONTAL Italiano Encendido/Apagado Puerto USB Compuesto Salida HDMI Puerto S/PDIF Adaptador de corriente Puerto Ethernet Puerto USB / eSATA Español Componente • Apagado Si desea apagar el sistema, por favor presione la tecla “POWER” en el control Português VISTA POSTERIOR • LED indicador del panel frontal Sin color- Apagado Color azul – En secuencia de arranque / En funcionamiento ESN-3 Русский remoto.
3 Conexiones de equipos periféricos (7) (5) (2) (3) (6) (1) (4) Adaptador de corriente Disco duro eSATA Amplificador Internet Memoria USB ADSL Televisor *Dongle inalámbrico (opcional) Enrutador Video y audio • El puerto HDMI (1) es para video de alta resolución y para salida de audio de alta calidad. • El puerto óptico S/PDIF (2) es para audio de alta calidad conectado a un descodificador externo o amplificador. • Componente (3) es para la salida de video.
No. 1 TECLA POWER 2 HOME 3 MULTIMEDIA 4 IMEDIA DESCRIPCIÓN DE LA FUNCIÓN Encender/En espera Regresar al menú principal. Entrar a la página de multimedia. Entrar a la página de iMedia. ESN-5 Русский Português Español Italiano Français Deutsch Utilice el control remoto para navegar en el menú y para seleccionar y ver videos, escuchar música o ver fotos en su televisor. Para obtener más detalles sobre cómo usar el control remoto, por favor consulte el manual del usuario.
5 NEWS 6 WEB 7 SORT 8 INFO 9 REPEAT 10 ZOOM 11 ROTATE 12 NUMBERS 13 MUTE 14 GO TO 15 BACK 16 Volume ADJ. 17 MENU 18 SET UP 19, 23 20, 22 21 DIRECTIONS FAST FORWARD/REWI ND OK/PLAY PAUSE 24 PREV/NEXT 25 STOP 26 SLOW/SLIDE 27 BGM 28 Func 29 Eject 30 A-B 31 Backup 32 OUTPUT 33 AUDIO 34 SUBTITLE 35 HELP Entrar a la página de noticias. Entrar a una página web. Ordenar todos los archivos en una carpeta y reordenarlos en orden alfabético.
English 5 Configuración y actualización 5.1 Configuración del modo de TV NOTA: Usted puede presionar el botón “SETUP” en el control remoto para entrar al menú principal de configuración. Luego utilice para seleccionar un elemento y presione el botón “OK” para confirmar la selección. Si usa HDMI, utilice el control remoto y presione el botón “OUTPUT”. Puede examinar los diferentes modos del televisor para obtener el modo correcto de visualización. 5.2 Configuración de la red con cable 1.
Wi-Fi USB proporcionado por AVerMedia. Para habilitar la función inalámbrica, por favor asegúrese de enchufar el dongle Wi-Fi en el puerto USB antes de encender el AVerLife ExtremeVision Media Player. También observe que un dongle Wi-Fi USD no autorizado por AVerMedia NO se admite. Para obtener video de muy alta definición, se recomienda usar una conexión con cable entre el AVerLife ExtremeVision Media Player y el enrutador doméstico. Reproducir música y fotos con una conexión inalámbrica está bien. 1.
2. Escoja “Internet Upgrade” y el sistema buscará automáticamente el código de firmware disponible de la Internet. 3. Seleccione “Yes” si desea proceder. Por favor observe que debe haber energía durante el proceso, de otro modo, el firmware podrá dejar de funcionar adecuadamente y AVerLife ExtremeVision Media Player no podrá cargarse otra vez. 4. Cuando el proceso haya terminado con éxito, AVerLife ExtremeVision Media Player reiniciará automáticamente. 5.
6 Fuentes de medios 6.1 UPnP y AVerMedia DMS AVerLife ExtremeVision Media Player detectará automáticamente todos los servidores de contenidos disponibles y compatibles con UPnP AV en la secuencia de arranque y los detallará en la columna UPnP del menú principal. No es necesario realizar una configuración adicional en el AVerLife ExtremeVision Media Player. Nota: Si necesita conectar AVerLife ExtremeVision Media Player a su computadora, por favor descárguelo de www.avermedia.com si se requiere UPnp. 6.
Nota: La cantidad de puertos USB pueden extenderse con un hub USB, por favor percátese del consumo de energía adicional por los dispositivos adicionales. AVerLife ExtremeVision Media Player de por sí proporciona una energía limitada (1.1A) para el puerto USB. Vaya a “MultiMedia” en la página principal. 2. Seleccione el nombre del dispositivo de almacenamiento de la lista y presione el botón “COPY”. 3. Seleccione el origen y el destino.
7 Disfrute su multimedia 7.1 Reproducción de archivos de música, fotos y música Para ver en detalle los formatos de archivos y sus contenidos, por favor consulte el manual del usuario. Algunas de las funciones de uso frecuente se resaltan como sigue: 1. Vista de la información de video: Presione el botón “INFO” para obtener la información de video; presiónelo otra vez para ver más información. 2.
English sólo pulsar el botón “BACK” en el tiempo numérico. Entonces será fácil regresar a donde estuvo en una ruta de directorio larga al presionar las teclas programables “MULTIMEDIA”. 7.2 Navegador de web y RSS También estará disponible un teclado virtual al presionar para facilitar el “tecleo”. Presione el botón HELP para obtener ayuda. Obtendrá instrucciones de todas las teclas programables con funciones como se muestran abajo.
Presione “ok” para confirmar o “Cancel” para saltar. Entre a la página de RSS desde la página principal y seleccione aquella que quiera ver. Ya hay algunos suministros integrados. 7.3 Reproducción de la radio en Internet Live 365™ Live365™ es un servicio de radio en Internet que proporciona acceso a petición ilimitado a miles de estaciones de radio. El audio se transmite directamente por Internet. Siga los pasos abajo para acceder a las estaciones de radio: 1.
Seleccione una estación de radio de la lista, presione “OK” y el botón “Play” para reproducirla. Nota1: English 5. representa una estación de 7.4 SHOUTcast™ Usted puede usar AVerLife ExtremeVision Media Player para escuchar una estación de ShoutCast sin tener que usar una PC. Français Nota2: Presione la tecla programable “BGM” en el control remoto para adicionar la estación a la lista de música de fondo. Deutsch radio. Español 1. Seleccione “iMedia” del menú principal o escoja “ShoutCast”.
2. Examine las fotos, presione el botón “OK”, y podrá ver la foto en tamaño completo. Presione “OK” otra vez y la reproducción se repetirá。 3. Presionar el botón “Search” le permitirá buscar sus fotos favoritas de Flickr。 PREGUNTAS FRECUENTES P: ¿Por qué no puedo ver nada en el televisor? Respuesta: Por favor seleccione la entrada de señal correcta en su televisor.
CONTEÚDO DA EMBALAGEM..........................................................................2 English Índice LIGAÇÕES PERIFÉRICAS ................................................................................4 COMO UTILIZAR O CONTROLO REMOTO......................................................5 Deutsch SUMÁRIO DO HARDWARE...............................................................................3 5.1 CONFIGURAÇÃO PARA MODO TV..................................................................
Sobre este guia Este Guia de Instalação Rápida descreve rapidamente o procedimento prático para disfrutar do seu AVerLife ExtremeVision Media Player. Para mais informações sobre como utilizar este aparelho, consulte o Manual do Utilizador disponível no website da AVerMedia: www.avermedia.
English Deutsch 2 Sumário do Hardware Français VISTA FRONTAL Italiano Lig. / Deslig. Porta USB Composto Saída HDMI Porta S/PDIF Adaptador da fonte de alimentação Porta Ethernet Porta USB / eSATA Español Componente • Botão de Energia Se quiser desligar o sistema, prima o botão “POWER” (ENERGIA) no controlo Português VISTA TRASEIRA • Indicador LED do painel frontal: Sem cor- Desligado Cor azul – A ligar / Em funcionamento PTG-3 Русский remoto.
3 Ligações Periféricas (7) (5) (2) (3) (6) (1) (4) Adaptador da Fonte de Alimentação HDD eSATA Internet Amplificador USB Flash ADSL TV *Dongle sem fios (opcional) Router Vídeo e Áudio • A porta HDMI (1) é para transmissão de video de alta definição e áudio de alta qualidade. • Porta óptica S/PDIF (2) é para áudio de alta qualidade ligado a um descodificador ou amplificador externo. • A saída de sinal Componente (3) é para transmissão de vídeo.
Nº. Botão 1 POWER 2 HOME Voltar ao menu principal. Entrar na página multimédia. 3 4 DESCRIÇÃO DA FUNÇÃO Ligar / Espera IMEDIA Entrar na página iMedia. PTG-5 Русский Português Español Italiano Français Deutsch Utilize o controlo remoto para navegar nos menus e para seleccionar e visualizar videos, ouvir música ou ver fotografias na sua televisão. Para mais informações sobre como utilizar o controlo remoto, consulte o Manual do Utilizador.
5 NEWS 6 WEB 7 SORT 8 INFO 9 REPEAT 10 ZOOM 11 ROTATE 12 NUMBERS 13 MUTE 14 GO TO 15 BACK 16 Volume ADJ. 17 MENU 18 SET UP 19, 23 20, 22 21 DIRECTIONS FAST FORWARD/REWI ND OK/PLAY PAUSE Entrar na página News (Notícias). Entrar na página Web. Ordenar todos os ficheiros numa pasta e reorganizá-los por ordem alfabética. Apresentar informação multimédia. Quando premir duas vezes, apresenta mais detalhes sobre o vídeo.
English 5 Configuração e actualização 5.1 Configuração para Modo TV Deutsch Configure o selector de fonte de vídeo da sua TV para corresponder à ligação do seu AVerLife ExtremeVision Media Player Por exemplo, se utilizar HDMI, configure a sua TV para utilizar a porta de entrada HDMI correspondente. para seleccionar uma opção e prima o botão “OK” para confirmar a selecção. Se utilizar HDMI, utilize o controlo remoto e prima o botão “OUTPUT” (SAÍDA).
USB fornecido pela AVerMedia. Para activar a função sem fios, ligue o dongle Wi-Fi à porta USB antes de ligar o AVerLife ExtremeVision Media Player. E lembre-se que um dongle Wi-Fi USB não autorizado pela AVerMedia NÃO é suportado. Para ver vídeo de muito alta definição, é aconselhável efectuar streaming com uma ligação com fios entre o o AVerLife ExtremeVision Media Player e o router de sua casa. A reprodução de música e fotos com ligação sem fios é aceitável 1.
5. Um método alternative consiste em seleccionar “USB Upgrade” (Actualização por USB). O ficheiro binário de firmware mais recente é comprimido e encontra-se em http://www.avermedia.com. Transfira o ficheiro de firmware, guarde-o no seu disco flash USB e descomprima-o. O ficheiro “upgrade.bin” deve ser guardado no directório de raiz para que o AVerLife ExtremeVision Media Player o consiga detectar. 6. Insira o disco USB na porta USB do AVerLife ExtremeVision Media Player.
transfira de www.avermedia.com se o UPnp for necessário. 6.2 Vizinhança de rede (Cliente Samba) Enquanto a rede estiver e ligada e nenhum firewall bloquear as partilhas de sites remotos, não é necessária configuração adicional para activar esta funcionalidade. Siga os passos para aceder aos formatos multimedia através do Samba Client Protocol (Protocolo Cliente Samba). 1.
4. Navegação dos directórios de localização: Prima o botão “MENU” (MENU) para ir para o directório no topo do ecrã. Premindo os botões numéricos no controlo remoto durante a navegação ordena os nomes dos ficheiros pela primeira letra do botão premido. Isto ajuda a encontrar o ficheiro procurado entre muitos. 5.
7.2 Web Browser e RSS Sempre que entrar na interface do utilizador, prima o botão “Home” (Página principal) no controlo remoto para voltar para o menu principal como indicado em baixo. Seleccione o ícone que representa o ‘Web Browser’ e prima o botão “OK”. A página principal do web browser é aberta. Depois, pode navegar na Web utilizando o controlo remoto ou teclado e rato. Pode ligar um teclado e rato USB para facilitar a navegação na Web. Certifique-se que os liga antes de executar o Web Browser.
English Vá para a página RSS a partir da página principal e seleccione a página que pretende abrir. Já existem alguns feeds pré-criados. 2. Seleccione “iMedia” no menu principal ou prima o botão “iMedia” no controlo remoto. 3. Seleccione “Live 365” e prima o botão “OK” no controlo remoto. 4. Seleccione um catálogo que quiser da lista ou seleccione “All Broadcasts” (Todas as transmissões) para navegar por todas as estações de rádio. 5. Seleccione uma estação de radio da lista e prima “OK.
2. Navegue para seleccionar uma para reproduzir. Porque o conteúdo é transmitido directamente pela Internet, seja paciente enquanto o conteúdo é carregado. 7.5 Flickr Sem computador, pod ever fotos do Flickr através do AVerLife ExtremeVision Media Player。 Siga as instruções: 1. Prima o botão “IMedia,” seleccione “Flickr,” as secções Interestingness e Recent são apresentadas no ecrã como em baixo: 2. Percorra as fotos e prima o botão”OK.” Pode ver a foto em tamanho completo.
Model No.