
User Guide


AVerTV 6
42
(This picture is only for reference.)
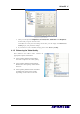
7. Then determine how to import the data file by choosing the desired import options.
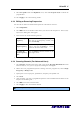
The options are explained below:
Import to program
list
This option will add the program data from the
imported file into the selected input port’s
program list. With this option enabled, you can
access the newly added programs without re-
scanning the programs.
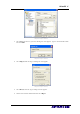
Append to the tail of
the list
The imported program data will be added to the
end of the application’s program list.
Overwrite
duplicated program
data
The imported program data will overwrite the
application’s program list when they have the
same data.
Overwrite program
name
For duplicated program data, the program names
will be replaced by the imported data.
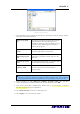
Import to satellite’s
frequency table
The option will add the frequencies stored in the
imported file into the selected satellite’s
frequency table.
Note: It is highly recommended to choose Import to satellite’s frequency table
and then re-scan the channels to obtain the latest program data. This is because
the program data stored in the imported file is not probably the most up to date.
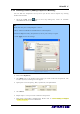
8. In this example, we select Import to satellite’s frequency table only, and then
choose the appropriate satellite name from the drop-down list. Click OK.
9. Then check your LNB’s configurations. Please refer to 3.2.2 Scanning for Digital
Satellite Programs for more information.
10. Click Program Scan to start the scanning process.
11. Click Apply to save the scanning results.