
User manual


AVerTV 6
50
4.4 Adding and Deleting Channel Groups
Selecting a Channel Group allows you to switch between the channels of the selected
group only when pressing the
Channel Up/Down button. If you want to add or delete a
channel group, do the following:
To add a new channel group:
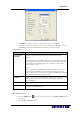
1. Click the Setup button and in the Setup dialog box,
click Analog TV or Programs icon on the left pane.
2. Click New and the Program List dialog box will then
appear (as shown on the right).
3. Type in a group name and click OK.
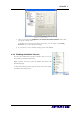
4. Click Program Scan and click Yes to continue the scanning process.
5. Available channels will then be listed in the Program Information and now you can
delete the unwanted programs by clearing the check box.
6. Click Apply to save the settings and click OK to exit the current dialog box. Or you
can click Cancel to revert to the original settings.
OR,
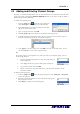
If you don’t want to scan programs every time you create a new channel group, you can
use the Copy function.
1. From the program drop-down list, select the group that you
want to duplicate.
2. Click Copy and the Program List dialog box will appear.
3. Type in desired name and click OK.
4. Finally, just like the steps described above, clear the check mark next to the
unwanted channels.
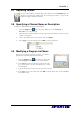
To delete a channel group:
1. Click the Setup button and in the Setup dialog box, click Analog TV or Programs
icon on the left pane.
2. From the program drop-down list, select the name of the group
that you want to remove.
3. Click Delete to remove the selected group.