
User manual


AVerTV 6
65
6.2 Customizing TimeShift Recording Settings
Before you start using the TimeShift function, first check its recording settings to see if
they fit your needs.
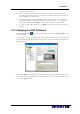
To check and customize recording settings:
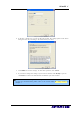
1. Click the Setup button and in the Setup dialog box, click the Storage icon on
the left pane. You will then see the following settings.
(This picture is only for reference.)
2. By default, TimeShift performs recording of the TV program by creating a temporary
video file and deletes this file once you click the Stop button. If you want to save
the video file, select the Keep TimeShift Files check box.
3. In the Record section, you can determine your file name format, recording time, file
size and destination folder.
4. Click Apply to save the new settings and click OK to exit the current dialog box. Or,
click Cancel to use the original settings.
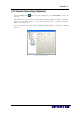
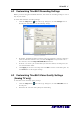
6.3 Customizing TimeShift Video Quality Settings
(Analog TV only)
To customize video and audio quality settings:
1. Click the Setup button
and in the Setup dialog box, click the Timeshift icon on
the left pane.
2. Determine the video and audio quality for timeshifting.