EXTERNAL T V TUNER BOX
FCC NOTICE This device has been tested and found to comply with the limits for a Class B digital device, pursuant to Part 15 of the FCC Rules. These limits are designed to provide reasonable protection against harmful interference in a commercial, industrial or business environment. This equipment can generate, use and radiate radio frequency energy and, if not installed and used in accordance with the instruction, may cause harmful interference to radio communications.
Contents Introduction............................................................................................ 1 What’s in the Package...................................................................... 1 The AVerMedia AVerTV Box Unit................................................... 2 The Touch Button Control Panel ...................................................... 2 Infrared Sensor................................................................................ 2 Connection Ports ..............
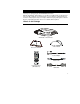
Introduction Thank you for purchasing the AVerMedia® AVerTV Box3! With the AVerMedia AVerTV Box3, you can turn your VGA monitor or LCD projector into a TV with or without even having to turn on your computer. Just plug it into your monitor or LCD projector and you’re ready to watch TV or play video games. AVerTV Box3 is completely plug-n-play. There is no software driver required.
User’s Manual The AVerMedia AVerTV Box3 Unit Touch Button Control Panel The Touch Button Panel found on the top side of the AVerTV Box3 provides quick access to commonly used functions.
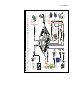
User’s Manual Connection Ports The port connectors allow connection of your TV antenna, PC, VGA monitor or LCD projector, speakers, video, or s-video source etc.
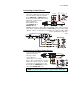
LCD PROJECTOR VGA Cable (not supplied) V G A M o n i to r (optional) Monitor Adapter Power Adapter CAM Ma c Mo nitor Wall Outlet (optional) Computer Adapter M AC IBM Compatible PC Macin tosh DC IN VG A OU T (supplied) VGA Cable VG A IN VIDEO 2 IN AUDI O2 IN L AU DI (not supplied) S-Video Cable (not supplied) Audio Cable External Amplified Speaker (not supplied) Audio Cable ANT (not supplied) Video Cable IN O IN S-VID EO PC SP EA KER R (supplied) Audio Cable Sound Ca
User’s Manual Connecting the VGA monitor or LCD Projector Connect the monitor cable to the AVerTV Box3 VGA OUT port. VGA Monitor Mac Monitor M AC Monitor Adapter (optional) VGA C able (not supplied) LCD PROJECTOR Connecting the Computer You can use AVerTV Box3 with or without turning the computer on. To switch to PC anytime, connect the supplied VGA cable to the AVerTV Box3 VGA IN port and to your computer's VGA card (the terminal where your monitor connects to the PC).
User’s Manual Connecting the Antenna Attach the antenna or cable TV to the ANT port of the AVerTV Box3. TV Antenna (75Ω) Connecting an Audio Cable OUT Sound Card Audio Cable (supplied) Plug one end of the supplied audio cable to your sound card LINE OUT (SPEAKER) port and the other end to the P C A U D I O I N p o r t o f t h e A V e r T V B o x 3 . T h i s connection allows you to have audio at all times and to adjust the volume from the AVerTV Box3.
User’s Manual Connecting a Video Source Composite Video: Connect the video OUT Example: Video & Audio Cable (not supplied) cable (not supplied) to the video out of VCR the video device and to the AVerTV Camcorder Box3 VIDEO1 IN or VIDEO2 IN port. Connect the audio cable to the left & Video Game right audio out of the video device and to the AVerTV Box3 left & right AUDIO1 IN or AUDIO2 IN ports.
User’s Manual Using the AVerMedia AVerTV Box3 Using AVerMedia® AVerTV Box3 for the First Time When you power on the AVerMedia ® AVerTV Box3 for the first time, it will automatically proceed to the SET AREA. Since TV signals vary in different countries, you need to select the appropriate signal. Refer to the table below for country signals.
User’s Manual AV/PC To toggle between TV/Video or PC display SOURCE Switch between TV or external video sources NUMBER BUTTONS To select a TV channel 100 Press this button first for cable channels over 100 FASTEXT LINK buttons Jumps to the teletext page which the color corresponds to MENU To call up the menu display CHANNEL RETURN Go to the previously selected channel PC BGM Allows you to continue listening to the TV or external video sound while you work on your PC.
User’s Manual Main Menu On Screen Display Usage TV SOURCE Use the CH+ or CH- buttons to select between air or cable TV source, then press Vol+ button to make the selection. CH FINETUNE If the TV reception is not clear, choose CH FINETUNE then press Vol+ and Vol- buttons until the TV picture becomes clear. CH SCAN Use the CH+ or CH- buttons to select between CHANNEL SCAN or All FREQ SCAN, then press Vol+ button to make the selection.
User’s Manual Main Menu CLOCK On Screen Display Usage Use this function to set the clock time and to program the AVerTV Box3 to turn on automatically. The clock and alarm format settings are in “hours : minutes”. Simply use the number buttons on the remote to key in the actual time and the time to automatically turn on the AVerTV Box3. If you want to clear or change the time, press Vol-. Under CLOCK menu, select number three (3).
User’s Manual Main Menu FAVORITE CH On Screen Display Usage This function allows you to add, remove and reprogram or reassign the TV channels with the channel numbers that are easier to remember. In the selected USER CH, enter in the new channel number you want to assign or the channel number you want to remove/add in to the channel line up. In the CATV, enter in the channel number you want to remap or the channel number you want to remove/add.
User’s Manual Main Menu On Screen Display Usage OSD POSITION Use the CH+, CH-, Vol+, and Vol- buttons to move the frame on where you want to set the position of the MENU, then press MENU. RESOLUTION Use the CH+ or CH- buttons to choose from 640 x 480, 800 x 600 or 1024 x 768 display resolution then press Vol+. LANGUAGE Use the CH+ or CH- buttons to select from different languages then press Vol+. 中文 영어 The available languages for NTSC version are English, 中文 and 영어.
User’s Manual Using Teletext (option) For European countries, the AVerTV Box3 provides the Teletext function which allows users to receive digital information from TV stations that broadcast such information. Teletext data is widely used in Europe and is transmitted along with normal television programs. The AVerTV Box3 can decode the teletext data and display the resulting information on your computer screen. TV stations transmit teletext data in pages.
User’s Manual Selecting a Teletext Page There are many ways of selecting a teletext page : • To enter a teletext page number, press on the NUMBER buttons 0 ~ 9. • To view the next upper or lower teletext page, press the CH+ and CHbuttons on the remote. • To return to the index page (i.e., page 100), press the 100 button. • To go directly to the next upper or lower 100th page, press the Vol+ or Vol- buttons.
User’s Manual LIMITED WARRANTY AVerMedia TECHNOLOGIES, Inc. warrants this product to be free of defects resulting from faulty manufacture or components under the following terms: WARRANTY LENGTH Labor is warranted for (1) one year from the date of purchase. Parts are warranted for (1) one year from the date of purchase. Replacement products will be warranted for the remainder of the one year warranty period or (30) thirty days, whichever is longer.