
Specifications


5-10 System Administrator’s Guide
Saving Changes
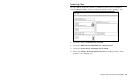
1. When you are done specifying the print server’s settings, select Write
Configuration from the File menu.
2. Exit the Paxar Sierra Sport Configurator.
The print server’s configuration is set and ready for Avalanche to
send to the printer.
3. Using the Avalanche Management Console, highlight the client and
click Update Now, which updates the client immediately, instead of
waiting until the scheduled time.
Creating Your Own Packages
We created the Paxar AVA package (PxrSSCfg.AVA) to easily configure the
print server and send updates to the printer. If you just need to update
firmware, you can create your own package.
1. Use the Avalanche Package Builder to set up packages since
everything is transferred to the printers via a package.
You may want to create separate packages for printer firmware
updates or print server firmware update.
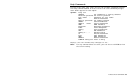
Packages include the following list of file extensions.
Extension Description
.bin Print Engine Firmware
.mif Standard Monarch .mif file (Monarch Initialization file)
.pcl MPCL data
.psb Print Server Binary
.psc Print Server Configuration Script
.asc Authentication Server Certificate
.lcc Local Client Certificate
2. Install the package.
3. Using the Avalanche Management Console, select the package, enable
the package and then, send the package.