Operator's Handbook 0 28028 Monarch® Sierra Sport4™ 9493™ Printer TC9493OH Rev. AB 4/09 ©2008 Avery Dennison Corp. All rights reserved.
Each product and program carries a respective written warranty, the only warranty on which the customer can rely. Avery Dennison reserves the right to make changes in the product, the programs, and their availability at any time and without notice. Although Avery Dennison has made every effort to provide complete and accurate information in this manual, Avery Dennison shall not be liable for any omissions or inaccuracies. Any update will be incorporated in a later edition of this manual.
TA B L E O F C O N T E N T S Getting Started ...................................................................................................................................... 1-1 Using this Manual............................................................................................................................... 1-1 Audience ........................................................................................................................................... 1-1 Printer Utilities ........
ii
G E T T I N G S TA R T E D 1 The Monarch® Sierra Sport4™ 9493™ printer is a portable thermal direct and thermal transfer printer that prints on tags, labels, or receipt paper. Before using the printer, review the safety information in the Regulatory Compliance document provided with your printer. Information in this document supercedes information in previous versions. Check our Web site for the latest documentation and release information.
About the Printer’s Power There are two ways to power the printer: ♦ Using a battery. See "Installing and Removing the Battery" for more information. ♦ Using the AC power adapter. Refer to the 9496™ Operating Instructions included with the charger/adapter for more information. Installing & Removing the Battery You must charge the battery before using it for the first time. To install the battery: 1. Review the safety information in the Regulatory Compliance document included with your printer. 2.
Battery and Safety Information ♦ You must charge a battery before using it. For optimal battery life, charge the battery within three months of receipt. WARNING: Use only the Monarch® 9496™ charger/adapter designed for Lithium-ion batteries when charging. The battery might explode if used with a different charger. Refer to the Operating Instructions provided with the charger/adapter for more information. ♦ The optimal battery storage temperature is -4°F - 104°F (-20°C - 40°C).
Connecting the Communications Cables You can communicate serially (9-pin) or through USB (version 2.0). For best results, use only Monarch® cables. See Appendix B, "Accessories" for part number information. To connect serial cables: 1. Open the hinged cable door on the side of the printer by loosening the two screws with a Phillips screwdriver. 2. Plug the DB9 connector into the DB9 port. 3. Place the cable into one of the cable cavities. 4. Close the cable door and tighten the screws.
LOADING RIBBON & SUPPLIES 2 This chapter describes how to load supply for ♦ non-peel mode (prints on continuous strip of supply). ♦ peel mode (prints and separates the label from the liner). ♦ fan-fold. Supply loading tips: ♦ Whenever you open and close the printer, press printhead. under to advance the supply under the ♦ The printer may be on or off when loading supplies.
Opening & Closing the Printer Before loading ribbon or supplies, you must open the printer. Close the printer before printing. To open the printer: 1. Insert your fingers into the indent beneath the supply door latch and lift. 2. Make sure the latch arms are free of the ribbon cassette. Ribbon Cassette Latch Arms Supply Door Latch 3. Tip the ribbon cassette back, if necessary, to lower the supply door. 4. Load ribbon or supplies.
Loading a Ribbon Cassette Use a ribbon to print on thermal transfer supplies. 1. Open the printer. See “Opening & Closing the Printer” for more information. 2. Tip the ribbon cassette back, if necessary, and pull it towards you until it slides out of the printer. Ribbon Shelf 3. Slide a new ribbon cassette with a loaded ribbon into the printer. See “Loading a Ribbon” for more information about loading a ribbon into the ribbon cassette. Note: 4.
6. Remove the clear wrap from a new ribbon and tear it at the perforation. B Take-up Core A Gear New Ribbon Latches 7. Make sure the preprinted side of the ribbon faces out. Slide the ribbon reel onto the long spool with the foam washer and the take-up reel onto the short spool. Thread the ribbon around the ribbon guide. Turn the ribbon roll slightly to take up some of the excess slack, if necessary. A Ribbon Guide Foam Washer Do not wind the ribbon too tightly.
8. Carefully replace the other half of the ribbon cassette so they fit together completely. Do not wrinkle or crush the ribbon! 9. Rotate the latches until they snap into the locked ( during ribbon loading. ) position. They may have moved 10. Turn the gear counterclockwise with your fingers until you see the black part of the ribbon. The ribbon cassette is ready to use in the printer. See “Loading a Ribbon Cassette” for more information.
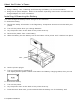
4. Pull out the supply so that a few inches extend past the front of the printer. Center the supply across the platen roller. 5. Raise the supply door back to the upright position but do not close the printer. 6. Remove a couple of labels from the liner. Feed the liner over the platen roller, over the peel bar, and under the peel edge as shown. Center the supply under the peel edge. Peel Bar Peel Edge Liner 7. Close the printer completely. See “Opening & Closing the Printer” for more information.
4. Position a stack of fan-fold supplies so they feed easily into the front of the printer. 5. Feed the fan-fold supply into the supply slot under the supply door and between the supply guides on the core so that a few inches extend past the front of the printer. Center the supply across the platen roller. 6. Close the printer. See “Opening & Closing the Printer” for more information. Make sure the printing side of the supply faces up after you close the printer. 7.
Printing The host sends online packets containing print jobs to the printer. 1. Turn on the printer. You see 2. Download a format and a batch. For information on creating packets and downloading print jobs, refer to the Packet Reference manual available on our Web site. The printer prints either a strip of supplies or one at a time (on-demand mode). 3. Remove the printed supplies. Tearing the Supplies Tear the supply from the right or left using the tear edge as a guide.
3 CARE & MAINTENANCE This chapter explains how to ♦ clear label jams. ♦ clean the printhead, platen roller, and supply sensors. Caution: Do not use sharp objects to clean the printhead or touch the printhead with your fingers. This may damage the printhead and require a service charge. Clearing Label Jams When you are printing and a jam occurs, a supply error message appears. To clear the jam: 1. Turn off the printer by pressing P. 2. Open the printer and remove the supply roll. 3.
4. Clean the printhead with a clean soft cloth, a cotton swab moistened with isopropyl alcohol, or a cleaning pen. Printhead 5. Clean the platen roller with a clean soft cloth moistened with isopropyl alcohol or a cleaning pen. Turn the platen roller with your finger to clean the entire surface. 6. Clean the on-demand and black mark sensors with a clean soft cloth, a cotton swab moistened with isopropyl alcohol, or a cleaning pen. Platen Roller Sensor 7. Allow the printer to dry. 8.
4 TROUBLESHOOTING This chapter lists some common problems and their solutions. Problem Solution Printer does not feed. Use a fully charged battery. Close the printer completely. Load the supply and ribbon correctly. Run the printer diagnostic tests. Refer to the System Administrator's Guide for more information. Printer does not print. Use a fully charged battery. Close the printer completely. Clean the printhead. Run the printhead diagnostics tests.
Error Description 613 Invalid Data Reference point off supply. 614 Invalid Data Portion of field off supply or there may be an invalid character in the packet. 703 Check Supply The printer sensed a calibration of different-sized black marks. Make sure the correct supply is loaded. 704 Check Supply Printer has not sensed a supply mark within the specified number of inches or is out of supplies. Check the supply tracking, supply marks, black mark sensor position, and supply roll for binding.
S P E C I F I C AT I O N S A Printer Specifications Height: 8.0" (203 mm) Width: 10.1" (254 mm) Depth: 4.6" (117 mm) Weight with Battery: 4.7 lbs. (2.14 kg) Display: Graphical 4-line LCD with backlight Printhead: 4" (102 mm) 203 dpi (8 dots per mm) Memory: 32MB RAM 32MB Flash 256MB microSD card (option) Power: 14.
Supply Specifications Supply Types: Thermal direct and thermal transfer labels, tags, fan-fold, or receipt paper. Supply Widths: 2.0" (51 mm) minimum Label with Liner Maximum: 4.65" (118 mm) Thermal Direct 4.10" (104 mm) Thermal Transfer Tag/Receipt Paper Maximum: 4.0” (102 mm) Supply Lengths: 12.0" (305 mm) maximum Maximum Print Area: 4.0" (102 mm) x 12.
ACCESSORIES B Use these part numbers when ordering an item. Call us at the number listed on the back of this manual to order parts or supplies.
B-2 Operator’s Handbook
C PRINTER OPTIONS This appendix lists the options that may be installed in your printer. ♦ Bluetooth® Bluetooth® Bluetooth wireless technology provides a low power-consuming method to communicate between devices. It has a maximum range of 30 feet (10m). Our Bluetooth device connects to your printer’s serial port and conforms to V2.0 of the Bluetooth specification. The printer defaults to receiving unencrypted data for the Bluetooth device.
C-2 Operator’s Handbook
0 28028 Avery Dennison Printer Systems Division 170 Monarch Lane Miamisburg, OH 45342 1-800-543-6650 (In the U.S.A.) 1-800-387-4740 (In Canada) www.monarch.