AVG 8.5 File Server Edition User Manual Document revision 85.2 (8.4.2009) Copyright AVG Technologies CZ, s.r.o. All rights reserved. All other trademarks are the property of their respective owners. This product Inc. Created This product This product uses RSA Data Security, Inc. MD5 Message-Digest Algorithm, Copyright (C) 1991-2, RSA Data Security, 1991. uses code from C-SaCzech library, Copyright (c) 1996-2001 Jaromir Dolecek (dolecek@ics.muni.cz).
Contents ........................................................................................................................ 6 1. Introduction 7 2. AVG ........................................................................................................................ Installation Requirements .......................................................................................................... 7 2.1 Operation Systems Supported ...................................................................
7.1.1 File .......................................................................................................... 22 .......................................................................................................... 22 7.1.2 Components .......................................................................................................... 22 7.1.3 History 7.1.4 Tools.......................................................................................................... 22 7.1.5 Help.........
.......................................................................................................... 44 8.8.3 Resident Shield Detection .......................................................................................................... 48 8.9 Update Manager .......................................................................................................... 48 8.9.1 Update Manager Principles ...................................................................................................
.......................................................................................................... 94 10.11 Anti-Rootkit 10.12 Update .......................................................................................................... 95 .......................................................................................................... 95 10.12.1 Proxy .......................................................................................................... 95 10.12.2 Dial-up ..........
1. Introduction This user manual provides comprehensive documentation for AVG 8.5 File Server. AVG 8.5 File Server is one of a range of award winning AVG products designed to provide you with peace of mind and total security for your PC. As with all AVG products AVG 8.5 File Server has been completely re-designed, from the ground up, to deliver AVG’s renowned and accredited security protection in a new, more user friendly and efficient way. Your new AVG 8.
2. AVG Installation Requirements 2.1. Operation Systems Supported AVG 8.5 File Server is intended to protect fileservers with the following operating systems: · Windows 2000 Server SP4 + Update Rollup 1 · Windows Server 2003 (x86, x64 and Itanium) SP1 · Windows Server 2008 (x86 and x64) (and possibly higher service packs for specific operating systems) 2.2. Minimum Hardware Requirements Minimum hardware requirements for AVG 8.
3. AVG Installation Options AVG can be installed either from the installation file available on your installation CD, or you can download the latest installation file from the AVG website (www.avg.com). Before you start installing AVG, we strongly recommend that you visit the AVG website to check for a new installation file. This way you can be sure to install the latest available version of AVG 8.5 File Server. During the installation process you will be asked for your license/sales number.
4. AVG Installation Process To install AVG on your computer, you need to get the latest installation file. You can use the installation file from the CD that is a part of your box edition but this file might be out-of-date. Therefore we recommended getting the latest installation file online. You can download the file from the AVG website (at www.avg.com) / Downloads section. Once you have downloaded and saved the installation file on your hard disk, you can launch the installation process.
license agreement press the Don't accept button, and the installation process will be terminated immediately. 4.3. Checking System Status Having confirmed the license agreement you will be redirected to the Checking System Status dialog. This dialog does not require any intervention; your system is being checked before the AVG installation can start. Please wait until the process has finished, then continue automatically to the following dialog. 4.4.
4.5. Activate Your AVG License In the Activate your AVG License dialog you have to fill in your registration data. Type in your name (User Name field) and the name of your organization (Company Name field). Then enter your license/sales number into the License Number text field. The license number will be in the confirmation email that you received after purchasing your AVG on-line. You must type in the number exactly as shown.
4.6. Custom Installation - Destination Folder The Destination folder dialog allows you to specify the location where AVG should be installed. By default, AVG will be installed to the program files folder located on drive C:. If you want to change this location, use the Browse button to display the drive structure, and select the respective folder. Press the Next button to confirm. 4.7.
components. However, you can only select from components that are included in your purchased AVG edition. Only those components will be offered to be installed within the Component Selection dialog! · Web Shield is a type of a real time resident protection; it scans the content of visited web pages (and possible files included in them) even before these are displayed in your web browser or downloaded to your computer. · LinkScanner cooperates with Internet Explorer and Firefox (1.5 and newer).
4.9. AVG Security Toolbar In the AVG Security Toolbar dialog, decide whether you want to install the AVG Security Toolbar - if you do not change the default settings, this component will be installed automatically into your Internet browser; in conjunction with AVG 8.5 and AVG XPL technologies to provide you with comprehensive online protection while surfing the Internet. 4.10. Setup Summary The Setup Summary dialog provides an overview of all parameters of the installation AVG 8.
process. Please make sure all the information is correct. If so, press the Finish button to continue. Otherwise, you can use the Back button to return to the respective dialog and correct the information. 4.11. Installing The Installing dialog shows the progress of the installation process, and does not require any intervention. Please wait until the installation is complete, then you will be redirected to the Installation Complete dialog. 4.12.
5. AVG First Run Wizard When you first install AVG on your computer, the AVG First Run Wizard pops up to help you with initial AVG 8.5 File Server settings. Though you can set all of the suggested parameters later on, it is recommended that you take the wizard’s tour to secure your computer’s protection simply and immediately. Follow the steps described in each of the wizard’s windows: 5.1.
5.2. AVG Task Scheduling In the Schedule regular scans and updates dialog set up the interval for new update files accessibility check-up, and define time when the scheduled scan should be launched. It is recommended to keep the default values. Press the Next button to continue. 5.3. Update AVG protection The Update AVG protection dialog will automatically check and download the latest AVG updates. Click on the Next button to download the latest update files and perform the update. AVG 8.
5.4. AVG Configuration Finished Now your AVG 8.5 File Server has been configured; press the Finish button to start working with AVG. AVG 8.5 File Server © 2009 Copyright AVG Technologies CZ, s.r.o. All rights reserved.
6. After Installation 6.1. Product Registration Having finished the AVG 8.5 File Server installation, please register you product online on the AVG website, Registration page (follow the instruction provided directly in the page). After the registration you will be able to gain full access to your AVG User account, the AVG Update newsletter, and other services provided exclusively for registered users. 6.2.
If AVG fails to identify the EICAR test file as a virus, you should check the program configuration again! 6.5. AVG Default Configuration The default configuration (i.e. how the application is set up right after installation) of AVG 8.5 File Server is set up by the software vendor so that all components and functions are tuned up to achieve optimum performance. Unless you have a real reason to do so, do not change the AVG configuration! Changes to settings should only be performed by an experienced user.
7. AVG User Interface AVG 8.
indicates the AVG current status - details >> 7.1. System Menu The System menu is the standard navigation used in all Windows applications. It is located horizontally in the very top part of the AVG 8.5 File Server main window. Use the system menu to access specific AVG components, feature, and services. The system menu is divided into five main sections: 7.1.1. File · Exit - closes the AVG 8.5 File Server's user interface.
7.1.3.
where you have previously placed the update file, and launch the update process. · Advanced settings - opens the AVG advanced settings dialog where you can edit the AVG 8.5 File Server configuration. Generally, it is recommended to keep the default settings of the application as defined by the software vendor. 7.1.5. Help · Contents - opens the AVG help files · Get Help Online - opens the AVG website at the customer support center page · Your AVG Web - opens the AVG homepage (at www.avg.
The orange icon warns that one or more components are incorrectly configured and you should pay attention to their properties/settings. There is no critical problem in AVG and you have probably decided to switch some component off for some reason. You are still protected by AVG. However, please pay attention to the problem component's settings! Its name will be provided in the Security Status Info section.
Components Overview >> · Computer scanner - use this link to open the AVG scanning interface where you can run tests directly, schedule scans, or edit their parameters - see chapter AVG Tests >> · Update now - this link open the updating interface, and launches the AVG update process immediately - see chapter AVG Updates >> These links are accessible from the user interface at all times.
· Update Manager controls all AVG updates - details >> Single-click any component's icon to highlight it within the components overview. At the same time, the component's basic functionality description appears in the bottom part of the user interface. Double-click the icon to open the components own interface with a list of basic statistical data.
· Update - launches an immediate update · Exit - click to close the System Tray Icon (Note that by closing it you will no longer be able to manage and monitor all other components, so you won't be fully protected!) AVG 8.5 File Server © 2009 Copyright AVG Technologies CZ, s.r.o. All rights reserved.
8. AVG Components 8.1. Anti-Virus 8.1.1. Anti-Virus Principles The antivirus software's scanning engine scans all files and file activity (opening/closing files, etc.) for known viruses. Any detected virus will be blocked from taking any action and will then be cleaned or quarantined. Most antivirus software also uses heuristic scanning, where files are scanned for typical virus characteristics, so called viral signatures.
8.1.2. Anti-Virus Interface The Anti-Virus component's interface provides some basic information on the component's functionality, information on the component's current status (Anti-Virus component is active.
8.2. 8.2.1. Anti-Spyware Anti-Spyware Principles Spyware is usually defined as a type of malware, i.e. software, that gathers information from a user's computer without the user's knowledge or consent. Some spyware applications may also be installed on purpose and often contain advertisements, window pop-ups or different types of unpleasant software. Currently, the most common source of infection is websites with potentially dangerous content.
· Spyware in database - number provides the count of spyware samples defined in the latest spyware database version · Latest database update - specifies when and at what time the spyware database was updated · Database version - defines the number of the latest spyware database version; and this number increases with every virus base update There is just one operating button available within this component's interface (Back) - press the button to return to the default AVG user interface (components overview
8.3.2. Anti-Rootkit Interface The Anti-Rootkit user interface provides a brief description of the component's functionality, informs on the component's current status (Anti-Rootkit component is active.) and also brings information on the last time the Anti-Rootkit test was launched. In the bottom part of the dialog you can find the Anti-Rootkit settings section where you can set up some elementary functions of the rootkit presence scanning.
· Back - press this button to return to the default AVG user interface (components overview) 8.4. E-mail Scanner WARNING: This component is not a part of standard AVG File Server installation, so it won't be available to you, unless you have previously selected it in the Custom Installation - Component Selection dialog of the Installation Process! 8.4.1. E-mail Scanner Principles One of the most common sources of viruses and trojans is via e-mail.
8.4.2. E-mail Scanner Interface In the E-mail Scanner component's dialog you can find a brief text describing the component's functionality, information on its current status (E-mail Scanner is active. ), and the following statistics: · Total e-mails scanned - how many e-mail messages were scanned since the E-mail Scanner was last launched (if needed, this value can be reset; e. g.
your account should be scanned for viruses (by default, this item is off) · Display notification icon while E-mail is being scanned - during the scanning the E-mail Scanner component displays a notification dialog informing on an actual task the component is processing (connecting to server, downloading a message, scanning the message, ...
In the E-mail Scanner detection dialog (accessible via system menu option History / E-mail Scanner detection) you will be able to see a list of all findings detected by the E-mail Scanner component.
· License number - provides the exact form of your license number. When entering your license number, you have to be absolutely precise and type it exactly as shown. For your comfort, the License dialog offers the Copy license number link: clicking it allows you to copy the license number into the clipboard, and then you can simply paste it anywhere you like (CTRL+V). · License type - specifies the product edition defined by your license number.
only time that really matters - when you are about to click the link. AVG Search Shield works with Google, Yahoo! and MSN search engines to deliver a real-time safety verdict on all search results, including search ads, displaying an icon to show the safety rating for each site. Note: AVG Link Scanner is not intended for server platforms! 8.6.2.
8.6.3. AVG Search-Shield When searching Internet with the AVG Search-Shield on, all search results returned from the most popular search engines like Yahoo!, Google, MSN, etc. are evaluated for dangerous or suspicious links. By checking these links and marking the bad links, the AVG Security Toolbar warns you before you click on dangerous or suspicious links, so you can ensure you only go to safe websites.
If you still wish to visit the infected page, a link to the page is available on this screen, but continuing to these pages in not recommended! 8.7. Web Shield WARNING: This component is not a part of standard AVG File Server installation, so it won't be available to you, unless you have previously selected it in the Custom Installation - Component Selection dialog of the Installation Process! 8.7.1.
change this settings, we recommend to keep the component active. If the item is checked, and the Web Shield is running, more configuration options are available and editable on two tabs: · Web - you can edit the component's configuration regarding the scan of the website content. The editing interface allows you to configure the following elementary options: o Web protection - this option confirms that the Web Shield should perform scanning of the www pages content.
significantly. You can use the slide bar to specify the maximum size of a file that is still to be scanned with Web Shield. Even if the downloaded file is bigger than specified, and therefore will not be scanned with Web Shield, you are still protected: in case the file is infected, the Resident Shield will detect it immediately. · Instant Messaging - allows you to edit the components settings referring to instant messaging (e.g. ICQ, MSN Messenger, Yahoo ...) scanning.
this dialog · Cancel - press this button to return to the default AVG user interface ( components overview) 8.7.3. Web Shield Detection Web Shield scans the content of visited web pages and possible files included in them even before these are displayed in your web browser or downloaded to your computer.
8.8.2. Resident Shield Interface Besides an overview of the most important statistical data and the information on the component's current status (Resident Shield is active and fully functional), the Resident Shield interface offers some elementary component settings options, too.
o or only after the user's approval (Ask me before removing threats) This choice has no impact on the security level, and it only reflects your preferences. In both cases, you can still select whether you want to Remove cookies automatically. In specific cases you can switch this option on to achieve maximum security levels, however it is switched off by default. (cookies = parcels of text sent by a server to a web browser and then sent back unchanged by the browser each time it accesses that server.
The dialog provides information on the threat detected, and it invites you to decide what action should be taken now: · Heal - if a cure is available, AVG will heal the infected file automatically; this option is the recommended action to be taken · Move to Vault - the virus will be moved to AVG Virus Vault · Ignore - we strictly recommend NOT TO use this option unless you have a very good reason to do so! AVG 8.5 File Server © 2009 Copyright AVG Technologies CZ, s.r.o. All rights reserved.
The Resident Shield detection offers an overview of objects that were detected by the Resident Shield, evaluated as dangerous and either cured or moved to the Virus Vault.
8.9.2. Update Manager Interface The Update Manager's interface displays information about the component's functionality and its current status (Update manager is active.
setting unless you have a true reason to change it! Please note: The software vendor has set up all AVG components to give optimum performance. Unless you have a real reason to do so, do not change the AVG configuration. Any changes to settings should only be performed by an experienced user. If you need to change AVG configuration, select the system menu item Tools / Advanced settings and edit the AVG configuration in the newly opened AVG Advanced Settings dialog.
Ø General - on this tab you can find two sections named Buttons and Ratings. The Buttons section allows you to configure which buttons are visible or hidden on the AVG Security Toolbar. By default all buttons are visible. The Ratings section allows you to determine what type of ratings do you want to be displayed for your search results. By default all ratings are visible but you may hide some of them (when searching from the Yahoo! search box, only safe results are displayed).
o Update - checks for new updates for your AVG Security Toolbar o Help - provides options to open the help file, contact AVG technical support, or view the details of the current version of the toolbar · Yahoo! powered search box - easy and safe way to search the web using Yahoo! search. Enter a word or phrase into the search box press Search to start the search on the Yahoo! server directly, no matter what page is currently displayed. The search box also lists your search history.
9. AVG for SharePoint Portal Server This chapter deals with AVG maintenance on MS SharePoint Portal Server that can be considered a special type of a file server. 9.1. Program Maintenance AVG 8.5 for SharePoint Portal Server uses the Microsoft SP VSAPI 1.4 virus-scanning interface for the protection of your server against possible virus infection. The objects on the server are tested for the presence of malware when they are downloaded and/or uploaded from or on the server by your users.
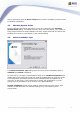
9.2. AVG for SPPS Configuration - SharePoint 2007 In the SharePoint 3.0 Central Administration interface you can easily configure the performance parameters and actions of the AVG 8.5 for SharePoint Portal Server scanner. Choose the Operations option in the Central Administration section. A new dialog will appear. Select Antivirus item in the Security Configuration part. The following window will then be displayed: You can configure various AVG 8.5 for SharePoint Portal Server anti-virus AVG 8.
scanning actions and performance features here: · Scan documents on upload – enable/disable the scanning of documents being uploaded · Scan documents on download – enable/disable the scanning of documents being downloaded · Allow users to download infected documents – allow/disallow users to download infected documents · Clean infected documents – enable/disable automatic erasing of infected documents · Time out duration (in seconds) – the maximum number of seconds the virus scanning process will run after
You can configure various AVG 8.
9.4. AVG for SPPS Edition Diagnostics The diagnostics messages of AVG 8.5 for SharePoint Portal Server can be viewed after choosing the Diagnostics Settings Configuration in the SharePoint Central Administration’s Component Configuration section: All diagnostics information related to AVG 8.5 for SharePoint Portal Server performance are stored in the *_AVG4SPS.LOG file.
10. AVG Advanced Settings The advanced configuration dialog of AVG 8.5 File Server opens in a new window named Advanced AVG Settings. The window is divided into two sections: the left part offers a tree-arranged navigation to the program configuration options. Select the component you want to change the configuration of (or its specific part) to open the editing dialog in the right-hand section of the window.
In the Language selection section you can chose your desired language from the drop-down menu; the language will then be used for the entire AVG user interface. The drop-down menu only offers those languages you have previously selected to be installed during the installation process (see chapter Custom Installation - Component Selection).
should be displayed or suppressed; o Display components state change notifications - decide whether information regarding component's activity/inactivity or its possible problem should be displayed. When reporting a component's fault status, this option equals to the informative function of the system tray icon (color changing) reporting a problem in any AVG component.
· system tray icon - while all parts of AVG are working properly, the icon is displayed in four colors; however, if an error occurs, the icons switches to grey color with a red exclamation mark, · text description of the existing problem in the Security Status Info section of the AVG main window There might be a situation that for some reason you need to switch a component off temporarily (this is not recommended, you should try to keep all components permanently on and in default configuration, but it may
10.3. Virus Vault The Virus Vault maintenance dialog allows you to define several parameters regarding the administration of objects stored in the Virus Vault: · Limit Virus vault size - use the slider to set up the maximum size of the Virus Vault. The size is specified proportionally compared to the size of your local disk. · Automatic file deletion - in this section define the maximum length of time that objects should be stored in the Virus Vault (Delete files older than ...
to keep such a program on your computer, you can define it as a potentially unwanted program exception: The Potentially Unwanted Programs Exceptions dialog displays a list of already defined and currently valid exceptions from potentially unwanted programs. You can edit, delete, or add new exception.
o File - type the full path to the file that you want to mark as an exception o Checksum - displays the unique 'signature' of the chosen file. This checksum is an automatically generated string of characters, which allows AVG to unequivocally distinguish the chosen file from other files. The checksum is generated and displayed after successful addition of the file. o File Info - displays any additional information available about the file ( license/version information etc.
10.5. Web Shield The Web Protection dialog allows you to activate/deactivate the entire Web Shield component (activated by default). For further advanced settings of this component please continue to the subsequent dialogs as listed in the tree navigation. In the bottom section of the dialog, select in which way you wish to be informed about possible detected threat: via standard pop-up dialog, via tray balloon notification, or via tray icon signalization. AVG 8.
10.5.1. Web Protection In the Web Protection dialog you can edit the component's configuration regarding the scan of the website content. The editing interface allows you to configure the following elementary options: · Web protection - this option confirms that the Web Shield should perform scanning of the www pages content. Provided this option is on (by default), you can further switch on/off these items: o Check archives - scan the content of archives possibly included in the www page to be displayed .
o Ports to be scanned - this field lists the standard http communication port numbers. If your computer configuration differs, you can change the port numbers as needed. o Maximum file size to be scanned - if included files are present in the displayed page you can also scan their content even before these are downloaded to your computer. However, scanning of large files takes quite some time and the web page download might be slowed significantly.
In the Instant Messaging Shield dialog you can edit the Web Shield components settings referring to instant messaging scanning. Currently the following three instant messaging programs are supported: ICQ and MSN - tick the respective item for each of them if you want the Web Shield to verify the on-line communication is virus free.
exploitive sites as they are accessed. Known malicious site connections and their exploitive content is blocked as they are accessed by the user via a web browser (or any other application that uses HTTP). · Enable reporting to AVG of exploited websites - (on by default): mark this item to allow back reporting of exploits and bad sites found by users either via Safe Surf or Safe Search to feed the database collecting information on malicious activity on the web. 10.7.
10.7.1. Scan Whole Computer The Scan whole computer option allows you to edit parameters of one of the scans predefined by the software vendor, Scan of the whole computer: Scan settings The Scan settings section offers a list of scanning parameters that can be optionally switched on/off: · Automatically heal/remove infection - if a virus is identified during scanning it can be healed automatically if a cure is available.
adware) and these can then be blocked, or removed; · Scan for Tracking Cookies - this parameter of the Anti-Spyware component defines that cookies should be detected; (HTTP cookies are used for authenticating, tracking, and maintaining specific information about users, such as site preferences or the contents of their electronic shopping carts) · Scan inside archives - this parameters defines that scanning should check all files even those stored inside archives, e.g. ZIP, RAR, ...
10.7.2. Shell Extension Scan Similar to the previous Scan whole computer item, this item named Shell extension scan also offers several options for editing the scan predefined by the software vendor. This time the configuration is related to scanning of specific objects launched directly from the Windows Explorer environment (shell extension), see chapter Scanning in Windows Explorer: The list of parameters is identical to those available for the Scan of the whole computer .
10.7.3. Scan Specific Files or Folders The editing interface for Scan specific files or folders is identical to the Scan Whole Computer editing dialog.
10.7.4. Removable Device Scan The editing interface for Removable device scan is also very similar to the Scan Whole Computer editing dialog: The Removable device scan is launched automatically once you attach any removable device to your computer. By default, this scanning is switched off. However, it is crucial to scan removable devices for potential threats since these are a major source of infection.
· Program update schedule 10.8.1. Scheduled Scan Parameters of the scheduled scan can be edited (or a new schedule set up) on three tabs: On the Schedule settings tab you can first check/uncheck the Enable this task item to simply deactivate the scheduled test temporarily, and switch it on again as the need arises. Next, give a name to the scan you are about to create and schedule. Type the name into the text field by the Name item.
be a specific version of the scan of selected files or folders. In this dialog you can further define the following parameters of the scan: · Schedule running - specify time intervals for the newly scheduled scan launch. The timing can either be defined by the repeated scan launch after a certain period of time (Run every ...) or by defining an exact date and time ( Run at specific time ...), or possibly by defining an event that the scan launch should be associated with (Action based on computer startup).
On the How to scan tab you will find a list of scanning parameters that can be optionally switched on/off. By default, most parameters are switched on and the functionality will be applied during scanning. Unless you have a valid reason to change these settings we recommend to keep the predefined configuration: · Automatically heal/remove infection - (switched on, by default): if a virus is identified during scanning it can be healed automatically if a cure is available.
maintaining specific information about users, such as site preferences or the contents of their electronic shopping carts) · Scan inside archives - (switched on, by default): this parameter defines the scanning should check all files even if they are stored inside an archive, e.g. ZIP, RAR, ...
(Shutdown computer upon scan completion), a new option activates that allows the computer to shut down even if it is currently locked (Force shutdown is computer is locked). On the What to scan tab you can define whether you want to schedule scanning of the whole computer or scanning of specific files or folders. If you select scanning of specific files or folders, in the bottom part of this dialog the displayed tree structure activates and you can specify the folders to be scanned. AVG 8.
10.8.2. Virus Database Update Schedule On the Schedule settings tab you can first check/uncheck the Enable this task item to simply deactivate the scheduled virus database update temporarily, and switch it on again as the need arises. The basic virus database update scheduling is covered within the Update Manager component. Within this dialog you can set up some detailed parameters of the virus database update schedule: Give a name to the virus database update schedule you are about to create.
computer is in low power mode or switched off completely. · Other update settings - check this option to make sure than if the internet connection gets corrupted and the update process fails, it will be launched again immediately after the internet connection is restored.
· Schedule running - specify the time intervals for the newly scheduled program update launch. The timing can either be defined by the repeated update launch after a certain period of time (Run every ...) or by defining an exact date and time (Run at specific time ...), or possibly by defining an event that the update launch should be associated with (Action based on computer startup).
The E-mail Scanner dialog is divided into three sections: · E-mail scanning - in this section select whether you want to scan the incoming/outgoing e-mail messages and whether all e-mails should be certified or only e-mails with attachments (e-mail virus-free certification is not supported in HTML/RTF format). Additionally you can choose if you want AVG to modify the subject for messages that contain potential viruses.
10.9.1. Certification In the Certification dialog you can specify exactly what text the certification note should contain, and in what language. This should be specified separately for Incoming mail and Outgoing mail. AVG 8.5 File Server © 2009 Copyright AVG Technologies CZ, s.r.o. All rights reserved.
10.9.2. Mail Filtering The Attachment filter dialog allows you to set up parameters for e-mail messages attachment scanning. By default, the Remove attachments option is switched off. If you decide to activate it, all e-mail message attachments detected as infectious or potentially dangerous will be removed automatically. If you want to define specific types of attachments that should be removed, select the respective option: · Remove all executable files - all *.
10.9.3. Logs and Results The dialog opened via the Logs and Results navigation item allows you to specify parameters for e-mail scanning results maintenance. The dialog is divided into several sections: · Logs Maintenance - define whether you want to log e-mail scanning information daily, weekly, monthly, ...
In this dialog (opened via Servers / POP3) you can set up a new E-mail Scanner server using the POP3 protocol for incoming mail: · POP3 Server Name - type in the name of the server or keep the AutoPOP3 default name · Type of login - defines the method for determining the mail server used for incoming mail: o Automatic - Login will be carried out automatically, according to your e-mail client settings.
o Fixed host - In this case, the program will always use the server specified here. Please specify the address or name of your mail server. The login name remains unchanged. For a name, you may use a domain name (for example, pop.acme.com) as well as an IP address (for example, 123.45.67.89). If the mail server uses a non-standard port, you can specify this port after the server name by using a colon as the delimiter (for example, pop.acme.com:8200). The standard port for POP3 communication is 110.
In this dialog (opened via Servers / SMTP) you can set up a new E-mail Scanner server using the SMTP protocol for outgoing mail: · SMTP Server Name - type in the name of the server or keep the AutoSMTP default name · Relay Host - defines the method for determining the mail server used for outgoing mail: o Automatic - login will be carried out automatically, according to your e-mail client settings o Fixed host - in this case, the program will always use the server specified here.
· Additional settings - specifies more detailed parameters: o Local port - specifies the port on which the communication from your mail application should be expected. You must then specify in your mail application this port as the port for SMTP communication.
10.10. Resident Shield The Resident Shield component performs live protection of files and folders against viruses, spyware and other malware. In the Resident Shield Settings dialog you can activate or deactivate the Resident Shield protection completely by checking/unchecking the Enable Resident Shield item (this option is switched on by default).
objects (e.g.
scanning, and also a list of file extensions defining files that must be scanned under all circumstances. 10.10.2.Exceptions The Resident Shield - Directory Excludes dialog offers the possibility of defining folders that should be excluded from the Resident Shield scanning.
· Edit list – allows you to edit the list of folders · Remove path – allows you to delete the path to a selected folder from the list 10.11. Anti-Rootkit In this dialog you can edit the Anti-Rootkit component's configuration: Editing of all functions of the Anti-Rootkit component as provided within this dialog is also accessible directly from the Anti-Rootkit component's interface.
· Quick rootkit scan - scans only the system folder (typically c:\Windows) · Full rootkit scan - scans all accessible disks except for A: and B: 10.12. Update The Update navigation item opens a new dialog where you can specify general parameters regarding the AVG update: When to update files In this section you can select between two alternative options: update can be scheduled for the next PC restart or you can launch the update immediately.
restart should be performed: · Require confirmation from the user - you will be asked to approve a PC restart needed to finalize the update process · Restart immediately - the computer will be restarted automatically immediately after the update process has finished, and your approval will not be required · Complete at next computer restart - the update process finalization will be postponed until the next computer restart - again, please keep in mind that this option is only recommended if you can be sure
10.12.1.Proxy The proxy server is a stand-alone server or a service running on a PC that guarantees safer connection to the Internet. According to the specified network rules you can then access the Internet either directly or via the proxy server; both possibilities can also be allowed at the same time.
If you select manual configuration (check the Manual option to activate the respective dialog section) you have to specify the following items: · Server – specify the server’s IP address or the name of the server · Port – specify the number of the port that enables Internet access (by default, this number is set to 3128 but can be set differently – if you are not sure, contact your network administrator) The proxy server can also have configured specific rules for each user.
10.12.2.Dial-up All parameters optionally defined in the Update settings - Dial-Up connection dialog refer to the dial-up connection to the Internet. The dialog's fields are inactive until you check the Use dial-up connections option that activates the fields. Specify whether you want to connect to the Internet automatically (Automatically open this connection) or you wish to confirm the connection manually every time ( Ask before connection).
10.12.3.URL The URL dialog offers a list of Internet addresses from which the update files can be downloaded.
10.12.4.Manage The Manage dialog offers two options accessible via two buttons: · Delete temporary update files - press this button to delete all redundant update files from your hard disk (by default, these files are being saved for 30 days) · Revert virus database to previous version – press this button to delete the latest virus base version from your hard disk, and to return to the previously saved version (new virus base version will be a part of the following update) AVG 8.
10.13. Remote Administration The Remote Administration settings refer to connecting the AVG client station to the remote administration system.
The Test connection button helps you to verify that all above stated data are valid and can be used to successfully connect to DataCenter. Note: For a detailed description on remote administration please consult the AVG Network Edition documentation. AVG 8.5 File Server © 2009 Copyright AVG Technologies CZ, s.r.o. All rights reserved.
11. AVG Scanning Scanning is a crucial part of AVG 8.5 File Server functionality. You can run ondemand tests or schedule them to run periodically at convenient times. 11.1. Scanning Interface The AVG scanning interface is accessible via the Computer Scanner quick link. Click this link to switch to the Scan for threats dialog.
11.2. Predefined Scans One of the main features of AVG is on-demand scanning. On-demand tests are designed to scan various parts of your computer whenever suspicion of possible virus infection arises. Anyway, it is strongly recommended to carry out such tests regularly even if you think that no virus can be found on your computer. In the AVG 8.5 File Server you will find two types of scanning predefined by the software vendor: 11.2.1.
Scan configuration editing You have the option of editing the predefined default settings of the Scan of the whole computer. Press the Change scan settings link to get to the Change scan settings for Scan whole computer dialog. It is recommended to keep to the default settings unless you have a valid reason to change them! · Scanning parameters - in the list of scanning parameters you can switch on/off specific parameters as needed.
· Additional scan settings - the link opens a new Computer shutdown options dialog where you can decide whether the computer should be shut down automatically once the running scanning process is over. Having confirmed this option (Shutdown computer upon scan completion), a new option activates that allows the computer to shut down even if it is currently locked (Force shutdown is computer is locked).
automatically and appear in the text box in the upper part of this dialog. There is also a possibility of having a specific folder scanned while all its subfolders are excluded from this scanning; to do that write a minus sign "-" in front of the automatically generated path. To exclude the entire folder from scanning use the "!" parameter. Finally, to launch the scanning, press the Start scan button; the scanning process itself is basically identical to the scan of a whole computer.
· Scanning parameters - in the list of scanning parameters you can switch on/off specific parameters as needed (for detailed description of this settings please consult chapter AVG Advanced Settings / Scans / Scan Specific Files or Folders). · Scan process priority - you can use the slider to change the scanning process priority. By default, the priority is set to medium level (Automatic scan) that optimizes the scanning process speed and the use of system resources.
option (Shutdown computer upon scan completion), a new option activates that allows the computer to shut down even if it is currently locked (Force shutdown is computer is locked). Warning: These scan settings are identical to the parameters of a newly defined scan - as described in the chapter AVG Scanning / Scan scheduling/ How to Scan.
· Within Windows Explorer highlight the file (or folder) you want to check · Right-click your mouse over the object to open the context menu · Select the Scan with AVG option to have the file scanned with AVG 11.4. Command Line Scanning Within AVG 8.5 File Server there is the option of running the scan from the command line. You can use this option for instance on servers, or when creating a batch script to be launched automatically after the computer boot.
· /EXCLUDE Exclude path or files from scan · /@ Command file /file name/ · /EXT Scan these extensions /for example EXT=EXE,DLL/ · /NOEXT Do not scan these extensions /for example NOEXT=JPG/ · /ARC Scan archives · /CLEAN Clean automatically · /TRASH Move infected files to the Virus Vault · /QT Quick test · /MACROW Report macros · /PWDW Report password-protected files · /IGNLOCKED Ignore locked files · /REPORT Report to file /file name/ · /REPAPPEND Append to the report file · /REPOK
· /ADS Scan Alternate Data Streams (NTFS only) The syntax of the command follows: · avgscanx /parameter ... e.g. avgscanx /comp for scanning the whole computer · avgscanx /parameter /parameter .. with multiple parameters these should be lined in a row and separated by a space and a slash character · if a parameters requires specific value to be provided (e.g.
Control buttons for the scan scheduling Within the editing section you can find the following control buttons: · Add scan schedule - the button opens the Settings for scheduled scan dialog, Schedule settings tab. In this dialog you can specify the parameters of the newly defined test. · Edit scan schedule - this button can only be used if you have already previously selected an existing test from the list of scheduled tests.
On the Schedule settings tab you can first check/uncheck the Enable this task item to simply deactivate the scheduled test temporarily, and switch it on again as the need arises. Next, give a name to the scan you are about to create and schedule. Type the name into the text field by the Name item. Try to use brief, descriptive and apt names for scans to make it easier to later recognize the scan from others.
Control buttons of the Settings for scheduled scan dialog There are two control buttons available on all three tabs of the Settings for scheduled scan dialog (Schedule settings, How to scan and What to scan) and these have the same functionality no matter on which tab you currently are: · Save - saves all changes you have performed on this tab or on any other tab of this dialog and switches back to the AVG scanning interface default dialog.
action is to remove the infected file to the Virus Vault.
Control buttons of the Settings for scheduled scan dialog There are two control buttons available on all three tabs of the Settings for scheduled scan dialog (Schedule settings, How to scan and What to scan) and these have the same functionality no matter on which tab you currently are: · Save - saves all changes you have performed on this tab or on any other tab of this dialog and switches back to the AVG scanning interface default dialog.
scheduled scan dialog (Schedule settings, How to scan and What to scan) and these have the same functionality no matter on which tab you currently are: · Save - saves all changes you have performed on this tab or on any other tab of this dialog and switches back to the AVG scanning interface default dialog. Therefore if you wish to configure the test parameters on all tabs, press the button to save them only after you have specified all your requirements.
- red icon warns there was an infection detected during the scan and it could not be removed! Each icon can either be solid or cut in half - the solid icons stands for a scan that was completed and finished properly; the cut-in-half icon means the scan was canceled or interrupted. Note: For detailed information on each scan please see the Scan Results dialog accessible via the View details button (in the bottom part of this dialog).
The dialog is further divided into several tabs: · Results Overview - this tab is displayed at all times and provides statistical data describing the scan progress · Infections - this tab is displayed only if a virus infection was detected during scanning · Spyware - this tab is displayed only if spyware was detected during scanning · Warnings - this tab is displayed only if some objects unable to be scanned were detected during scanning · Information - this tab is displayed only if some potential threats w
the total number of scanned objects, on the scanning duration and the number of errors that have occurred during scanning. Control buttons There is only one control button available in this dialog. The Close results button returns to the Scan results overview dialog. 11.7.2. Infections Tab The Infections tab is only displayed in the Scan results dialog if a virus infection was detected during scanning.
original location o Moved to Virus Vault - the infected object was moved to the Virus Vault quarantine o Deleted - the infected object was deleted o Added to PUP exceptions - the finding was evaluated as an exception and added to the list of PUP exceptions (configured in the PUP Exceptions dialog of the advanced settings) o Locked file - not tested - the respective object is locked and AVG is therefore unable to scan it o Potentially dangerous object - the object was detected as potentially dangerous but no
· Remove selected infections - use the button to move the selected finding to the Virus Vault · Remove all unhealed infections - this button deletes all findings that cannot be healed or moved to the Virus Vault · Close results - terminates the detailed information overview and returns to the Scan results overview dialog 11.7.3. Spyware Tab The Spyware tab is only displayed in the Scan results dialog in if spyware was detected during scanning.
original location o Moved to Virus Vault - the infected object was moved to the Virus Vault quarantine o Deleted - the infected object was deleted o Added to PUP exceptions - the finding was evaluated as an exception and added to the list of PUP exceptions (configured in the PUP Exceptions dialog of the advanced settings) o Locked file - not tested - the respective object is locked and AVG is therefore unable to scan it o Potentially dangerous object - the object was detected as potentially dangerous but no
· Remove selected infections - use the button to move the selected finding to the Virus Vault · Remove all unhealed infections - this button deletes all findings that cannot be healed or moved to the Virus Vault · Close results - terminates the detailed information overview and returns to the Scan results overview dialog 11.7.4. Warnings Tab The Warnings tab displays information on "suspected" objects (typically files) detected during scanning.
11.8. Virus Vault Virus Vault is a safe environment for the management of suspect/infected objects detected during AVG tests. Once an infected object is detected during scanning, and AVG is not able to heal it automatically, you are asked to decide what is to be done with the suspect object. The recommended solution is to move the object to the Virus Vault for further treatment.
Control buttons The following control buttons are accessible from the Virus Vault interface: · Restore - removes the infected file back to its original location on your disk · Restore As - in case you decide to move the detected infectious object from the Virus Vault to a selected folder, use this button The suspicious and detected object will be saved with its original name. If the original name is not known, the standard name will be used.
12. AVG Updates 12.1. Update Levels AVG offers two update levels to select from: · Definitions update contains changes necessary for reliable anti-virus, anti-spam and anti-malware protection. Typically, it does not include any changes to the code and updates only the definition database. This update should be applied as soon as it is available. · Program update contains various program changes, fixes and improvements.
13. Event History The Event History dialog is accessible from the system menu via the History/Event History Log item. Within this dialog you can find a summary of important events that occurred during AVG 8.5 File Server operation.
14. AVG Diagnostics AVG Diagnostics is a supportive AVG diagnostic utility. Its main purpose is to obtain information from the host computer. This information helps the technical support team to solve your problem with AVG 8.5 File Server by analyzing the collected logs, error reports, system information, suspicious files, your own comments and other data.
structure view of your computer. The attached file will then be listed in the List of attached files section. Control buttons There are two control buttons available in the AVG Diagnostics dialog: · Diagnose and send results - the button opens a new window with information on data being collected from your PC. The data is a significant source of information for the technical support team, and will help us to define the problem and find the respective solution faster.
15. FAQ and Technical Support Should you have any problems with your AVG, either business or technical, please refer to the FAQ section of the AVG website at www.avg.com. If you do not succeed in finding help this way, contact the technical support department by email. Please use the contact form accessible from the system menu via Help / Support by e-mail. AVG 8.5 File Server © 2009 Copyright AVG Technologies CZ, s.r.o. All rights reserved.