Avid Media Composer ® ® Adrenaline ™ Editing Guide m a k e m a n a g e m ove | m e d i a ™ Avid ®
Copyright and Disclaimer Product specifications are subject to change without notice and do not represent a commitment on the part of Avid Technology, Inc. The software described in this document is furnished under a license agreement. You can obtain a copy of that license by visiting Avid's Web site at www.avid.com. The terms of that license are also available in the product in the same directory as the software.
IN NO EVENT SHALL SAM LEFFLER OR SILICON GRAPHICS BE LIABLE FOR ANY SPECIAL, INCIDENTAL, INDIRECT OR CONSEQUENTIAL DAMAGES OF ANY KIND, OR ANY DAMAGES WHATSOEVER RESULTING FROM LOSS OF USE, DATA OR PROFITS, WHETHER OR NOT ADVISED OF THE POSSIBILITY OF DAMAGE, AND ON ANY THEORY OF LIABILITY, ARISING OUT OF OR IN CONNECTION WITH THE USE OR PERFORMANCE OF THIS SOFTWARE.
logo, Trilligent, UnityRAID, Vari-Fi, Video Slave Driver, VideoSPACE, and Xdeck are either registered trademarks or trademarks of Avid Technology, Inc. in the United States and/or other countries. iNEWS, iNEWS ControlAir, and Media Browse are trademarks of iNews, LLC. Aaton is a registered trademark of Aaton S.A. Adobe, Acrobat, and Acrobat Reader are either registered trademarks or trademarks of Adobe Systems Incorporated in the United States and/or other countries.
Contents Using This Guide . . . . . . . . . . . . . . . . . . . . . . . . . . . . . . . . . . . . 29 Who Should Use This Guide . . . . . . . . . . . . . . . . . . . . . . . . . . . . . . . . . 29 About This Guide . . . . . . . . . . . . . . . . . . . . . . . . . . . . . . . . . . . . . . . . . . 29 Symbols and Conventions . . . . . . . . . . . . . . . . . . . . . . . . . . . . . . . . . . . 30 If You Need Help . . . . . . . . . . . . . . . . . . . . . . . . . . . . . . . . . . . . . . . . . .
Using the Avid Media Composer Adrenaline Folder . . . . . . . . . . . . . . . 46 Managing the Avid Projects and Avid Users Folders . . . . . . . . . . . . . . . 47 Using the Avid Projects and Avid Users Folders . . . . . . . . . . . . . . . 48 Changing Project and User Names . . . . . . . . . . . . . . . . . . . . . . . . . 49 Deleting Projects and User Profiles . . . . . . . . . . . . . . . . . . . . . . . . . 50 Retrieving Files from the Avid Attic Folder . . . . . . . . . . . . . . . . . . . . . . .
Mounting All Drives . . . . . . . . . . . . . . . . . . . . . . . . . . . . . . . . . . . . . 79 Session Check List . . . . . . . . . . . . . . . . . . . . . . . . . . . . . . . . . . . . . . . . . 80 Chapter 4 Working with the Project Window . . . . . . . . . . . . . . . . . . . . . . 81 Opening and Closing the Project Window . . . . . . . . . . . . . . . . . . . . . . . 82 Using the Bins Display . . . . . . . . . . . . . . . . . . . . . . . . . . . . . . . . . . . . . . 83 Viewing a List of Bins. . . .
Restoring Default Settings . . . . . . . . . . . . . . . . . . . . . . . . . . . . 107 Copying Settings Between Settings Files . . . . . . . . . . . . . . . . 107 Using Site Settings. . . . . . . . . . . . . . . . . . . . . . . . . . . . . . . . . . 109 Using the Info Display . . . . . . . . . . . . . . . . . . . . . . . . . . . . . . . . . . . . . . 110 Viewing Memory . . . . . . . . . . . . . . . . . . . . . . . . . . . . . . . . . . . . . . . 110 Accessing the Hardware Tool. . . . . . . . . . . . . . . .
Chapter 5 Using Basic Tools . . . . . . . . . . . . . . . . . . . . . . . . . . . . . . . . . . 141 Navigating in Dialog Boxes and Menus . . . . . . . . . . . . . . . . . . . . . . . . 142 Using Toolsets . . . . . . . . . . . . . . . . . . . . . . . . . . . . . . . . . . . . . . . . . . . 142 Opening Toolsets. . . . . . . . . . . . . . . . . . . . . . . . . . . . . . . . . . . . . . 143 Customizing Toolsets. . . . . . . . . . . . . . . . . . . . . . . . . . . . . . . . . . .
Moving Bins into and out of the SuperBin . . . . . . . . . . . . . . . . . . . 168 Moving Clips and Sequences into and out of the SuperBin . . . . . . 168 Copying Clips and Sequences into and out of the SuperBin . . . . . 169 Deleting a Bin with the SuperBin Enabled . . . . . . . . . . . . . . . . . . . 169 Basic Bin Procedures . . . . . . . . . . . . . . . . . . . . . . . . . . . . . . . . . . . . . . 169 Using Bin Display Views . . . . . . . . . . . . . . . . . . . . . . . . . . . . . . . . .
Deleting a Column . . . . . . . . . . . . . . . . . . . . . . . . . . . . . . . . . . 190 Duplicating a Column . . . . . . . . . . . . . . . . . . . . . . . . . . . . . . . 191 Adding Customized Columns to a Bin . . . . . . . . . . . . . . . . . . . 192 Changing a Custom Column Heading . . . . . . . . . . . . . . . . . . . 192 Managing Clip Information in Text View . . . . . . . . . . . . . . . . . . . . 193 Moving Within Column Cells . . . . . . . . . . . . . . . . . . . . . . . . . .
Creating Audio Leader . . . . . . . . . . . . . . . . . . . . . . . . . . . . . . . 221 Storyboard Worksheet . . . . . . . . . . . . . . . . . . . . . . . . . . . . . . . . . . . . . 222 Chapter 7 Managing Media Files . . . . . . . . . . . . . . . . . . . . . . . . . . . . . . . 223 Working with Media Files in an Avid Unity Environment . . . . . . . . . . . . 224 Configuring Avid Editing Systems to Work with MediaManager and TransferManager . . . . . . . . . . . . . . . . . . . . . . . . . . . . . . . . .
Script Integration Workflow . . . . . . . . . . . . . . . . . . . . . . . . . . . . . . 261 Using Script Integration in Video Projects . . . . . . . . . . . . . . . . . . . 262 Script Window Basics . . . . . . . . . . . . . . . . . . . . . . . . . . . . . . . . . . . . . . 263 Script Settings Options . . . . . . . . . . . . . . . . . . . . . . . . . . . . . . . . . 263 Importing a Script. . . . . . . . . . . . . . . . . . . . . . . . . . . . . . . . . . . . . .
Displaying Take Numbers. . . . . . . . . . . . . . . . . . . . . . . . . . . . . . . . 283 Changing the Representative Frame for a Take. . . . . . . . . . . . . . . 283 Loading Takes . . . . . . . . . . . . . . . . . . . . . . . . . . . . . . . . . . . . . . . . 284 Playing Takes . . . . . . . . . . . . . . . . . . . . . . . . . . . . . . . . . . . . . . . . . 284 Adjusting Take Lines . . . . . . . . . . . . . . . . . . . . . . . . . . . . . . . . . . . 284 Indicating Off-Screen Dialog. . . . . . . . . . .
Viewing Methods . . . . . . . . . . . . . . . . . . . . . . . . . . . . . . . . . . . . . . . . . 315 Fast Frame Display in 24p and 25p Projects . . . . . . . . . . . . . . . . . . . . 318 Playing Selected Clips in a Loop . . . . . . . . . . . . . . . . . . . . . . . . . . . . . 318 Loading and Clearing Footage . . . . . . . . . . . . . . . . . . . . . . . . . . . . . . . 319 Loading Footage into the Playback and Pop-up Monitors . . . . . . .
Dragging IN and OUT Points . . . . . . . . . . . . . . . . . . . . . . . . . . 339 Marking an Entire Clip or Segment. . . . . . . . . . . . . . . . . . . . . . . . . 339 Creating Subclips . . . . . . . . . . . . . . . . . . . . . . . . . . . . . . . . . . . . . . 340 Subclips and Audio Sync for 24p and 25p Projects . . . . . . . . . . . . 341 Marking Audio Clips . . . . . . . . . . . . . . . . . . . . . . . . . . . . . . . . . . . . 342 Using Locators . . . . . . . . . . . . . . . . . . . . . . . . . . . .
User Preferences for Creating Tracks . . . . . . . . . . . . . . . . . . . 366 Adding Filler . . . . . . . . . . . . . . . . . . . . . . . . . . . . . . . . . . . . . . . . . . 367 Making an Edit . . . . . . . . . . . . . . . . . . . . . . . . . . . . . . . . . . . . . . . . . . . 368 Creating an Instant Rough Cut . . . . . . . . . . . . . . . . . . . . . . . . . . . 370 Undoing or Redoing Edits. . . . . . . . . . . . . . . . . . . . . . . . . . . . . . . . . . .
Displaying the Timeline Top Toolbar . . . . . . . . . . . . . . . . . . . . . . . 394 Displaying Timecode Tracks in the Timeline . . . . . . . . . . . . . . . . . 394 Assigning Local Colors to Clips in the Timeline . . . . . . . . . . . . . . . 395 Displaying Local and Source Colors in the Timeline . . . . . . . . . . . 396 Displaying Source Colors. . . . . . . . . . . . . . . . . . . . . . . . . . . . . 396 Displaying Local Colors . . . . . . . . . . . . . . . . . . . . . . . . . . . . . .
Extracting/Splicing Segments . . . . . . . . . . . . . . . . . . . . . . . . . 417 Lifting/Overwriting Segments. . . . . . . . . . . . . . . . . . . . . . . . . . 418 Deleting Segments in Segment Mode . . . . . . . . . . . . . . . . . . . 419 Marking Clips and Sequences in Segment Mode . . . . . . . . . . 420 Adding Comments in Segment Mode . . . . . . . . . . . . . . . . . . . . . . 420 Using Advanced Timeline Techniques . . . . . . . . . . . . . . . . . . . . . . . . . 421 Bin Editing into the Timeline .
Finding Black Holes and Flash Frames . . . . . . . . . . . . . . . . . . . . . 448 Finding Black Holes . . . . . . . . . . . . . . . . . . . . . . . . . . . . . . . . . 448 Finding Flash Frames . . . . . . . . . . . . . . . . . . . . . . . . . . . . . . . 448 Printing the Timeline . . . . . . . . . . . . . . . . . . . . . . . . . . . . . . . . . . . . . . . 449 Chapter 12 Working in Trim Mode . . . . . . . . . . . . . . . . . . . . . . . . . . . . . . . 451 Understanding Trim Mode. . . . . . . . . . . . .
Maintaining Sync While Trimming . . . . . . . . . . . . . . . . . . . . . . . . . . . . 475 Adding Black When Trimming . . . . . . . . . . . . . . . . . . . . . . . . . . . . 475 Trimming with Sync-Locked Tracks . . . . . . . . . . . . . . . . . . . . . . . . 477 Using the Transition Corner Display. . . . . . . . . . . . . . . . . . . . . . . . . . . 479 Chapter 13 Working with Audio . . . . . . . . . . . . . . . . . . . . . . . . . . . . . . . . . 481 Exploring the Audio Tools. . . . . . . . . . . . . .
Adjusting Volume While Playing an Audio Mix Effect . . . . . . . . . . . 503 Limitations on Adjusting Volume . . . . . . . . . . . . . . . . . . . . . . . 505 Improving Response Time . . . . . . . . . . . . . . . . . . . . . . . . . . . . 505 Using Audio Gain Automation . . . . . . . . . . . . . . . . . . . . . . . . . . . . . . . . 506 Automation Gain Values and System Clip Gain Values . . . . . . . . . 506 Adjusting Volume in the Timeline . . . . . . . . . . . . . . . . . . . . . . . . . .
Adding an EQ Template to the Audio EQ Tool Fast Menu . . . 537 Adjusting EQ While Playing an Audio Effect . . . . . . . . . . . . . . . . . 539 Understanding Digidesign AudioSuite Plug-Ins . . . . . . . . . . . . . . . . . . 540 Installing AudioSuite Plug-Ins (Windows) . . . . . . . . . . . . . . . . . . . 540 Installing AudioSuite Plug-Ins (Macintosh) . . . . . . . . . . . . . . . . . . 541 Starting and Quitting the DAE Application (Macintosh Only) . . . . .
GPI Signal Sequence When Using the Audio Punch-In Tool Without Preroll or Postroll . . . . . . . . . . . . . . . . . . . . . . . 566 GPI Signal Sequence When Using the Audio Punch-In Tool with Preroll and Postroll . . . . . . . . . . . . . . . . . . . . . . . . 567 Example of Linking GPI Actions to Trigger Signals . . . . . . . . . 567 Connecting a V-LAN VLXi Controller and GPI . . . . . . . . . . . . . . . . 568 Configuring a V-LAN VLXi Controller and GPI . . . . . . . . . . . . . . . .
Ganging Footage in Monitors . . . . . . . . . . . . . . . . . . . . . . . . . . . . . . . . 595 Match framing Footage. . . . . . . . . . . . . . . . . . . . . . . . . . . . . . . . . . . . . 596 Chapter 15 MultiCamera Editing . . . . . . . . . . . . . . . . . . . . . . . . . . . . . . . . 597 Understanding Grouping and Multigrouping Clips . . . . . . . . . . . . . . . . 598 Creating Group Clips . . . . . . . . . . . . . . . . . . . . . . . . . . . . . . . . . . . 599 Creating Multigroup Clips. . . . . . .
Figures 26 Figure 1 Sample Statistics File . . . . . . . . . . . . . . . . . . . . . . . . . . . 114 Figure 2 Sample Spreadsheet Form . . . . . . . . . . . . . . . . . . . . . . 117 Figure 3 Tracking Information Menu. . . . . . . . . . . . . . . . . . . . . . . 305 Figure 4 Keyboard Settings . . . . . . . . . . . . . . . . . . . . . . . . . . . . . 330 Figure 5 Timeline Window . . . . . . . . . . . . . . . . . . . . . . . . . . . . . . 401 Figure 6 Track Selector Panel . . . . . . . . . . . . .
Tables Table 1 Project Types for Media Composer Adrenaline Systems . . . . . . . . . . . . . . . . . . . . . . . . . . . . . . . . . . . . .61 Table 2 Settings Scroll List . . . . . . . . . . . . . . . . . . . . . . . . . . . . . . .95 Table 3 Settings Display Groups . . . . . . . . . . . . . . . . . . . . . . . . .100 Table 4 Navigation Keys. . . . . . . . . . . . . . . . . . . . . . . . . . . . . . . .142 Table 5 Object Icon Descriptions . . . . . . . . . . . . . . . . . . . . . . . . .
Using This Guide Congratulations on your purchase of an Avid™ system. You can use your system to create broadcast-quality output incorporating every possible production element from full-speed, high-resolution footage, to multimedia artwork and animation, to computer-generated effects and titling. n The documentation describes the features and hardware of all models. Therefore, your system might not contain certain features and hardware that are covered in the documentation.
Using This Guide The Contents lists all topics included in the book. They are presented with the following overall structure: • Chapter 1, “Editing Overview,” helps you to get oriented with beginning concepts and a general workflow, and provides valuable pointers to keep in mind as you proceed. • Chapter 2 through Chapter 15 follow the natural flow of your work, with clear and comprehensive step-by-step procedures. • Finally, a detailed Index helps you quickly locate specific topics.
Symbols and Conventions Symbol or Convention Meaning or Action w A warning describes an action that could cause you physical harm. Follow the guidelines in this document or on the unit itself when handling electrical equipment. > This symbol indicates menu commands (and subcommands) in the order you select them. For example, File > Import means to open the File menu and then select the Import command. t This symbol indicates a single-step procedure.
Using This Guide If You Need Help If you are having trouble using Media Composer Adrenaline: 1. Retry the action, carefully following the instructions given for that task in this guide. It is especially important to check each step of your workflow. 2. Check the release notes supplied with your Avid application for the latest information that might have become available after the hardcopy documentation was printed. 3.
If You Have Documentation Comments To access the tutorial from the Tutorial CD-ROM: 1. Insert the Avid Media Composer Adrenaline Tutorial CD-ROM into the CD-ROM drive. 2. Double-click the Mainmenu.exe to start the tutorial. To access the online library from the Online Library CD-ROM: 1. Insert the Avid Media Composer Adrenaline Online Library CD-ROM into the CD-ROM drive. 2. Double-click the Mainmenu.pdf to open the online library. To access the tutorial from the Help: 1.
Using This Guide How to Order Documentation To order additional copies of this documentation from within the United States, call Avid Sales at 800-949-AVID (800-949-2843). If you are placing an order from outside the United States, contact your local Avid representative. Avid Educational Services For information on courses/schedules, training centers, certifications, courseware, and books, please visit www.avid.com/training or call Avid Sales at 800-949-AVID (800-949-2843).
Chapter 1 Editing Overview This chapter provides an overview of the editing workflow. The editing process begins after you transfer your source material to the Avid system. For information about planning a project, capturing your source material, and outputting your final sequence, see the input and output guide.
Chapter 1 Editing Overview Editing Workflow The editing workflow varies depending on your project. For example, you can log your clips before you capture to eliminate creating and organizing bins during editing. The following procedure lists the basic steps to edit a sequence and refers you to other resources for more information: 1. Open a project containing the captured material. 2. Set the appropriate Project settings from the Settings scroll list. See “Using the Settings Scroll List” on page 94. 3.
Starting a Project Starting a Project 1. Turn on your equipment in a prescribed order and start the Avid application. See Chapter 2 2. Select or create a new project: the job that will result in one or more finished sequences. See Chapter 3. 1. Turn on and start your Avid system. 2. Select or create a project. 3. Set the Project settings from the Settings scroll list. See Chapter 4. 3. Set the Project settings. 4. Create and organize bins. See Chapter 6. Settings scroll list 4.
Chapter 1 Editing Overview Preparing to Edit 1. Batch capture, log and capture, or capture on-the-fly your source material into the Avid system. See the input and output guide. 2. Use bins to organize the project items. See Chapter 6. 1. Capture footage, creating master clips and media files. 2. Sort and organize clips in the bins. 3. Manage media files for storage efficiency and backup security. 3. Manage media files by using the Media tool. See Chapter 7. 4. Use the bins to create storyboards.
Editing a Sequence Editing a Sequence 1. View your clips and mark IN and OUT points, or create subclips based on selected portions of your master clips. See Chapter 9. 2. Build your sequence in Source/Record mode, which provides nonlinear editing controls with Source and Record monitors, and in the Timeline. See Chapter 10). 3. Fine-tune your edits and effects by using the various edit modes, such as Segment, Trim, and Effect modes. See Chapter 11, Chapter 12. 1. Screen, mark, and subcatalog footage.
Chapter 1 Editing Overview 40
Chapter 2 Desktop Basics Although most of your work is performed within the Avid application, you need to use a few basic desktop procedures. For example, you use the desktop to move projects and user profiles between systems. This chapter describes the location of the various project files.
Chapter 2 Desktop Basics Working with the Desktop For information on the Windows operating system, such as the desktop and icons, see your Microsoft® Windows Help. For information on the System Folder and other Macintosh® features, such as the desktop and icons, see the Macintosh documentation.
Working with the Desktop Using Shortcut Menus (Windows) Instead of using the standard menus to find the command you need in a window, try using the shortcut menus. To use a shortcut menu, do one of the following: t Right-click in a window to access a shortcut menu that shows the most frequently used commands for that window. t Right-click a screen object to access What’s This? Help for the object.
Chapter 2 Desktop Basics To change the taskbar settings: 1. Right-click an unused part of the taskbar, and select Properties. The Taskbar and Start Menu Properties dialog box opens. 2. Click the General tab. 3. Select the options you want: t To keep the taskbar hidden, deselect “Always on top” and “Auto hide.” t To set the taskbar to appear when you want, select “Always on top” and “Auto hide.” 4. Click OK. n The taskbar can to be dragged to the top, bottom, or either side of the monitor.
Working with the Desktop Dragging Windows (Windows Only) By default, Windows systems show the contents of windows when you drag them. Deselect this option to improve screen display and to avoid problems repainting the screen. To drag windows without showing the contents: 1. Right-click an empty part of the Windows desktop, and select Properties. The Display Properties dialog box opens. 2. Click the Effects tab. 3. Deselect “Show window contents while dragging.” 4. Click OK.
Chapter 2 Desktop Basics Changing Screen Resolution (Windows) To view or change the screen resolution: 1. Right-click an empty part of the Windows desktop, and select Properties. The Display Properties dialog box opens. 2. Click the Settings tab. 3. Under “Screen area,” drag the slider to the resolution you want. 4. Click the Colors pop-up menu, and select True Color (32 bit). 5. Click OK. Changing Screen Resolution (Macintosh) To view or change the screen resolution: 1.
Managing the Avid Projects and Avid Users Folders You should not touch any of these files, except where noted in the following descriptions: • Help folder: This folder contains the Help files. You can find information about Help by clicking Using Help in the Contents list in the Help browser. • Avid application: The application icon resides here.
Chapter 2 Desktop Basics Using the Avid Projects and Avid Users Folders The Avid Projects and Avid Users folders are located in: n • (Windows) drive:\Program Files\Avid\Media Composer Adrenaline • (Macintosh) Macintosh HD/Users/Shared — Files in this folder are available to all users. (Windows only) The location of the user folder and project folder depends on your Avid Media Composer Adrenaline installation.
Managing the Avid Projects and Avid Users Folders Changing Project and User Names You cannot change project or user names from within the Avid application. You must change the names from your desktop before starting the Avid application. For information about the location of the Avid files for the project and user names, see “Using the Avid Projects and Avid Users Folders” on page 48.
Chapter 2 Desktop Basics Deleting Projects and User Profiles You cannot delete projects and user profiles from within the Avid application. You must make the change from your desktop before starting the application. For information about the location of the Avid files for the project and user names, see “Using the Avid Projects and Avid Users Folders” on page 48. n Captured media related to a deleted project is not eliminated with the project folder.
Retrieving Files from the Avid Attic Folder Retrieving Files from the Avid Attic Folder The Avid Attic folder contains backup files of each bin in a project. For information on setting automatic save features, see “Saving Bins Automatically” on page 92.
Chapter 2 Desktop Basics Retrieving Files from the Avid Attic Folder (Windows) To retrieve a file from the Avid Attic folder: 1. Minimize the Avid application. For information on minimizing, see the Windows documentation. 2. From the desktop, double-click the Avid Attic folder, located in drive:\Program Files\Avid\Avid Media Composer Adrenaline. n The Avid Attic folder is usually located in the same folder as the Avid Projects and Avid Users folders.
Retrieving Files from the Avid Attic Folder 10. Select File > Open Bin. Select one of the backup bin files you copied to the desktop, and click Open. When you open the backup bin, a link to the backup bin on the desktop is created in the Other Bins folder. n The Avid application does not allow a bin and a copy of a bin to be open at the same time. You must keep all other bins closed and open the backup bins one at a time. 11. Create a new bin if you do not plan to overwrite existing files. 12.
Chapter 2 Desktop Basics 6. Command (k)+click the files you want to retrieve. 7. Option+drag the selected backup bin files to the desktop. This makes a copy of the files, leaving the original files in the Avid Attic folder. 8. Click the Avid application icon on the Dock to activate the Avid application. 9. Click the Project window to activate it, and click Bins to display the Bins list. 10. Select File > Open Bin. Select one of the backup bin files you copied to the desktop, and click Open.
Starting the Avid Application (Windows) Starting the Avid Application (Windows) For more information on using the Start menu and creating a shortcut, see your Windows Help. c The Avid application is in the following location: drive:\Program Files\Avid\Media Composer Adrenaline For most users, the desktop or the Start menu is a more convenient location for starting the application. The installation process adds a pointer to the Avid application in the Start menu.
Chapter 2 Desktop Basics Starting the Avid Application (Macintosh) The Avid application is in the following location: Macintosh HD/Applications/Avid Media Composer Adrenaline For most users, the desktop or Dock is a more convenient location for starting the application. The installer places a shortcut alias icon for the Avid application on the desktop. n c For more information on making an alias and using the Dock, see your Macintosh documentation.
Chapter 3 Starting a Work Session Your work begins when you turn on the system, start the application, and open an existing project or create a new project that conforms to the specifications of your material. This chapter describes these and other procedures for starting a work session. You can use several techniques to safeguard and restore your work if necessary.
Chapter 3 Starting a Work Session For information on the Windows operating system and terminology, see the Windows Help. For information on the Macintosh features, such as the desktop and icons, see your Macintosh documentation. Opening and Closing a Project When you start your Avid application, the Select Project dialog box opens. Login name The name you used to log in is selected as the user. You can change users.
Opening and Closing a Project Changing Users To change users: 1. Quit the Avid application. 2. Do one of the following: n t (Windows) Select Start > Log Off, and then log in as a different user. t (Macintosh) Select Apple P menu > Log Out, click Log Out, and then click a new user. (Macintosh only) You have to create a new user before you can change to that user. See your Macintosh documentation or the Macintosh Help. 3. Start the Avid application.
Chapter 3 Starting a Work Session n If you plan to move bins and projects from one platform to another, do not use the characters / \ : * ? “ < > | or leading spaces, trailing spaces, or trailing periods, when naming projects, bins, and users. Bin and project names are limited to 27 characters, not including the period and 3-character extension that the system automatically adds to a file name.
Opening and Closing a Project Table 1 Project Types for Media Composer Adrenaline Systems Project Type Source Footage Transfer 23.976p NTSC For film-originated or video-originated footage that has been shot at 23.
Chapter 3 Starting a Work Session 5. Click OK. The system creates the new project files and folder, and then returns to the Select Project dialog box. The project name is highlighted in the Projects scroll list. You are now ready to open the project. See “Opening a Project” on page 70.
Opening and Closing a Project Selecting a Shared Project To select a shared project: 1. Start the Avid application. The Select Project dialog box opens. Shared folder Location Shared option selected 2. Select Shared in the Select a Project area. n You cannot type into the User or Folder text boxes. 3. Select a project, and then click OK. The Project window, the Composer monitor, and the Timeline open with the selected User settings loaded.
Chapter 3 Starting a Work Session Selecting a Private Project To select a private project: 1. Start the Avid application. The Select Project dialog box opens. Login name Private folder location Private option selected 2. Select Private in the Select a Project area. Your private projects appear. n You can’t type into the User or Folder text boxes. 3. Select a project, and then click OK. The Project window, the Composer monitor, and the Timeline open with the selected User settings loaded.
Opening and Closing a Project Selecting an External Project You can select a project that is external to the Avid Projects folder. To select an external project: 1. Start the Avid application. The Select Project dialog box opens. 2. In the Select Project dialog box, select External. 3. Click the Browse button.
Chapter 3 Starting a Work Session 4. The Browse for Folder (Windows) or Project Directory (Macintosh) dialog box opens.
Opening and Closing a Project 5. Navigate to the folder that contains the project you want. 6. Click OK (Windows) or Choose (Macintosh), and then click OK. Browsing for a Project To browse for a project in a location other than the default Shared and Private folders: 1. Start the Avid application. The Select Project dialog box opens. 2. Click the Browse button.
Chapter 3 Starting a Work Session 3. The Browse for Folder (Windows) or Project Directory (Macintosh) dialog box opens.
Opening and Closing a Project 4. Navigate to the folder that contains the project you want. 5. Click OK (Windows) or Choose (Macintosh). Opening a Project Automatically If you have already created a project, when you enter the Avid application you can bypass the Select Project dialog box and have your last project open automatically. n You can automatically open only projects created in the standard shared or private areas. See “Selecting a Project” on page 59. To open a project automatically: 1.
Chapter 3 Starting a Work Session The Select Project dialog box opens. Browse button 3. Select a project and click OK. The Project window, the Composer monitor, and the Timeline open with the selected User settings loaded. Opening a Project To open a project, do one of the following: t Select a project in the Select Project dialog box, and then click OK. t Double-click a project name in the Projects scroll list.
Opening and Closing a Project The title bar of the Project window contains the project name and user name you selected in the Select Project dialog box. Project name User name Close button Using User Profiles You can establish different profiles for a single user without having to log out of your system and log back in under a different name (see “Changing Users” on page 59). You might want separate editing functions to have separate settings, for example.
Chapter 3 Starting a Work Session Creating a User Profile To create a user profile: 1. Click the Settings tab in the Project window. 2. Click the User Profile Selection pop-up menu, and select Create User Profile. User Profile Selection pop-up menu The Create User Profile dialog box opens. 3. Type a name in the Profile Name text box, and then click OK. The new user profile appears selected in the pop-up menu, and the user profile name appears in the Project window title bar.
Opening and Closing a Project Importing a User Profile To import user settings from another user or user profile: 1. Click the Settings tab in the Project window. 2. Click the User Profile Selection pop-up menu, and select Import User or User Profile. 3. Navigate to the user or user profile you want to import. Changing User Profiles To change user profiles: 1. Click the Settings tab in the Project window. 2. Click the User Profile Selection pop-up menu, and select another user profile.
Chapter 3 Starting a Work Session Closing a Project When you close the current project, you return to the Select Project dialog box. To close the current project, do one of the following: t With the Project window active, select File > Close. t Click the Close button in the Project window.
Ending a Work Session 4. Double-click the internal hard drive (Windows) or the Macintosh HD (Macintosh) to open it. 5. Drag a project folder, user folder, or settings file to the targeted storage location. 6. When the system finishes copying the files, unmount the drive or eject the floppy disk and store it where appropriate. Restoring from a Backup To restore a project, user profile, or settings from a backup storage device: 1.
Chapter 3 Starting a Work Session Quitting the Avid Application When you quit the Avid application, it writes a media database file (.mdb) to the workspace in which you are working. Before quitting the Avid application, make sure that the workspace has approximately 50 MB of storage space available. Ask your MediaNetwork administrator to increase the space if you need more storage.
Ending a Work Session To quit the Avid application from an open project: 1. Click the Close button at the far right (Windows) or at the far left (Macintosh) of the Project Window title bar. The Select Project dialog box dialog box opens. 2. Click Quit. 3. Click Leave. Turning Off Your Equipment When you finish using your system and want to turn it off completely, follow these steps to avoid damaging your system or media storage drives. Quit the Avid application before turning off your equipment.
Chapter 3 Starting a Work Session Mounting and Unmounting Drives The Unmount command makes selected media drives inaccessible to the Avid application. If the drive being ejected supports the auto-eject feature (for example, Jaz® drives), the command ejects the disk from the drive. By default, all media drives connected to your system are listed and can be seen by the Avid application. You can remove one or more drives from the list at any time by selecting File > Unmount.
Mounting and Unmounting Drives Unmounting Drives To unmount a drive or make a drive unavailable to the Avid application: 1. With the Avid application running, select File > Unmount. The Unmount Disk or Drives dialog box opens. The scroll list displays all drives currently available. 2. Select a drive to unmount. 3. Ctrl+click (Windows) or Shift+click (Macintosh) to select additional drives. 4. Click Unmount. The drives are no longer available to the Avid application.
Chapter 3 Starting a Work Session Session Check List Turn on your equipment in the proper order: storage first, peripherals second, and system last. For more information, see the Help. On your desktop, move any settings files, project folders, or user folders from another system into the Avid folders (if necessary) before starting the application. Start the Avid application. Create new projects or user profiles, or select existing ones in the Select User and Project dialog box dialog box.
Chapter 4 Working with the Project Window The Project window provides controls for structuring and viewing important information about your current project. You can also modify User, Project, and Site settings from the Project window and display a list of effects.
Chapter 4 Working with the Project Window Opening and Closing the Project Window The Project window provides controls (Bins, Info, and Usage) for structuring and viewing information about your current project. The Project window provides access to the Settings scroll list for altering various User, Project, and Site settings, as well as access to the Effect Palette. You can use the Project window to: • Create and open bins. • View and modify settings. • Access effects.
Using the Bins Display To close the Project window, do one of the following: t With the Project window active, select File > Close Project. t Click the Close button in the Project window. The Select User and Project dialog box opens. Using the Bins Display Bins contain the master clips created when you capture source material. (The master clips are linked to the media files.) Bins also contain the sequences, subclips, group clips, and effect clips that you create during a project.
Chapter 4 Working with the Project Window Displaying Folders of Bins in the Bins List You can add folders to the Bins list in the Project window to help organize your project. You can drag bins into folders or drag folders into folders. See “Managing Folders and Bins” on page 90. Fast Menu button Triangular opener New folders Trash icon To display the folder’s contents in the Bins list of the Project window: t Click the triangular opener next to a folder icon.
Using the Bins Display Creating a Folder in a Project To create a folder in a project: 1. Click the Bins tab in the Project window. 2. Click the Fast menu button, and select New Folder. A new untitled folder appears. 3. Click the untitled folder name in the Bins list and rename it. Creating a New Bin To create a new bin from the Project window: 1. Do one of the following: t Select File > New Bin. t Click the New Bin button in the Project window.
Chapter 4 Working with the Project Window Renaming a Bin Each new bin that you create takes the name of the project that appears in the title bar of the Project window and is numbered incrementally. n If you plan to move bins and projects from one platform to another, do not use the characters / \ : * ? “ < > | or leading spaces, trailing spaces, or trailing periods, when naming projects, bins, and users.
Using the Bins Display Opening and Closing a Bin n If you have the SuperBin enabled, see “Opening Bins in the SuperBin” on page 166. To open a bin directly: 1. Click the Bins tab in the Project window. 2. Double-click the Bin icon next to the bin name. The bin opens in a separate window. The Bin icon appears dimmed in the Bins list, indicating the bin is open. Opening Selected Bins To open several bins at once from the Project window: 1. Click a Bin icon in the Bins list. 2.
Chapter 4 Working with the Project Window The bin appears in the Bins list in the Project window in a folder called Other Bins. The name Other Bins appears in italic. You can rename this folder. This option is useful when you want to open a bin not currently displayed in the Project window. n The Other Bins folder disappears from the Bins list when you delete all the bins in the Other Bins folder.
Using the Bins Display To delete a bin or folder from the Project window: 1. Select the bin or the folder you want to delete in the Bins list. 2. Press the Delete key. A Trash icon appears in the Bins list in the Project window. The Trash contains the deleted item. The deleted item is stored in the Trash until you empty it. n The Trash is not visible in the Project window until you delete your first item.
Chapter 4 Working with the Project Window To empty the Trash in the Bins list: 1. Click the Fast Menu button, and select Empty Trash. A message box opens. 2. Click Empty Trash to delete the bins or folders from the Trash and from your system drive. Managing Folders and Bins You can use the Project window to create hierarchies of folders and bins that reflect the specific workflow of the current project. This structure provides both simplicity and backup security.
Using the Bins Display A format cuts bin for storing the final cuts with added format elements such as segment breaks, color bars and tone, slate, or countdown n For information on creating Script windows using scripts for your projects, see Chapter 8. • (Option) Create additional folders at the desktop level for better organization. For example, you can create one folder for each capture bin and show cut bin, or a folder to contain all shot logs to be imported.
Chapter 4 Working with the Project Window Saving Bins Automatically The Avid system automatically saves changes to your work on a regular basis during each session. You can modify the frequency of the automatic backups by using the Bin settings in the Settings scroll list in the Project window. When you are working with bins, an asterisk (Windows) or a diamond (Macintosh) appears before the bin name in the bin’s title bar.
Using the Bins Display n Setting both the maximum number of files stored in the Avid Attic folder and the maximum number of versions of a bin to zero deletes existing files in the project folder in the Avid Attic folder and prevents any backup bins from being saved. For more information about backup options, click the Bin Settings dialog box and press F1 (Windows) or the Help key (Macintosh), or see “Bin Settings” in the Help.
Chapter 4 Working with the Project Window Using the Settings Scroll List From the Settings scroll list in the Project window, you can view, select, open, and alter various User, Project, and Site settings. To view the Settings scroll list: t Click the Settings tab in the Project window.
Using the Settings Scroll List n • Project settings are directly related to individual projects. When you change a Project setting, it affects all editors working on the project. Specific Project settings are stored in each project folder. • Site settings establish default parameters for all new users and projects on a particular system. They can apply to particular configurations of equipment installed at the site (for example, specification and node settings for an external switcher).
Chapter 4 Working with the Project Window Table 2 Settings Scroll List (Continued) Setting Name Description For More Information Composer Configures the display and behavior of buttons and information in the Playback, Source, and Record monitors. See “Understanding Composer Settings” on page 314. Communication (Serial) Ports Configures the serial ports on your system See “Using the Communication (Serial) for deck control. Ports Tool” on page 157.
Using the Settings Scroll List Table 2 Settings Scroll List (Continued) Setting Name Description For More Information Grid Defines the grid to use when you create effects. See “Setting the Effect Grid Options” in the Help. Import Sets parameters for file import. See “Import Settings Options” in the Help. Interface Defines the appearance and function of certain interface elements. See “Interface Settings” in the Help and “Customizing the Appearance of the Avid User Interface” on page 118.
Chapter 4 Working with the Project Window Table 2 Settings Scroll List (Continued) Setting Name Description For More Information Timecode Window Displays various timecodes in an adjustable window. Appears in the Settings scroll list to facilitate copying settings. See “Displaying Timecode in the Timecode Window” on page 312. To access the Timecode window: t Select Tools > Timecode Window. Timeline Contains general Timeline preferences. See “Timeline Settings Options” on page 400.
Using the Settings Scroll List Defining Settings You can use the Settings scroll list to establish a hierarchy of settings that address the specific needs of each production phase.
Chapter 4 Working with the Project Window Reviewing Basic Settings For information on the following basic system settings, see: • ”Film Settings” in the Help • ”Bin Settings” in the Help • ”General Settings” in the Help • ”Interface Settings” in the Help To view the settings: t Double-click each setting in the Settings scroll list in the Project window.
Using the Settings Scroll List Table 3 Settings Display Groups (Continued) Option Description Workspaces Displays all the Workspace settings you created Workspace Linked Displays only the linked workspaces Changing the Settings Scroll List Display To change the Settings scroll list display in the Project window: 1. Click the Settings tab in the Project window. The Settings scroll list appears. 2. Click the Fast Menu button, and select a settings display group from the Settings menu.
Chapter 4 Working with the Project Window Working with Settings You can view and modify most of your current settings by double-clicking them in the Settings scroll list in the Project window and by selecting new options. You can duplicate, rename, copy, and move settings among files or systems. Selecting Another User Because User settings are not project or site specific, you can display another set of User settings in the Project window. To select another user: 1.
Using the Settings Scroll List Modifying Settings You can alter the default options for various settings to reflect the specific needs of a project or to customize the system based on personal preferences.
Chapter 4 Working with the Project Window Working with Multiple Settings You can have multiple versions of settings in your Settings scroll list in the Project window that apply to several users at various stages of production.
Using the Settings Scroll List Naming Settings You can give settings custom names to differentiate among copies or to indicate a specific use. To enter a custom setting name: 1. Click the Settings tab in the Project window. The Settings scroll list appears. 2. Click the Custom setting name column located to the right of the setting name. Custom setting name column 3. Type a name, and press Enter (Windows) or Return (Macintosh). The new name appears in the list and is saved in the settings file.
Chapter 4 Working with the Project Window Selecting Among Multiple Settings With multiple settings, only one setting at a time is active. Settings that are currently active have a check mark to the left of the setting name. To change the active setting: 1. Click the Settings tab in the Project window. The Settings scroll list appears. 2. Click in the space to the left of the setting that you want to select as the active setting.
Using the Settings Scroll List Restoring Default Settings To restore settings to their default values: 1. Click the Settings tab in the Project window. The Settings scroll list appears. 2. Click a setting to select it. Ctrl+click (Windows) or Shift+click (Macintosh) each additional setting you want to select. 3. Select Special > Restore to Default. A message box opens, asking whether you want to save the settings. 4.
Chapter 4 Working with the Project Window t Open an existing settings file by selecting File > Open Settings File, locate and select a settings file (which has the file name extension .avs), in the Avid Projects or Avid Users folder, and then click Open. The settings file window opens. 2. Click the setting you want to copy in the Settings scroll list in the Project window. Ctrl+click (Windows) or Shift+click (Macintosh) any additional settings that you want to copy. 3.
Using the Settings Scroll List Do one of the following: t Click Add to add the new settings to the project without affecting the project’s current settings. t Click Replace to replace the current version of each setting with the new settings. Additional versions of each setting are not affected. Using Site Settings When the system opens a new project, it first searches the Site_Settings file and loads site settings and any settings placed here.
Chapter 4 Working with the Project Window 5. Close the Site Settings window. All new users and projects opened from the Select Project dialog box use these settings as the default settings. Using the Info Display The Info display in the Project window allows you to view basic project information, such as the video format (NTSC, for example). The displayed information lists the options you selected in the New Project dialog box when you created the project.
Using the Info Display The Memory window displays the following information: • Objects: The total number of memory handles currently used by the Avid system. Objects include memory requirements of the application, such as windows, as well as clips, sequences, and other items associated with a project. • Total physical memory (Windows) or Total Mem (Macintosh): The total number of bytes of RAM (random-access memory).
Chapter 4 Working with the Project Window Accessing the Hardware Tool The Hardware tool gives a visual representation of usage for each drive and provides operating system information. To open the Hardware tool, do one of the following: t Click the Info tab in the Project window, and then click the Hardware button. t Select Tools > Hardware. The Hardware tool opens. n For more information about the Hardware tool, see “Using the Hardware Tool” on page 156.
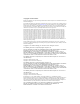
Displaying Usage Information Statistics File Structure and Layout A new statistics file is created each time you open the project. The files are stored in a Statistics folder inside each project folder. The file name has the following format: Statistics.yymmdd.
Chapter 4 Working with the Project Window The statistics file is formatted as comma-separated ASCII text, so it can be accepted by a variety of software programs. Each line in the file is tagged with indicators for identifying content and data type to assist in programming custom applications. Figure 1 shows a sample statistics file.
Displaying Usage Information Description of Statistics File Values The values in the first column indicate the content of the line: 01 title1 02 title2 03 heading 100 project info 101 Time Project open 102 Capture tool open 104 Capture tool active 105 Captured Media bytes used 106 Rendered Effects bytes used 110 Effects rendering time 111 Title tool open 113 Title tool active 114 Title tool rendering 115 Capture tool capturing 116 Capture tool logging 117 user comments The
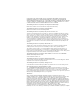
Chapter 4 Working with the Project Window Importing the Statistics File into a Spreadsheet You can import the statistics file into a spreadsheet or other program as an ASCII file and use the application (for example, Microsoft Excel) to set up the proper format. To create a statistics file in Microsoft Excel: 1. Start Microsoft Excel. 2. Select File > Open, and navigate to the statistics file you want to import. (Windows only) Make sure All Files (*.*) is selected in the Files of Type list. 3. Click Open.
Displaying Usage Information Spreadsheet Form of Statistics Data File Figure 2 is the same sample file as it appears when you import it into a spreadsheet.
Chapter 4 Working with the Project Window Displaying Disk Space Statistics To improve system performance, statistics for disk space (captured media and rendered effects) are not calculated and are not displayed in the Usage window, unless you issue a Console command. To display disk space statistics in the Usage window: 1. Select Tools > Console. 2. In the command entry text box, type: toggleStatSpace 3. Press Enter (Windows) or Return (Macintosh). 4. Select File > Load Media Database.
Customizing the Appearance of the Avid User Interface Changing Interface Component Colors You can use a color selection grid to change the color of interface components. For the interface components that you can customize, see “Customizable Interface Components” in the Help. n The Settings scroll list has several Interface templates with predefined color schemes. For information about using the Interface templates, see “Using Interface Appearance Templates” on page 125.
Chapter 4 Working with the Project Window 3. Click in the color box next to the interface component that you want to customize. A color selection grid opens. 4. Click the color to which you want to set your interface component. The color selection grid disappears. The color you selected appears in the color box. A check mark appears in the check box to show that you want your new color attribute for this component to take effect.
Customizing the Appearance of the Avid User Interface 4. Do one of the following: t n Click Apply to apply the change you selected. If you click Cancel after you click Apply, Shading Style retains the selection you applied. t Click OK to close the dialog box and put the new setting into effect. t Click Cancel to close the dialog box. The change you selected but did not apply does not take effect. The following examples show the shading styles.
Chapter 4 Working with the Project Window 4. Do one of the following: t n Click Apply to apply the change you selected. If you click Cancel after you click Apply, Shading Depth retains the selection you applied. t Click OK to close the dialog box and put the new setting into effect. t Click Cancel to close the dialog box. The change you selected but did not apply does not take effect. The following examples show Shading Depth selections of 5% and 50%.
Customizing the Appearance of the Avid User Interface 3. Do one of the following: t Click the Monitor Button Separation pop-up menu, and select a separation setting. t Click the Timeline Button Separation pop-up menu, and select a separation setting. 4. Do one of the following: t n Click Apply to apply the change you selected. If you click Cancel after you click Apply, Button Separation retains the selection you applied. t Click OK to close the dialog box and put the new setting into effect.
Chapter 4 Working with the Project Window Changing Button Style Button style controls the shape of buttons in the interface. To change the style of buttons: 1. In the Project window, double-click the Interface Settings. The Interface dialog box opens. 2. Click the Appearance tab. 3. Click the Button Style pop-up menu, and select a button style. 4. Do one of the following: t n Click Apply to apply the change you selected.
Customizing the Appearance of the Avid User Interface Using Interface Appearance Templates There are several interface appearance templates available for the Avid user interface that have preset background and button colors. To use an interface appearance template: t Click to the left of one of the named Interface settings in the Settings scroll list in the Project window. The look of your Avid user interface changes.
Chapter 4 Working with the Project Window Window Location of Changes (Continued) Composer Changes the font and point size of the sequence or source clip name text; saved as a Composer setting. Script Changes the font and point size of the text in the Script window; saved as a Script setting. Timeline Changes the font and point size of clip text; saved as a Timeline View setting. To change the font displayed in the Project, Timeline, Composer, Script, or Bin window: 1.
Customizing Your Workspace Customizing Your Workspace A workspace is the arrangement and size of tool windows displayed on your Avid system. If you are accustomed to working with a particular group of windows arranged and sized in a particular setup, you can assign them to a workspace setting that you can then recall with a workspace button. For example, during capture you might want to display the Capture tool and Video Input tool in specific locations.
Chapter 4 Working with the Project Window Creating a New Workspace Setting To create a new workspace setting: 1. Click the Settings tab in the Project window. The Settings scroll list appears. 2. Scroll to the bottom of the Settings scroll list, and select Workspace. Workspace is highlighted. 3. Select Edit > Duplicate. A new workspace setting appears in the Settings scroll list. n If you are duplicating a previously named workspace setting, a .1 appears at the end of the new name. 4.
Customizing Your Workspace 6. Open the windows and tools with which you want to associate the workspace. Resize and move the windows to the location you want them to appear on the monitors. 7. Double-click the custom workspace setting. The Workspace Settings dialog box opens. 8. Select or deselect the following options, depending on your preference for the behavior of the workspace: - Activate Settings Linked By Name: This setting allows you to link other settings to the workspace.
Chapter 4 Working with the Project Window To link user settings and a workspace: 1. Create a new workspace setting. See “Creating a New Workspace Setting” on page 128. 2. Give the workspace a custom name. 3. Click a setting in the Settings scroll list that you want to link to the new workspace. For example, click Timeline View. Adjust the Timeline to what you want displayed (enlarged tracks, audio waveform, and so forth).
Customizing Your Workspace Switching Between Workspaces To switch from one workspace to another: 1. Click the Settings tab in the Project window. The Settings scroll list appears. 2. Click to the left of the workspace setting you want to use. A check mark appears next to the workspace. You can also switch between workspaces by using the workspace buttons. To assign workspace buttons, see “Assigning a Workspace Button” on page 131. Deleting a Workspace To delete a workspace: 1.
Chapter 4 Working with the Project Window 2. Select Tools > Command Palette. W1 button More tab 3. Click the More tab. 4. Select Button to Button Reassignment. 5. Click a workspace button (W1 – W8), and drag the button to a location on another palette (for example, the Tool palette) or the Keyboard setting. The buttons are assigned to the workspaces in the Settings scroll list in the Project window in the order that they appear.
Sharing Bins and Projects on Avid Unity MediaNetwork Sharing Bins and Projects on Avid Unity MediaNetwork Read this section if you are working in an Avid Unity environment that does not use Avid Unity MediaManager. If you are using Avid Unity MediaManager, see the Avid Unity MediaManager Setup and User’s Guide. Understanding Avid Unity MediaNetwork Avid Unity MediaNetwork allows you to share bins and projects across the network.
Chapter 4 Working with the Project Window Mapping Workspaces on the Avid Unity Network For information on mapping workspaces, see the MediaNetwork clients quick start cards. These instructions assume that Avid Unity MediaNetwork is up and running. For details on Avid Unity MediaNetwork, see the Avid Unity MediaNetwork Management Guide. Sharing Methods Before you begin copying or creating bins and projects on an Avid Unity MediaNetwork workspace, determine the sharing method you will use for the project.
Sharing Bins and Projects on Avid Unity MediaNetwork The folder is similar to the folder created when you select New Folder from the Project Window Fast menu. For more information, see “Managing Folders and Bins” on page 90. n • Displays an extra column in the Project window that identifies the computer that has the bin locked. • Uses bold text to identify bins that are locked by other users. • Creates a folder at the top level of the shared workspace called Unity Attic.
Chapter 4 Working with the Project Window The following illustration shows the contents of a shared workspace at the desktop level. Shared projects Shared media files Unity Attic Opening a Shared Project To open an existing project on the shared volume: 1. Start your Avid application. 2. In the Select Project dialog box, navigate to the project on Avid Unity MediaNetwork. The Project window opens.
Sharing Bins and Projects on Avid Unity MediaNetwork The following illustration shows locked and unlocked bins. Unlocked bin Locked bin When a bin is unlocked, you have permission to make changes. You should not make changes to a locked bin. See “Restrictions and Limitations for Locked Bins” on page 138. n The Bin Lock Status button does not appear if the bin is not on Avid Unity MediaNetwork.
Chapter 4 Working with the Project Window If one user has the lock and another user has the same bin open, when the first user closes the bin, the second user must close and reopen the bin to get the lock. You can click the red or green Bin Lock Status button in the bin to view a history file that shows which computers and users have modified the bin. To open a bin without taking the lock: t Alt+double-click (Windows) or Option+double-click (Macintosh) the bin in the Project window.
Sharing Bins and Projects on Avid Unity MediaNetwork • You cannot drag to a locked bin. • If you drag from a locked bin to a writable bin, the Avid system creates a duplicate (not a copy) of the selection in the writable bin. The original item is not removed from the locked bin. This operation is the equivalent of duplicating a selection and then dragging the duplicate to another bin. • You cannot move a bin that is locked by another user.
Chapter 4 Working with the Project Window 140
Chapter 5 Using Basic Tools The Tools menu on the Avid application menu bar provides quick access to essential tools that you can use in your projects.
Chapter 5 Using Basic Tools Navigating in Dialog Boxes and Menus You can use the keys shown in Table 4 to navigate in many dialog boxes and menus and to select and deselect options.
Using Toolsets The Toolset menu provides you with five environments, or special-purpose workspaces, that include the following: • Tools appropriate for the task • A screen optimized for the task, screen resolution, and number of monitors • A neatly organized workspace with non-overlapping windows You can change the toolset workspace, restore it to the default arrangement, or link it to other settings. For example, you might want each toolset to appear with a different color scheme.
Chapter 5 Using Basic Tools Linking Toolsets to Other Settings You can link the current toolset to custom User settings. To link a toolset to another setting: 1. Select Toolset > toolset (the toolset you want to link). 2. Select Toolset > Link Current to. The Link Toolset dialog box opens. 3. Click the Links to Current Toolset pop-up menu, and select Link to Named Settings. 4. Type the name of the other setting to which you want to link the toolset.
Using the Tools Menu Using the Tools Menu You can open any of the most frequently used system tools from the Tools menu located on the Avid application menu bar. To open a tool: t Select Tools > tool name. The Tools menu also allows you to activate or open windows that have been closed or are covered by other windows. These include any open tools, the Composer window, Timeline, and Project window. The following sections describe several basic tools that you can use at any time during a project.
Chapter 5 Using Basic Tools The Avid Deck Manager program is initialized, and a new Deck Controller window opens.
Using the Command Palette For more information on logging, see “Logging Directly into a Bin” in the Help. • The Deck Selection pop-up menu allows you to specify a deck with deck control parameters that you can customize in the Deck Settings dialog box. For more information, see “Deck Settings” in the Help. • The deck controller allows you to associate a tape name with the controller by clicking the Tape Name button and selecting a tape in the Select Tape dialog box.
Chapter 5 Using Basic Tools The Command palette organizes buttons by editing function. Tabs are displayed for each editing function and the buttons that perform those functions are displayed in each tab. The functions are Move, Play, Edit, Trim, FX (Effects), 3D, CC (Color Correction), MCam (MultiCamera), Other, and More. n When you are working with a 24p project, the Command palette displays the Step Forward 8 Frames button and Step Backward 8 Frames button.
Using the Command Palette Understanding Button Mapping Mapping user-selectable buttons allows you to reconfigure Tool palettes or the keyboard in various combinations to suit different editing needs. n When you map buttons to the keyboard, the mapping might be specific to the current editing mode. For example, buttons mapped to the Page Up or Page Down key revert to the default key functions when you enter Effect mode. After you exit Effect mode, the keys return to the mapped function.
Chapter 5 Using Basic Tools For more information on multiple settings, see “Working with Multiple Settings” on page 104. When you remap buttons or commands, the system immediately saves your new configuration in one of the default settings that you can open from the Project window. You can also save, rename, and recall multiple versions of any of these settings to serve various purposes.
Using the Command Palette 2. Select Tools > Command Palette. The Command palette opens. 3. Select Button to Button Reassignment at the bottom of the Command palette. 4. Click the tab from which you want to select a user-selectable button. 5. Drag the button from the Command palette to a button location on the other palette. Using the Blank Button The Blank button in the Other tab of the Command palette allows you to replace a defined button with an undefined button.
Chapter 5 Using Basic Tools For example, on a Windows system, if you map the Add Alt Key button to the Mark IN key (I key), the function of the I key changes to Go to IN Point (which is equivalent to pressing Alt+I). For a list of other functions that use modifier keys, select Help > Shortcuts.
Using the Command Palette t Open the Keyboard palette from the Settings scroll list in the Project window. 2. Select Tools > Command Palette. The Command palette opens. n When you are working with a 24p project, the Command palette displays the Step Forward 8 Frames button and Step Backward 8 Frames button. 3. Click a target button in the Keyboard palette or other palette (for example, the Command palette under a monitor). The pointer changes to a small white menu. 4.
Chapter 5 Using Basic Tools Using the Avid Calculator The Avid Calculator helps you calculate video and film durations, and convert timecode and film key numbers to different formats. For example, you can: • Convert drop-frame to non-drop-frame timecode values. • Convert timecode durations between 30-fps and 25-fps projects. • Convert a duration in video to the corresponding length in footage and frames for measuring 35mm film. To use the Avid Calculator: 1. Select Tools > Calculator.
Using the Console Window Using the Console Window The Console window provides a number of features, including: c • Current system information, including your system ID number • A log of error messages • Detailed information about sequence segments in the Timeline or about objects in a bin • Information after you capture or import Do not use the programming features of the Console without guidance from Avid professionals. Contact your Avid Reseller with specific questions.
Chapter 5 Using Basic Tools Getting Information with the Console This Console window provides quick access to bin information such as total duration of selected clips or total items in a bin including hidden items. You can also use the Console window to display information about a clip, segment, or sequence in the Timeline. To get information with the Console window: 1. Select Tools > Console. The Console window opens. 2.
Using the Communication (Serial) Ports Tool The Hardware tool contains the following information: • Each online drive is listed on the left side of the Drives tab. The name of each drive and its total size are listed below each Drive icon. The shaded portion of the bar graph to the right of each drive shows the amount of storage space currently filled. The number in the bar graph indicates the amount of available drive storage space for each drive.
Chapter 5 Using Basic Tools To access the Communication (Serial) Ports tool: 1. Select Tools > Communication (Serial) Ports. The Communication (Serial) Ports tool opens. 2. Assign ports for deck control and other devices, as necessary, by selecting a port or no port from any of the pop-up menus. 3. Close the Communication (Serial) Ports tool. n 158 The options available in the Communication (Serial) Ports tool vary depending on what peripheral equipment you have connected to your system.
Chapter 6 Organizing with Bins The Avid system provides powerful database tools for organizing and managing your captured material. You can view bins in four different display views. You can rename, sort, sift, duplicate, and delete clips and sequences. You can also print single-clip frames or whole bins. A worksheet at the end of this chapter provides guidelines for using these techniques to create and print storyboards for your project.
Chapter 6 Organizing with Bins Preparing to Work with Bins There are several procedures you might want to perform before organizing your project because they affect the display of information in bins or the way the clips play back during screening: • If you want to center the pan between the left and right speakers for some or all of the clips in a bin, see “Adjusting Audio Pan Defaults” on page 160.
Preparing to Work with Bins For information on using the Audio Mix tool to adjust pan for individual clips in a sequence, see “Using the Audio Mix Tool” on page 495. You can set global pan settings before or during editing by using the Audio Settings dialog box and the Center Pan command, as described in this section.
Chapter 6 Organizing with Bins and A2. Panning all the audio to center eliminates the distraction of having to listen to left and right speakers, in turn. It also smooths the playback of the edited sequence because all shots are panned to center. To adjust the pan on clips: 1. In a bin, select the clips you want to pan to the center. 2. Select Clip > Center Pan. A dialog box opens and asks you to confirm the pan. 3. Click OK. The system pans all the selected clips to the center.
Preparing to Work with Bins 6. Select Fill Undecodeable Frames to instruct the system to fill in any timecode breaks with continuing timecode. This is the default. For example, in a 3-minute master clip, the audio timecode starts at 1:00:20:20. At 1:00:22:10, the timecode ends. With the Fill Undecodeable Frames option selected, the system assigns 1:00:22:11 to the next frame and continues assigning timecode. n Do not select this option if you do not want to fill timecode breaks. 7.
Chapter 6 Organizing with Bins Setting the Bin Display By default, your bins display all existing media objects except source clips and rendered effects. To reduce crowding in the bin and to display only those objects that you need to organize your project, you can display selected media objects. You can use the Set Bin Display option to display clips referenced by a sequence, even if the clips were not previously in the bin. Place a sequence in a new bin, and follow this procedure.
Preparing to Work with Bins Table 5 Object Icon Object Icon Descriptions Object Description Master Clips Clips that reference audio and video media files formed from captured footage or imported files. Subclips Clips that reference selected portions of master clips. Sequences Clips that represent edited programs, partial or complete, that you created from other clips. Sources Clips that reference the original videotape source footage for master clips.
Chapter 6 Organizing with Bins Conserving Screen Real Estate with the SuperBin You can use the SuperBin to conserve screen real estate. The SuperBin lets you open different bins in a single bin window and switch between the bins, keeping them open with only one visible at a time. You can also switch a bin between being open in its own window and being open in the SuperBin, and you can move or copy clips and sequences into or out of the SuperBin.
Conserving Screen Real Estate with the SuperBin 3. Single-click a bin name. The bin opens in the SuperBin. The SuperBin icon appears in the upper left corner, and the title is SuperBin: bin name. n Double-clicking a bin opens it in its own window, not in the SuperBin. SuperBin button To view a bin previously opened in the SuperBin: t n Click the SuperBin button, and then select a bin. If you have no other bins open in the SuperBin, you will not see a pop-up menu when you click the SuperBin button.
Chapter 6 Organizing with Bins Moving Bins into and out of the SuperBin You can move bins currently displayed in their own windows into the SuperBin. You can also move a bin displayed in the SuperBin into its own window. To move an opened bin into the SuperBin: 1. Click the Bins tab in the Project window. 2. Double-click the open bin’s icon in the Project window. The individual bin window closes, and the bin appears in the SuperBin. To move a bin out of the SuperBin and into its own window: 1.
Basic Bin Procedures Copying Clips and Sequences into and out of the SuperBin To copy a clip or sequence into the SuperBin: t Press and hold the Alt key (Windows) or the Option key (Macintosh), and then drag a clip or sequence from another open bin window into the bin displayed in the SuperBin. The clip or sequence is copied into the Superbin. You can copy a clip or sequence from the SuperBin directly to a bin in the Project window. To copy a clip or sequence out of the SuperBin: 1.
Chapter 6 Organizing with Bins When you are working with bins, an asterisk (Windows) or a diamond (Macintosh) appears before the bin name in the bin’s title bar. The asterisk (Windows) or diamond (Macintosh) indicates that the changes to the bin have not been saved. Once you save the bin, the asterisk (Windows) or diamond (Macintosh) is removed. n To view a complete list of the bins in your project, see “Using the Bins Display” on page 83.
Basic Bin Procedures • Statistics view: Uses the standard statistical column headings derived from information established during capture, such as start and end timecodes, duration, resolution, and so on. Text tab Bin Fast Menu button Bin View pop-up menu If you import a log file from your telecine transfer, most of this information will be placed in the bin when you import the log.
Chapter 6 Organizing with Bins To customize views of the bin, you can add, hide, copy, or rearrange standard or customized columns in any combination to create your own custom views. You can name and save them to suit your needs. See “Saving a Custom Bin View” on page 172. When you create a new bin view, the system saves the settings for this view so that you can later access and alter, copy, or delete these settings. New bin view settings appear in the Settings scroll list in the Project window.
Basic Bin Procedures To change a custom bin view with the Bin View dialog box: 1. Click the Settings tab in the Project window. The Settings scroll list appears. 2. Double-click the custom bin view you want to change. The Bin View dialog box opens. 3. Select and deselect the columns you want to see. 4. Click OK. Using the Bin Fast Menu All Bin menu commands are also available in the Bin Fast menu located in the lower left corner of every bin.
Chapter 6 Organizing with Bins To select multiple clips or sequences in a bin, do one of the following: t (Windows) Ctrl+click additional items (Text view). t (Windows) Shift+click the first and last items (Text view). t (Windows) Shift+click additional items (Frame view). t (Macintosh) Shift+click additional items. t Lasso several items; see “Lassoing Objects” on page 173. To reverse your selection: t Select Bin > Reverse Selection.
Basic Bin Procedures Moving Clips and Sequences You can move clips and sequences to other bins to group and organize various types of material based on project needs. To move clips or sequences from one bin into another: 1. Create or open another bin. Give the bin a name that represents its purpose or contents. 2. Position or resize the bins so that you can see both of them at the same time. 3. Select the clip or sequence that you want to move, or select multiple clips or sequences. 4.
Chapter 6 Organizing with Bins To copy clips or sequences from one bin to another bin: 1. Position or resize the bins so that you can see both of them at the same time. 2. In the original bin, click the clip or sequence that you want to copy, or select multiple clips. 3. While pressing the Alt key (Windows) or Option key (Macintosh), drag the clips or sequences to the destination bin, and release the mouse button. The copies appear in the destination bin, and the originals remain in the source bin.
Basic Bin Procedures c When you delete media files, you no longer have access to visuals of the deleted material. If you load a clip for which a media file has been deleted, a black screen appears with the words “Media Offline.” If you need to use those clips again, you must recapture from tape or reimport graphics. To delete clips, subclips, and sequences with their media files from a bin: 1. Select the clips, subclips, or sequences that you want to delete. 2.
Chapter 6 Organizing with Bins 3. Click the check boxes for the items you want to delete. t Select both clips and the associated media files for deletion. t Select only the media files for deletion if you want to retain the clips for recapturing later. t Select only the clips for deletion if the media file is referenced by another clip. 4. Click OK. If you choose to delete media files, a dialog box opens. 5. Click Delete. The selected clips, sequences, and media file are deleted.
Basic Bin Procedures Assigning a Source Color To assign a color to a clip, subclip, sequence, or effect clip in a bin: 1. With a bin in Text view, select the bin objects to which you want to assign a color. 2. Select Edit > Set Clip Color > color. The color appears in the Color column and on the clip icon. n You can also assign a color by clicking in the Color column and selecting a color from the pop-up menu.
Chapter 6 Organizing with Bins A menu of all the colors you are using in the bin appears. Any custom colors you assigned are labeled Other. 3. Select one of the colors. The color appears in the Color column and on the clip icon. Sifting Clips and Sequences When you sift clips and sequences, the bin displays only those clips and sequences that meet a specific set of criteria. For example, you can do a custom sift to display only those clips containing the word “close-up” in the heading column.
Basic Bin Procedures 2. Click the Criterion pop-up menu, and select one of the sifting options. 3. Click the first Text to Find text box, and type the text that you want to use as a sift criterion. When sifting by color, type the exact name of the color (using uppercase and lowercase letters) in the text box. 4. Click the Column or Range to Search pop-up menu, and select a column heading to which you want to apply the criterion. 5.
Chapter 6 Organizing with Bins Sifting Timecodes or Keycode Ranges You can sift on a timecode (or keycode) number within a specific range. For example, you can sift for all the clips that start before and end after a particular timecode. Before custom sift For example, type 01:08:32:00 in the Text to Find text box in the Custom Sift dialog box, click the Column or Range to Search pop-up menu, and select Start to End Range.
Basic Bin Procedures Some column pairs explicitly define a range, for example, Start and End or Mark IN and Mark OUT. Other columns define the beginning of a range, and the end of the range is determined by the Duration column. For example, Auxiliary TC1 implies a range that begins at the value in the Auxiliary TC1 column and ends at that value plus the value in the Duration column.
Chapter 6 Organizing with Bins Table 7 lists all columns associated with implicit ranges and their corresponding menu choices. The Duration column determines the end of these ranges.
Basic Bin Procedures 4. Click OK. The bin will display those clips that encompass the timecode (or keycode) number that you entered. Locking and Unlocking Items in a Bin You can lock any items in a bin — including source clips, master clips, subclips, and sequences — to prevent deletion. When you lock clips in a bin, you lock their associated media files on your desktop as well. To lock items: 1. Click a clip, subclip, or sequence to select it.
Chapter 6 Organizing with Bins To unlock previously locked items: 1. Select the items in the bin. 2. Select Clip > Unlock Bin Selection. n You can use the clip-locking feature along with archiving software to automatically archive all locked media files. For more information on archiving locked files, see your archiving software’s documentation.
Basic Bin Procedures 4. Select the clip or sequence, and select Bin > Select Media Relatives. The system highlights all related objects in all open bins. Selecting Sources Used by an Object Use the Select Sources command to identify all the sources used by a particular object. For example, if you select a sequence as the object, use the Select Sources command to identify every master clip, subclip, tape, and media file that is a source for that sequence. To identify sources for a clip or sequence: 1.
Chapter 6 Organizing with Bins Selecting Unreferenced Clips When you select Select Unreferenced Clips, the system highlights all clips not currently referenced by clips or sequences that are in the open bins. Any master clips, subclips, or effect clips you edited into sequences in the bins are not highlighted. n The Select Unreferenced Clips command is useful for finding unused footage or media. To identify unreferenced clips: 1. Open the bin containing the sequence or clip that is referenced. 2.
Using Text View Using Text View Text view provides the most complete view of clip information. It uses database columns that you can rearrange and customize to suit your needs. For information about saving a custom bin view, see “Saving a Custom Bin View” on page 172. To enter Text view: t Click the Text tab in the bin.
Chapter 6 Organizing with Bins Aligning Bin Columns When you align bin columns, the system maintains the same order of columns from left to right but spaces them according to the length of their contents. This is especially useful for removing spaces remaining after you move or rearrange columns. To align bin columns: t Select Bin > Align to Grid. Showing and Hiding Columns You can select individual or multiple headings to be displayed or hidden in the bin.
Using Text View To delete a column: 1. Click the column heading in a bin. 2. Do one of the following: t Select Edit > Delete. t Press the Delete key. The column disappears from the view, and surrounding columns close to fill the space. Duplicating a Column You can duplicate existing columns containing timecode information into other compatible columns that you target in a dialog box. To duplicate a timecode column: 1. Select the column you want to duplicate by clicking its heading. 2.
Chapter 6 Organizing with Bins Adding Customized Columns to a Bin In addition to the standard statistical or film column headings, you can add your own column headings to describe information about clips and sequences. For example, you might want to add a column heading to describe what kind of shot (close-up, wide shot, master shot, extreme close-up, and so on) is used in a clip. To add a new custom column: 1. Click an empty area to the right of the current headings in the headings box. 2.
Using Text View Managing Clip Information in Text View For additional bin shortcuts, see the Help. There are several ways to manage clip information in bin columns. These methods include copying information between cells, moving information between whole columns, sorting clip information, and modifying clip data, as described in this section. Moving Within Column Cells Use the keyboard shortcuts to move from cell to cell in bin columns: • Tab: Moves the pointer to the parallel cell in the next column.
Chapter 6 Organizing with Bins Modifying Clip Information You can change or modify the information in certain columns for your master clips, subclips, tapes, and other objects stored in the bin. This is especially useful if some of the data is incorrect or if you need to conform information for organizational purposes. The following conditions apply to modifying clip information: • When you modify a clip’s information, related objects are automatically updated to reflect the new data.
Using Text View Table 8 Modifiable Bin Headings Heading Restrictions (Clip) Name No restrictions. Mark IN Altering the mark IN also alters the IN to OUT duration. This replaces any previous mark. Mark OUT Altering the mark OUT also alters the IN to OUT duration. This replaces any previous mark. Color No restrictions. Color Framing Must be according to tape specifications. See “Tracking Color Frame Shifts” on page 446. Auxiliary timecodes, 1–5 No restrictions.
Chapter 6 Organizing with Bins To modify the clip data directly in a bin: 1. Click the Text tab in the bin to enter Text view. 2. Click the cell that you want to modify. Select only one item at a time. In this example, the timecode data is highlighted. 3. Click the cell again to enter text. If the pointer does not change to an I-beam, you might be attempting to modify a column that cannot be directly modified. 4. Type the new information, and press Enter (Windows) or Return (Macintosh).
Using Text View Table 9 Modify Command Options Type of Modification Options Description Set Timecode Drop/ Non-drop Drop, Non-drop Changes the timecode format between dropframe and non-drop-frame. Setting must match the timecode format of the tape. Set Timecode By Field Start or End Changes either the start or end timecode. Only start timecode can be altered after capture. Hour, Minutes, Seconds, Allows you to enter custom timecode.
Chapter 6 Organizing with Bins Table 9 Modify Command Options (Continued) Type of Modification Options Description Set Tracks V, A1, A2, A3, A4, A5, A6, A7, and A8 track selector buttons Changes the clip’s configuration of tracks (film projects only). The clip must be unlinked. See “Unlinking Clips from Media Files” on page 255. Set Source None Opens the Select Tape dialog box. Selects another source tape name for the clips that should match the original source tape name.
Using Text View 6. Click OK. The modification takes effect. Copying Information Between Columns The following procedure describes how to copy all the information in one column to another column. The procedure uses an example of copying timecode information in one column to a new column. To copy column information to another column: 1. Select the timecode column that you want to copy. 2. Select Edit > Duplicate. The Select dialog box opens, prompting you to target a timecode column for the data. 3.
Chapter 6 Organizing with Bins If you want to sort clips in a customized order in Text view, you must first rearrange the clips in Script view, and then return to Text view. For information about Script view, see “Rearranging Clips in Script View” on page 213. Sorting Clips in Ascending Order To sort clips in ascending order: 1. With a bin in Text view, click the heading of the column that you want to use as the criterion. The column is highlighted. 2. Select Bin > Sort.
Using Text View Performing Multilevel Sorting with Columns You can select multiple columns in a bin and perform a multilevel sort by using the information in the columns. To perform a multilevel sort using the information in the bins: 1. With a bin in Text view, arrange the columns in the bin to establish the primary column. The column that appears farthest to the left in Text view becomes the primary criterion for the sorting operation. 2. Select the columns that you want to sort.
Chapter 6 Organizing with Bins n For information on displaying timecodes in the Timeline and the Tracking Information display, see “Displaying Timecode Tracks in the Timeline” on page 394 and “Displaying Tracking Information” on page 304. After you add a timecode column (TC 24, TC 25, TC 25P, or TC 30) to a bin, you can use the Duplicate command to convert the values for master clips and subclips to the appropriate timecode for that column.
Using Text View Frame Counting for Timecodes Table 11 shows the frame count for each timecode. The timecodes are listed as 24 for 24 fps, 25 for 25 fps, 25P for 25 (PAL with pulldown), and 30 for 30 fps (the count skips six frames to fit 30 frames into 24 fps).
Chapter 6 Organizing with Bins 4. Select Edit > Duplicate. The Select dialog box opens. 5. Select the timecode heading from the list. 6. Click OK. The values for master clips, subclips, and sequences in the Start column are converted to the appropriate timecode format and entered into the column you selected. Bin Column Headings You can select individual or multiple headings to be displayed or hidden in a bin. Table 12 describes the Bin Column Selection headings.
Using Text View Table 12 Bin Column Selection (Continued) Heading Description Auxiliary TC1 through TC5 You can enter an auxiliary timecode, such as Aaton® or Arri®, or another timecode for editing film or audio timecode for film. (Not restricted to film projects.) CFPS The captured frames per second. Cadence The type of pulldown present on the source NTSC tapes when in a 23.976 or 24p project. Camera The camera used to film this clip. This feature is used in multicamera shoots.
Chapter 6 Organizing with Bins Table 12 206 Bin Column Selection (Continued) Heading Description KN IN-OUT The Mark IN and Mark OUT key number for the clip. Used for 24p projects, 25p projects, and matchback projects only. KN Mark IN The key number for the IN point, if you set one for the clip. Used for 24p projects and 25p projects only. KN Mark OUT The key number for the OUT point, if you set one for the clip. Used for 24p projects and 25p projects only.
Using Text View Table 12 Bin Column Selection (Continued) Heading Description Shoot date The date the footage was shot. Slip The number and direction of perfs for subclips (audio clips only). Used for 24p and 25p projects only. Sound TC The timecode for audio. Soundroll The sound roll this clip came from. Used for 24p projects, 25p projects, and matchback projects only. Start The timecode of the clip’s head frame. TC 24 The 24-fps timecode. TC 25 The 25-fps timecode, no pulldown.
Chapter 6 Organizing with Bins Using Frame View In Frame view, each clip is represented by a single frame, with the name of the clip displayed below the frame. The system uses the head frame as the default, but you can play back the footage within any clip and select any frame to represent the footage. You can make the pictures larger to see more detail or smaller to see more clips in the window. You can also rearrange the frames in any order. You can also mark IN points and OUT points in Frame view.
Using Frame View Changing the Bin Background Color You can customize the background color of the bin behind the frames. Changes affect one bin at a time. However, changes you make in Frame view appear in Script view as well. Text view remains black and white. To change the bin background color: 1. Activate the bin you want to change, and make sure you are in Frame view (or Script view). 2. Select Edit > Set Bin Background > color. The bin color changes, based on your selection.
Chapter 6 Organizing with Bins Rearranging Frames Frame view allows you to rearrange the display of the frames in the bin by moving them. To rearrange frames: 1. Click a single frame, and drag it to its new position. To rearrange more than one frame at a time, Ctrl+click (Windows) or Shift+click (Macintosh), or lasso multiple frames and drag them to a new position in the bin. See “Lassoing Objects” on page 173. 2. Click the background area of the bin to deselect the clips.
Using Script View To change the frame identifying the clip: 1. Select the clip that you want to change. Press and hold the K key on the keyboard (Pause) and press the L key (Play Forward) to roll the footage within the frame forward at slow speed. To move backward through the footage, press and hold the K key and press the J key (Play Reverse). 2. When you see the frame that you want to use, release the keys. The Avid application saves your choice as part of the bin configuration.
Chapter 6 Organizing with Bins To enter Script view: t Click the Script tab in the bin. Script tab Clip information Script text box Adding Text in Script View To type text in the script box: t Click the text box and begin typing. This text does not appear in sequences edited from the clips, only in printouts of the bin in Script view. You can use basic word processing procedures to highlight, delete, cut, copy, and paste text between script boxes.
Printing Bins Playing Clips in Script View Each clip is represented by a single frame in Script view. The head frame is the default, but you can play back the footage within any clip and select any frame to represent the footage. To change the represented frame: t Press the J-K-L keys to move through the clip. For more information about playing footage, see “Controlling Playback” on page 325.
Chapter 6 Organizing with Bins 2. Click the Brief tab (Brief View), Text tab (Text View), Script tab (Script View), or Frame tab (Frame View) of the bin to select the view you want to print. 3. Select File > Page Setup. The Page Setup dialog box opens, reflecting the specific options for your printer. 4. Select the appropriate options from the Page Setup dialog box. 5. Click OK (Windows) or click Print (Macintosh). 6. Select File > Print Bin.
Gathering Format Elements Gathering Format Elements While organizing your project, you can gather various format elements into a single bin that you can open and use later during editing. Some useful format elements might be: • Bars and tone • Head and tail leader • Repeated titles • Countdowns or SMPTE • Graphic elements (repeated animations, and so forth) This section describes techniques for creating digital bars and tone, as well as leader clips for use in sequences.
Chapter 6 Organizing with Bins • Record bars from an external color bar generator. This method provides good results, but you must have a color bar generator available, and you must rearrange your system inputs to attach the generator. In addition, you must acquire tone separately and sync it with bars within the Avid application. • Import a PICT file of bars. This method provides the highest quality results because the source image is already digital.
Gathering Format Elements The Select Files to Import dialog box opens.
Chapter 6 Organizing with Bins Macintosh Source file list File to import 4. Select one of the following items: - (Windows) Click the Files of Type pop-up menu, and select Graphic. - (Macintosh) Click the Show pop-up menu, and select Graphic Documents. 5. Click Options to adjust the Import settings. The Import Settings dialog box opens. 6. Click the Image tab, and select the following options: a. Select 601, non-square from the Aspect Ratio, Pixel Aspect area. b.
Gathering Format Elements 7. Use the Look In pop-up menu (Windows) or the From pop-up menu (Macintosh) to locate the folder containing the test pattern file. Test pattern files are located in the folder: - n (Windows) drive:\Program Files\Avid\Avid Media Composer Adrenaline\SupportingFiles\Test_Patterns (Windows only) The location of the Avid folders is determined during the installation of Media Composer Adrenaline. These are the default folder locations.
Chapter 6 Organizing with Bins 12. Select the new subclip, Ctrl+click (Windows) or Shift+click (Macintosh) the audio clip containing the tone, and select Bin > AutoSync. A new subclip containing bars and tone appears in the bin. 13. Rename the clip as necessary. Creating Leader Film editors traditionally use standard head and tail leaders for cueing and syncing material.
Gathering Format Elements Once the leader is prepared, you can splice the leader during editing onto the tracks that you want to keep in sync. You can use the sync points for visually aligning tracks. Creating Audio Leader To create tail leader for audio tracks: 1. Load a clip that includes a section of captured tone into the Source monitor. 2. Create a subclip according to your chosen specifications. 3. Name this new subclip Head Leader or Tail Leader. 4. Load this subclip into the Source monitor. 5.
Chapter 6 Organizing with Bins Storyboard Worksheet Make preliminary preparations such as synchronizing picture and sound, converting audio timecode, and modifying clip data. Set the bin display to show only the media objects you will use for your storyboard. Narrow down the clip selection by deleting, moving, copying, sorting, and sifting clips. Select either Script view or Frame view to display your storyboard in the bin with or without a script box. Enter information in the script box, if necessary.
Chapter 7 Managing Media Files When you capture footage, the system creates digital media files for the video and audio tracks on the media drives attached to your system. Bin tools allow you to organize the clips that reference the media files. In addition, your Avid system provides tools and features for directly managing media files for storage and playback efficiency, for backup, and for transfer between systems.
Chapter 7 Managing Media Files Working with Media Files in an Avid Unity Environment If you are using your Avid editing system in an Avid Unity workgroup environment, you can use Avid Unity MediaManager to share media files between systems. Avid Unity MediaManager is a media database that allows you to search the large number of media objects (master clips, sequences, effects, and any other type of object that references digital media) in the Avid Unity MediaNetwork shared storage environment.
Working with Media Files in an Avid Unity Environment Configuring Avid Editing Systems to Work with MediaManager and TransferManager Before you can interact with MediaManager and TransferManager, you need to configure your Avid editing system. You do this using the following settings from the Settings scroll list: • MM Host • MM User • Transfer You must specify the MediaManager location to let your Avid editing system know where to look for MediaManager on the network.
Chapter 7 Managing Media Files Support for an Avid Unity LANshare Workgroup Your Avid editing system can be used as a client in an Avid Unity LANshare workgroup. A LANshare workgroup allows you to share media with other clients connected to a high-performance server through an Ethernet network. For complete information on using a LANshare workgroup, including system requirements and supported resolutions, see the LANserver release notes and documentation.
Using the Media Tool Using the Media Tool The Media tool is your window into the captured video and audio data files stored on your media drives. As an important counterpart to the bins, the Media tool provides similar database tools for manipulating digital media files in tandem with your organization of clips and sequences.
Chapter 7 Managing Media Files n Media Tool views are saved as User settings and appear in the Settings scroll list in the Project window as bin views. • You can print Media Tool data by using the same procedures for printing bins, as described in “Printing Bins” on page 213. The Media tool also has a number of unique functions: • Unlike a bin, the Media tool can display all the tracks captured for each clip as separate media files.
Using the Media Tool - You can display only captured master clips, precompute (rendered effect) clips, or media files, or any combination of the three. 3. Click OK. The Media tool opens. Frame view Text view Script view Brief view Master clip Precompute clip Deleting Media Files with the Media Tool You can use the Media tool to delete selected media files without harming the related master clips, subclips, and sequences.
Chapter 7 Managing Media Files Depending on your needs, you can do the following: t Delete selected audio or video tracks and retain other tracks from a clip. t Delete entire sets of media files and related clips from within the Media tool. t Delete all unrelated media upon completion of a project, and retain only the media required for playback of a finished sequence as described in “Consolidating Media” on page 231. To delete selected media files: 1. Open the Media tool.
Freeing Storage Space Freeing Storage Space To quickly view remaining storage on your media drives at any time, open the Hardware tool as described in “Using the Hardware Tool” on page 156. Unlike the bin files stored in project folders, media files require considerable storage space. When you finish either a rough cut or a final version of a sequence, you can quickly free storage space by deleting the media and clips that are not referenced by the sequence.
Chapter 7 Managing Media Files Understanding the Consolidate Feature The Consolidate feature operates differently depending upon whether you are consolidating master clips, subclips, or sequences. There are also different advantages in each case, as follows: • Master clips: When you consolidate a master clip, the system creates exact copies of the media files. If you link the original master clip to the new files, the system creates a master clip with the file name extension .
Consolidating Media • Subclips: When you consolidate a subclip or group of subclips, the system copies only the portion of the media files represented in the subclip and creates a new master clip that is the duration of the subclip and a new subclip. The file name extension .new is attached, along with incremental numbering beginning with .01. Consolidating a Subclip Original media files Master Clip Subclipped copy of media files Subclip Master Clip.new.01 Subclip.new.
Chapter 7 Managing Media Files • Sequences: When you consolidate a sequence, the system copies only the portions of media files edited into the sequence and creates new master clips for each clip in the sequence. The file name extension .new is attached to the master clips, along with incremental numbering beginning with .01. The sequence is not renamed but is automatically relinked to the new media files. Consolidate finished sequences to: n - Create backup files.
Consolidating Media Using the Consolidate Command To consolidate master clips, subclips, or sequences: For more information on rendering effects, see the effects guide for your Avid system. 1. If you are consolidating a sequence, duplicate the sequence to maintain links to the original files, if necessary, and render any unrendered effects. 2. Select a clip or sequence. 3. Select Clip > Consolidate/Transcode. The Consolidate/Transcode dialog box opens. 4.
Chapter 7 Managing Media Files Table 13 Option Description Video and audio on same drive(s) Select to store the consolidated media files on the same target drive. Deselecting this option allows you to select separate drives for the audio and video media files. Handle length n frames If you are consolidating subclips or sequences, type a handle length for the new clips, or accept the default: leave it at 60 frames (NTSC) or 50 frames (PAL).
Consolidating Media 7. Select other options as described in Table 14. Table 14 Consolidate-Only Options Option Description Delete original media files when done Select to delete original media files automatically. Skip media files already on the target drive Select to bypass files if some related media files are already located on the target drive. Relink selected clips to target drive before skipping Select to ensure that all selected clips are linked to media on the target drive.
Chapter 7 Managing Media Files Using the Transcode Command The Transcode option in the Consolidate/Transcode dialog box lets you create a playable sequence from clips that have different target resolutions. To use the Transcode option: 1. Select a clip or sequence in a bin. 2. Select Clip > Consolidate/Transcode. The Consolidate/Transcode dialog box opens. 3. Select the Transcode option in the upper left corner. 4. In the Target Drive(s) area, select a drive or drives. 5.
Consolidating Media Loading the Media Database The media database is a catalog of master clips and precomputes stored on the external media drives. One use of the media database by the Avid system is to display master clips and precomputes in the Media tool. Bins also contain references to some of the media files based on the contents of the bin. The Avid system does not maintain the entire database in memory at all times.
Chapter 7 Managing Media Files Refreshing Media Databases Refresh the media directories after you remove media from the media drives (for example, after you have physically moved drives). The Refresh Media Directories command reexamines all the media databases on the system. This command can take a long time to execute on systems that have large amounts of media online. To refresh media databases: t Select File > Refresh Media Directories.
Using Videotapes for Archiving and Restoring Media Files Using Videotapes for Archiving and Restoring Media Files You can archive to videotape the source media associated with sequences, master clips, subclips, and group clips. Archiving the source media to videotape is similar to recording a digital cut, except that you can reedit the sequence after you restore it. n The archive to videotape process is not available with progressive media projects.
Chapter 7 Managing Media Files During the archiving process, the original media is archived to videotape. Media with effects is not recorded to tape because you can easily re-create the effects after the project is recaptured. However, the handles for transition effects are included in the archive file. The final sequence can be linked to the recaptured media to recreate the project. Each archived master clip is stamped with the archive tape name and archive timecodes during the restore process.
Using Videotapes for Archiving and Restoring Media Files To archive a video project’s media files: 1. Set the Digital Cut tool as follows: a. Select Output > Digital Cut. The Digital Cut tool opens. Deck Selection pop-up menu b. Click the Deck Selection pop-up menu, and select a deck. n If the Select Tape dialog box opens, click Cancel to leave Tape Name unspecified. c.
Chapter 7 Managing Media Files 4. Drag the appropriate duplicate sequences and clips to the Archive bin. 5. Select the clips and sequences to archive from the Archive bin by doing one of the following: t Select Edit > Select All to select all the clips and sequences in the bin. t Ctrl+click (Windows) or Shift+click (Macintosh) to select specific clips or sequences. 6. Select Clip > Archive to Videotape. The Archive to Videotape dialog box opens. 7. Select the appropriate options.
Using Videotapes for Archiving and Restoring Media Files n The archiving process uses the tapes in the order listed in the Tape Lengths dialog box. For example, if you type 10 in the 120 Minutes text box and 5 in the 60 Minutes text box, when you start the archive the Avid system will prompt you for each of the ten 120-minute tapes before using the five 60-minute tapes. 10. Click OK. The Digital Cut tool opens and becomes the active window. 11.
Chapter 7 Managing Media Files Archive to Videotape Options The Archive to Videotape dialog box allows you to optimize the archiving of media files for the selected sequences and clips. To access the Archive to Videotape dialog box: t Select Clip > Archive to Videotape. Table 16 describes the Archive to Videotape options. Table 16 Archive to Videotape Options Option Description Archive Name Type a name for the archive in the Archive Name text box. ProjectArchive is the default name.
Using Videotapes for Archiving and Restoring Media Files Table 16 Archive to Videotape Options (Continued) Option Description For Sequences Archive all clips in a group edit Select this option if you selected a sequence that contains group clips and you want to archive the media for all the clips in the group. Restoring an Archive from Videotape Restoring an archive from videotape is similar to performing a batch capture. The archiving process creates new master clips for sequences.
Chapter 7 Managing Media Files 4. Select Tools > Capture, and set the following options in the Capture tool: a. Click the Deck Selection pop-up menu, and select a deck. n If the Select Tape dialog box opens, click Cancel to leave Tape Name unspecified. b. Click the Res (Resolution) pop-up menu, and select a resolution. c. Click the Target Drive pop-up menu, and select a drive volume. d. Make sure the audio sample rate is set correctly. See “Setting the Pulldown Switch” in the Help.
Finding a Related Media File Finding a Related Media File The Reveal File command allows you to select a clip in a bin and automatically open its related media file. This command is useful if you want to delete, move, or label the media file. To find a related media file: 1. Select the clip in a bin for which you want to find the media file. The clip is highlighted. 2. Select File > Reveal File.
Chapter 7 Managing Media Files Relinking Clips to Media Files or Bin Items You can relink clips and sequences to the original media files. You can also relink clips, subclips, and sequences to selected items in a bin. After you consolidate or move material between systems, the clips or sequences might lose their links to the original media files. When a clip becomes unlinked, it displays the message “Media Offline.
Relinking Clips to Media Files or Bin Items To relink clips, subclips, or sequences: 1. Select the unlinked object or objects in the bin. 2. Select Clip > Relink. The Relink dialog box opens. 3. Click the “Relink by” pop-up menu, and select an option: t To relink using the key numbers, select “Key Number (KN Start) picture only.” t To relink using source timecode and tape name, select “Source Timecode and Tape.” 4.
Chapter 7 Managing Media Files The system searches the selected media drives, and relinks clips and sequences, if possible. The system disregards capture rate, video resolution, and audio resolution when matching media files. n To maintain the original capture settings for a subclip or sequence, use the Batch Capture command; do not use the Relink command.
Relinking Clips to Media Files or Bin Items 7. Click the “Relink to media on volume” pop-up menu, and select an option: n t Select All Available Drives to search across all media drives that are online. t Select a specific drive volume if you know the location of the media or if you want to relink to media on a specific media drive. When you select “Allow relinking to offline items,” all available drives are searched. 8. (Option) Select “Relink only to media from the current project.” 9.
Chapter 7 Managing Media Files 3. Click the “Relink by” pop-up menu, and select an option: t Select “Source Timecode and Tape” to relink by using source timecode and tape name. t Select “Key Number (KN Start) - picture only” to relink by using the key numbers. 4. Select “Relink offline master clips to online media files” to relink master clips to media files that share similar database information. 5.
Unlinking Clips from Media Files Unlinking Clips from Media Files You can use the Ctrl and Shift keys to modify the Relink command for unlinking clips from their media files. To unlink master clips from their current links: 1. Select the master clips to unlink. 2. Press Ctrl+Shift, and select Clip > Unlink. The clips are unlinked and display the message “Media Offline.
Chapter 7 Managing Media Files 256
Chapter 8 Using Script Integration The lined script is traditionally used as a tool for managing scene and take information during postproduction on a dramatic feature film or television production. With the Avid system, script integration allows you to adapt the lined script to the digital realm for use in any type of production, from drama to documentary to spot advertising.
Chapter 8 Using Script Integration Lined Script Basics The conventional lined script — which evolved during decades of trial and error in Hollywood — provides assistant editors and chief editors with a road map that helps them find the coverage they need to edit scenes in a film or television show. Traditionally, the continuity person creates the lined script on the set at the time of shooting. All notes are handwritten.
Lined Script Basics Explanation of Symbols Each vertical line drawn through the scene represents a single take from the moment the director says “Action” to the moment the director says “Cut.” Each scene might require several camera angles and positions, with one or more takes, all of which are lined and identified alphanumerically.
Chapter 8 Using Script Integration Lining in the Digital Realm Script integration in the Avid application provides a number of enhancements to this traditional system. These enhancements allow you to shorten dramatically the distance between the concepts captured on the page and the source materials used to assemble a finished program.
Lined Script Basics In addition to the standard lining conventions, script integration includes the following enhancements: • Slates: Takes are organized into slates that display a representative frame and clip name for the take that is currently selected. • Takes: The Takes tabs and lines extending from the bottom of each slate indicate the number of takes for that scene. Click a Takes tab to select the take.
Chapter 8 Using Script Integration Using Script Integration in Video Projects Script integration can be an effective tool for editing any type of production, not just feature films and television drama. For example: • You can adapt many of the procedures described in this chapter for use in audiovisual scripts for documentaries, corporate spots, news magazine segments, and spot advertisements.
Script Window Basics Script Window Basics This section describes basic procedures for creating and manipulating Script windows, including importing script text; navigating through the script; displaying clip information; opening, closing, and saving windows; and adjusting margins. Before you begin creating Script windows, make sure you have established the proper defaults in the Script Settings dialog box for font, margin, and display of frames and takes.
Chapter 8 Using Script Integration Importing a Script The first step in script integration is to import a script in the correct format. c The imported script must be in ASCII text format. To maintain the original formatting, however, export the script from your word processor by using the “Text Only with Line Breaks” option. If you export the script as “text” only, the formatting will be lost. To import a new script: 1.
Script Window Basics 4. Locate the file and double-click it, or select the file and click Open. - A script bin appears in the Bins list in the Project window. - The script, with its original layout, appears in the Script window. 5. Change the name of the script bin by clicking the title in the Bins list in the Project window, and typing a new name.
Chapter 8 Using Script Integration n When you save a Script window, the saved file is given an .avc file name extension. • You can select File > Open Bin to open existing Script window (.avc) files and add them to the Other Bins folder in the Bins list in the Project window. • You can select File > New Script to open a new script (.txt) file and add it to the Bins list in the Project window. • You can select File > Close to close Script windows.
Manipulating Script Text Adjusting the Script Margins You can resize a Script window at any time to show more script or to enlarge the right margin by dragging the size box in the lower right corner. The default size of the left margin is established on import, based on the current Script settings. You can also override the margin setting and adjust the left margin after importing the script. To adjust the left margin of an imported script: 1. Select Script > Left Margin. The Left Margin dialog box opens.
Chapter 8 Using Script Integration 3. Type a new font size in the text box, and click OK. The Script window reflects the new settings. n As you enlarge font size, the available sizes for the slate frames also increase. This can be useful for presentation or screening purposes, when you need to display extra-large text and slate frames for a large audience or across a room. For information on enlarging slate frames, see “Resizing Slates” on page 277.
Manipulating Script Text To select several lines of script, use one of the following methods: t Lasso the first line of the selection, and drag through the text. As you drag, a box outlines your selection. Lasso a portion of script to select it. Release the mouse button when you finish lassoing the selected lines. The text is highlighted. t n Click the first line of the selection, and then Shift+click the last line. The entire block of text is highlighted.
Chapter 8 Using Script Integration Cutting, Copying, and Pasting Script You can cut, copy, and paste text in the script as you would in a normal word processor. However, because you cannot select individual words or characters, you can move only lines or paragraphs. n c To rearrange or rewrite individual words or characters in the script, you should make the changes in a word processor before importing them into a separate Script window.
Searching Through Script Removing Script Text You cannot delete lines of text from the Script window by using the Delete key as you would in a normal word processor. Use the Cut command to remove the text. To remove lines of script: 1. Select the lines of script you want to delete. 2. Select Edit > Cut. Unlike a normal deletion, the text remains in the Windows Clipboard or Macintosh Clipboard until the next time you copy or cut a selection.
Chapter 8 Using Script Integration Adding a Page or Scene Number To add a page or scene number: 1. Select the line of the script at the beginning of the scene or page. 2. Click the Add Scene or the Add Page button in the Script window toolbar, or select Script > Add Scene or Script > Add Page. A dialog box opens. 3. Type the number for the scene or page, and click OK. The scene number appears in the left margin and the page number appears in the right margin next to the first line of the selected region.
Searching Through Script To change a page or scene number: 1. Select the beginning line of the scene or page. 2. Do one of the following: t Click the Add Scene or Add Page button in the Script window toolbar. t Select Script > Add Scene or Script > Add Page. A dialog box opens. 3. Type a new number for the scene or page, and click OK. 4. If the renumbering affects page or scene numbers that precede or follow the current change, then repeat these steps as necessary.
Chapter 8 Using Script Integration The Go To Scene/Page dialog box opens. 2. Type the number of the scene or page, and click OK. The Script window scrolls to the page or scene, and the first line is highlighted. If you type a page or scene number that is not in the script, then no action occurs. Conducting a Text Search To search for text in the script: 1. With the Script window active, select Edit > Find. The Find dialog box opens. 2. Type the text you are looking for. 3.
Linking Clips to the Script t If you are not working with scene and take information (for example, in a video documentary project), you can provide your own numbering for the clips in a custom column, or you can sort the clips manually in Frame view according to their order in the script. For more information on adding a custom column, see “Adding Customized Columns to a Bin” on page 192. 4. Select the portion of the script that is covered by the first clip or clips. 5.
Chapter 8 Using Script Integration A slate frame appears above the text, with one or more of the takes covering the scene as lines. The slate appears. 6. Continue to apply clips to additional portions of the script until you have finished creating all your slates. Alternatively, you can create slates one at a time, place script marks, and fine-tune the lining of each scene before proceeding to the next portion of the script.
Manipulating Slates To set Interpolate Position: t n Select Script > Interpolate Position. You can change the default behavior before opening a script in the Script window by selecting Interpolate Position in the Script Settings dialog box. (See “Script Settings Options” on page 263.) Manipulating Slates Once you create a slate by dragging a clip into the Script window, you can manipulate the slate’s appearance and position.
Chapter 8 Using Script Integration n You can enlarge the font size of the script to increase the size of the slate frames. This can be useful for presentation or screening purposes when you need a large display for an audience. For information on resizing the font, see “Changing the Font of the Script” on page 267. Holding Slates On Screen in the Script Window When you are working with slates in the Script window, you can choose to hold slates on screen.
Manipulating Slates To hide the slate frames: t Select Script > Show Frames. The check mark to left of the command is removed, indicating Show Frames is disabled. The Script window shows only the clip names for the takes. To restore the frames: t Select Script > Show Frames again. Showing One Take Per Slate You can minimize clutter on the screen by showing only one take per nonactive slate. To show one take per nonactive slate: t Select Script > Show All Takes.
Chapter 8 Using Script Integration The Script window shows only the first take in each nonactive slate. A single take is shown. To display all the takes: t Select Script > Show All Takes again. Moving a Slate You can adjust the position of slates to make room for more slates, to avoid blocking words, or to display takes over specific lines. To move a slate, use one of the following methods: 280 t To move a slate horizontally, click the slate and drag it to the left or the right.
Manipulating Takes n As you move the slate, the takes continue to cover the same number of lines in the script. To lengthen or shorten the number of lines covered in the takes at the new location, see “Adjusting Take Lines” on page 284. Deleting a Slate Occasionally, you might need to delete a slate — for example, when you find that the takes in the slate are no longer needed. n c When you delete slates and takes from the Script window, the captured source clips remain in the source bins.
Chapter 8 Using Script Integration Selecting Takes To select takes, use one of the following methods: n t Click any take tab to select it. The outline of the take changed to red, indicating that the take is active. t Shift+click additional takes in the same slate or across slates to select them. t Drag a lasso through an entire region of the script. All takes within the lasso are selected. Selecting multiple takes is especially useful when you add or delete color or off-screen dialog indicators.
Manipulating Takes To delete one or more takes: 1. Select the takes in the Script window. 2. Press the Delete key. The Delete dialog box opens. 3. Select Delete Takes, and click OK. The takes are deleted. Displaying Take Numbers To display the take numbers in the tab of each take: t Type the numbers in the Take column of the source bin for the clips. Numbers in the Take column appear in the tabs for each take.
Chapter 8 Using Script Integration Loading Takes To load individual takes into the Source monitor: t Double-click any Takes tab. To load multiple takes into the Source monitor: t Select multiple takes, and then double-click any take you selected. Playing Takes To play back a take, do one of the following: t Double-click a take to load it into the Source monitor, and then click the Play button or press the Play key. The clip plays back and stops when it reaches the end.
Manipulating Takes 3. Press the Ctrl key (Windows) or the k key (Macintosh), and drag the opposite end of the take to a new location, if necessary. 4. Repeat the procedure for other takes in the slate as necessary. Indicating Off-Screen Dialog In the traditional lined script, you indicate off-screen dialog by drawing a jagged line next to the dialog. You can apply a similar effect to lines in the Script window. To indicate off-screen dialog: 1. Select the range of script containing the off-screen dialog.
Chapter 8 Using Script Integration To apply color to takes: 1. Select Script > Color > color. 2. Select the region of the script that covers the range within the take or takes that you want to highlight with color. 3. Select one or more takes. 4. Click the Set Color button in the Script window toolbar. The color appears only in the highlighted script region of the selected takes. You can switch the indicators on or off by clicking the button repeatedly.
Using Script Marks Placing Script Marks Manually To place script marks manually: 1. Map the Add Script Mark button from the Other tab in the Command palette to a user-customizable palette or to the Keyboard palette. 2. Double-click in the Script window at the intersection of a take and the line of dialog that you want to mark. Intersection of take and line of dialog The take is selected in the slate, the selected line of the dialog is highlighted, and the clip loads into the Source monitor. 3.
Chapter 8 Using Script Integration The line is marked in the Script window with a small horizontal bar, and play stops. The script mark appears. 5. Repeat these steps to add more script marks. Automating Screening and Marking The Script window provides controls for automating the process of screening and placing script marks for a single take or across multiple takes. To use automated screening and marking: 1. Select one or more takes. 2. Click the Record button in the Script window toolbar.
Using Script Marks Several takes are selected for automated playback. Current playback is highlighted in green. 3. As you hear a line of dialog (or see a particular clip) that you want to mark, click the matching line in the Script window. A script mark appears at that location in the take, and the clip continues to play. 4. Continue to mark additional sync points using one of the following methods: You can scroll through the Script window without affecting playback.
Chapter 8 Using Script Integration Loading and Playing Marked Segments Once you have placed marks syncing lines in your script to points in the source clips, you can quickly load and cue takes for selected lines of dialog. You can load a single take, or you can load all the coverage for any given range of lines. To load the marked segment of a take: t Double-click the script mark at the line of dialog that you want to cue.
Finding Clips and Script Deleting a Script Mark When you remove a script mark, you do not delete the marked portion of the take, only the sync point between the script and the source clip. c You cannot undo the deletion of script marks. To restore a script mark after deletion, see “Placing Script Marks Manually” on page 287. To delete a script mark: 1. Click once on a script mark to select it. (If you double-click, you will load the clip and make the Composer window active.
Chapter 8 Using Script Integration To find the script linked to a loaded clip: 1. Place the position indicator in the clip at the line of dialog (or within a range of dialog) that you want to find. 2. Click the Find Script button in the Other tab of the Command palette. The Script window instantly scrolls to and highlights the portion of script that most closely matches the clip location.
Editing with the Script Window To use the Script window most effectively during a session, make sure: • The Script window is fully prepared, including preferred takes, alternative takes (indicated with colors), and script marks for matching lines of text to sync points in the clips. • The Single Mark Editing option is selected in the Edit tab of the Composer Settings dialog box.
Chapter 8 Using Script Integration Splicing a Script Range During editing, you can use the Ctrl and Alt keys (Windows) or the Ctrl key (Macintosh) to instantly splice clips linked to ranges of script directly from the Script window into the sequence. To use this feature with accuracy, you should carefully mark with script marks the ranges of script during the screening and marking phase. To splice a range: 1.
Editing with the Script Window Interactive Screenings The Script window can be a valuable tool during screenings of work in progress, allowing you to: Sequences cannot be loaded into the Script window. Instead, you can perform a video mixdown and load the resulting master clips. For more information, see the Help for your Avid system. • Quickly search for scenes and pages with clips attached for instant retrieval. • Match back and cue source material to compare alternative takes.
Chapter 8 Using Script Integration 296
Chapter 9 Viewing and Marking Footage Before making your first edit, you can review your footage, add locators and comments to clips, mark IN to OUT points, and create subclips. By viewing and marking your material in advance, you can concentrate on editing and refining your sequence at a later time without having to pause and set marks each time you load a new clip.
Chapter 9 Viewing and Marking Footage Customizing the Composer Window The Composer window is central to the editing process, providing all the essential controls for viewing, tracking, marking, and editing source and record footage. The Composer window includes either the Source and Record monitors or the Playback monitor.
Customizing the Composer Window Source/Record mode Composer window Source and Record monitors Timeline window Use the Composer Settings dialog box and various menus within the Composer window to configure displays and functions in the Source monitor, Record monitor, and Playback monitor. You can learn about Composer settings as follows: • For information on Composer settings, see “Understanding Composer Settings” on page 314.
Chapter 9 Viewing and Marking Footage In addition, you can: • Map various buttons onto command palettes or the keyboard, as described in “Understanding Button Mapping” on page 149. • Display or hide labels on buttons by using Interface settings, as described in “Reviewing Basic Settings” on page 100. • Use the Timeline Settings dialog box to configure displays and functions of the Timeline window. For more information about the Timeline window, see Chapter 11.
Customizing the Composer Window The Source/Record monitors become a single monitor. To view the Source/Record monitors: t (Windows) Click either edge of the single monitor and drag it to the outside. t (Macintosh) Do the following: a. Click the single monitor title bar and drag it to the left. b. Click the bottom right corner of the single monitor and drag it to the right.
Chapter 9 Viewing and Marking Footage The monitor splits into two. When you double-click a sequence icon in a bin, the sequence appears in the right (Record) monitor. To open a clip in the left monitor: t Drag a clip from the Bin window into the left monitor. The clip appears in the left monitor.
Customizing the Composer Window n If you have the “Double-click loads object in” option set to “Source or Record Monitor” in the Bin Settings dialog box, you can also double-click a clip or a sequence in the Bin window to have it appear in the right or left monitor as appropriate. See “Bin Settings” in the Help. To switch between the monitors: t n Press Esc. When you are using a single monitor, double-clicking a clip opens it in a free-standing Source pop-up monitor.
Chapter 9 Viewing and Marking Footage Using 16:9 for 24p and 25p Editing For 24p and 25p projects, you can use the 16:9 Monitors option to correctly display the 16:9 aspect ratio from the film transfer. To display a larger film image: 1. During either shooting or the telecine process, use a 16:9 lens to squeeze the film images anamorphically to the 4:3 aspect ratio. 2. After capturing the footage, select the 16:9 Monitors option to return the squeezed image to its normal aspect ratio.
Customizing the Composer Window Second row of information (the top row) Click display area to access Tracking Information menu. Tracking Information menu First row of information (the bottom row) Figure 3 Tracking Information Menu By default, the tracking information area displays no information until you select a tracking format. In addition, there is no display of tracking data when there is no material loaded in the monitor.
Chapter 9 Viewing and Marking Footage n To move through footage by entering timecode, make sure the top row of information displays timecode (for example, V1). For more information, see “Using Timecode to Find a Frame” on page 352. Tracking Format Options The Tracking Information menu contains options for information to be displayed above the monitors. Table 17 describes the tracking format options.
Customizing the Composer Window Table 17 Tracking Format Options (Continued) Option Description Frames Displays tracking information as total frames. None Hides the display. The option you select from pane 1, pane 2, or pane 3 is displayed above the monitor.
Chapter 9 Viewing and Marking Footage • Pane 1 lists options for summary information, such as master timecode (Mas), duration of the entire clip (Dur), IN to OUT duration (I/O), absolute timecode (Abs), and time remaining (Rem). The format type that you select from pane 4 determines the tracking format to be displayed. The item you select in pane 1 is displayed above the monitor. Pane 1 • n Pane 2 lists the tracks with the type of information you selected from the pane 3.
Customizing the Composer Window n You need to add the timecode track to the clip or sequence before the timecode option appears in the Tracking Information menu. For more information, see “Displaying Timecodes in a 24p or 25p Project” on page 201.
Chapter 9 Viewing and Marking Footage Displaying the Info Window The Info window displays statistical information about a clip and sequences. You can open the Info window from the Playback monitor, the Source monitor, the Record monitor, a pop-up monitor, a bin, or a Script window. The Info window updates the information automatically. n If no clip or sequence is loaded in the Playback monitor, Source monitor, or Record monitor, the Info window is not available.
Customizing the Composer Window To display information about a sequence in the Record monitor: 1. Move the pointer to the gray area above the Overwrite button. 2. Press and hold the mouse button to open a pop-up window with sequence information. Only fields with data will be displayed. 3. Drag the window to a new location to leave the window open. The Info window opens. As you move the position indicator through the sequence in the Record monitor, the information in the Info window is updated.
Chapter 9 Viewing and Marking Footage For information on displaying clip or sequence information from the Script window, see “Displaying Clip and Sequence Information in a Script Window” on page 266. For information on changing the sequence name or starting timecode, see “Changing the Sequence Name and Timecode” on page 364. Copying Text from the Info Window You can cut, copy, and paste information from the Info window anytime, but you cannot edit or change any information within the window.
Customizing the Composer Window When displaying TC 30 source or M 30 timecodes, the pulldown phase for NTSC reference is displayed. To set a timecode display in the Timecode window: 1. Select Tools > Timecode Window. The Timecode window opens. 2. (Option) Drag the lower right corner of the Timecode window to adjust the display size. 3. Click anywhere in the Timecode window to display the Timecode popup menu. 4. Click the Timecode pop-up menu, and select a display option.
Chapter 9 Viewing and Marking Footage Understanding Composer Settings The Composer Settings dialog box allows you to customize various aspects of the appearance and behavior of controls in the Composer window. To open the Composer Settings dialog box: t Double-click Composer in the Settings scroll list in the Project window. For more information about Composer Settings, see the Help. Using the Tool Palette The Tool palette provides additional buttons for editing and navigating with your Avid system.
Viewing Methods To leave the Tool palette open and move it to another location: 1. Click the Fast Menu button in the Composer window or on a pop-up monitor. 2. Click the location where you want the Tool palette to be displayed. n If a subset of the buttons appears in the Tool palette, click the lower right corner and drag it to the right and down to reveal the full Tool palette. To view the names of the buttons in the Tool palette: t Move the pointer over a button.
Chapter 9 Viewing and Marking Footage • Viewing in the Source monitor: You can load clips and sequences into the Source monitor to view and mark or subcatalog shots for use in a sequence that you build in the Timeline. For more information, see “Loading and Clearing Footage” on page 319. • Viewing in the Record monitor: You can load a sequence into the Record monitor to view, mark, or modify an existing sequence.
Viewing Methods • Viewing in pop-up monitors: You can load several clips into pop-up monitors to view and mark clips in smaller, movable windows. See “Loading and Clearing Footage” on page 319. Two pop-up monitors with clips loaded • Viewing in the Timeline: Use the Timeline to view individual tracks for either a sequence or a source clip. Click the Toggle Source/Record in Timeline button to switch between displaying the sequence tracks and the source tracks.
Chapter 9 Viewing and Marking Footage Fast Frame Display in 24p and 25p Projects You can display a full frame in the Record, Playback, and Client monitors when stopped on a frame or when single-stepping through the frames, by deselecting Special > Fast Frame Display. Although the frames are captured and stored as frames, they are displayed by default as a singlefield representation of the frame. Deselecting Fast Frame Display does not affect playing a clip or sequence.
Loading and Clearing Footage Loading and Clearing Footage You can load individual or multiple clips or sequences into the Playback monitor, Source monitor, Record monitor, or pop-up monitors by using different methods. You can also use the Clip Name menus to display or clear clips and sequences from the monitors, as described in this section. n The results of double-clicking might vary in the procedures in this section.
Chapter 9 Viewing and Marking Footage Loading Footage into the Source, Record, and Pop-up Monitors To load a single clip or sequence into the Source, Record, or pop-up monitor: 1. Alt+click (Windows) or Option+click (Macintosh) the Source/Record Mode button to enter Source/Record mode. 2. Open a bin and locate the clip or sequence. Press and hold the Alt key (Windows) or Option key (Macintosh), and then double-click the clip or sequence to reverse the outcome. 3.
Loading and Clearing Footage Press and hold the Alt key (Windows) or Option key (Macintosh), and then double-click the clip or sequence to reverse the outcome. 3. Drag the selected clips to the Source monitor, or double-click a selected clip with one of the following results, depending on the setting of the “Double-click loads clip in” option in the Bin Settings dialog box: - Source or Record monitor (default setting): The clips load into the Source monitor.
Chapter 9 Viewing and Marking Footage To switch between clips: 1. Click the name of the current clip displayed above the monitor to reveal the Clip Name menu. The list in the lower portion of the menu contains a list of all the clips or sequences currently loaded in the monitor. The lower portion of the Clip Name menu contains a list of loaded clips. 2. Select a different clip name from the menu. The selected clip will replace the current clip in the monitor display.
Resizing Monitors 3. Select one of the following commands: - Clear Monitor removes the displayed clip from the screen, leaving black. The clips are still loaded. - Clear Menu deletes the list of all loaded clip names and leaves only the clip currently displayed. Resizing Monitors You can resize the Source monitor, the Record monitor, the Playback monitor, and any pop-up monitors to provide more area for displaying the Timeline or other windows.
Chapter 9 Viewing and Marking Footage Resizing a Monitor You can resize the Source and Record or Playback monitors to a variety of sizes. To resize the Source and Record or Playback monitors: 1. Click a monitor to make it active. 2. Drag the lower right corner of the window to the new size you want the monitor. The monitor is displayed with the new size. Customizing the Playback Monitor Size You can switch between the full-size Playback monitor and a smaller custom size.
Controlling Playback Controlling Playback There are several ways to play, view, and cue clips: • Instantly access frames or move through footage by using the position indicator within the position bar under the monitors. • Play, step (jog), or shuttle through footage by using user-selectable buttons. • Play, step, or shuttle by using keyboard equivalents. • Step or shuttle by using the mouse.
Chapter 9 Viewing and Marking Footage • In the Timeline, the position indicator shows your position within the sequence. It is always in the same position as the position indicator in the position bar of the Playback monitor or Record monitor and works in the same way: you can click anywhere in the Timeline to relocate the position indicator, or you can drag the position indicator through footage at varying speeds.
Controlling Playback The Fast Forward and Rewind buttons instantly cue the footage to the next transition between clips. By default, the buttons cue footage to the head frame of the next transition. You can select the following alternatives from the FF/REW tab of the Composer Settings dialog box: • Stop at Tail Frames • Stop at Locators • Ignore Track Selectors The Play, Fast Forward, and Rewind buttons appear by default in the first row of buttons below the Source, Record, and pop-up monitors.
Chapter 9 Viewing and Marking Footage To play in standby mode: 1. Click the Play Standby button. The Play button under the Source or Record monitor blinks yellow. 2. Click anywhere to play the sequence. Step Buttons You can also use the Step buttons under the monitors to play the clip backward or forward in 1-frame to 10-frame (NTSC and PAL) or 1-frame to 8-frame (24p) increments. When you have a single row of buttons displayed under your monitors, the Step Forward and Step Backward buttons appear.
Controlling Playback With single-field step, you can view both fields of each two-field frame sequentially to locate a dropout from the source videotape or dust and scratches from the original film footage. n You can map the Step Forward One Field and Step Backward One Field buttons to any monitor Command palette, Tool palette, or the keyboard. For information on mapping buttons, see “Using the Command Palette” on page 147. To use single-field step: 1.
Chapter 9 Viewing and Marking Footage n The keyboard settings vary, depending on the type of keyboard attached to your Avid system. Figure 4 shows the keyboard settings for a keyboard used in the United States. If an Avid-supported European keyboard is attached to your Avid system, then the keyboard settings will match that keyboard.
Controlling Playback To shuttle through the footage using the J-K-L keys on the keyboard: 1. Do one of the following: t Load a clip or sequence into the Source or Record monitor. t Open a pop-up monitor. t Select a clip in a bin in Frame view. 2. Use the following keys to shuttle at varying speeds: t Press the L key to move forward through the footage at normal speed. Table 18 shows how you can increase the speed.
Chapter 9 Viewing and Marking Footage Home, End, and Arrow Keys You can also use the Home, End, and arrow keys (located to the left of the numeric keypad) to move through footage when a clip or sequence is loaded in a monitor. • The Home key takes you to the beginning of a clip or sequence. • The End key takes you to the end of a clip or sequence. • The Left Arrow key moves the footage one frame backward. • The Right Arrow key moves the footage one frame forward.
Controlling Playback Shuttling with the Mouse To shuttle using the mouse: 1. Do one of the following: t Load a clip or sequence into the Source or Record monitor. t Open a pop-up monitor. t Select a clip in a bin in Frame view. 2. Do one of the following: t Press the semicolon (;) key to activate mouse control for shuttling. t Click the Mouse Shuttle button, which is available in the Play tab of the Command palette and can be mapped to an editing button under the Record monitor. 3.
Chapter 9 Viewing and Marking Footage Playing Video to the Client Monitor You might want to see your sequences and effects as they will appear on an external display monitor. To do this, connect a Client monitor to your Avid editor. This section describes how to connect a Client monitor to your system and how to configure your system to play video to the Client monitor.
Playing Video to the Client Monitor The Video Display Settings dialog box opens. 2. If it is not already selected, select the “DV device supports digital video input” option. 3. Select the “Send video to DV device (client monitor enabled)” option. 4. Specify a number of seconds of video to prefill in the Seconds of Video to Pre-Fill text box. This setting instructs the system to delay the beginning of playback by the number of seconds you specify.
Chapter 9 Viewing and Marking Footage of playback, you increase the likelihood that the system will play the material successfully. The maximum delay you can specify is 10 seconds. 5. Select the OpenGL® mode for your video display in the OpenGL Hardware section. Select one of the following: n You will get better performance selecting a hardware OpenGL. t All video boards installed in your Avid editing application will be listed in the pop-up menu. Select your OpenGL video board.
Marking and Subcataloging Footage 2. If “DV device supports digital video input” is selected, a check mark appears in the box. Deselect it by clicking the check box. - Send video to DV device (client monitor enabled) is dimmed. - Digital Cut is dimmed in the Clip menu. The next time you connect a digital camera with video input, select “DV device supports digital video input.” The desktop video settings return to their previous state and the digital camera provides the desktop video display.
Chapter 9 Viewing and Marking Footage To mark IN to OUT points: 1. Load a clip or sequence from a bin into a monitor, or select a clip in the bin (Frame view). 2. Play, step, or shuttle through the material. Use the J-K-L keys when playing a clip in a bin (Frame view). 3. Mark an IN point by doing one of the following: t Click the Mark IN button under the monitor to mark an IN point and stop playback. t Press the Mark IN key when marking a clip in a bin. (The Mark IN key does not stop playback.
Marking and Subcataloging Footage 7. To clear an OUT point and set a new OUT point, you can either: t Click the Mark OUT button or press the Mark OUT key when you reach a different frame. t Click the Clear OUT Mark button or press the Clear OUT Mark key to remove the OUT point, and then mark a new one. 8. To clear both the IN and OUT points, click the Clear Both Marks button or press the G key on the keyboard.
Chapter 9 Viewing and Marking Footage To mark an entire clip or segment: 1. Load a clip or sequence into a monitor. 2. In a sequence, move the position indicator to the segment that you want to mark. 3. In the Timeline, select the tracks corresponding to the cuts you want to mark. 4. Click the Mark Clip button under the monitor, or press the T key on the keyboard.
Marking and Subcataloging Footage The subclip handle changes to an icon of a hand pointing at a frame during the drag, and then becomes a Subclip icon when you release the frame in the intended bin. • Use the Make Subclip button: Click the Make Subclip button located in the Edit tab of the Command palette to create the subclip and place it into the active bin by default.
Chapter 9 Viewing and Marking Footage sync. It is easier to adjust the subclip’s audio sync before you work the subclip into an edit. For more information about adjusting audio sync, see Chapter 14. Marking Audio Clips You can mark audio and video separately for an edit by using the Audio Mark buttons. This feature is useful for creating an overlap edit for an audio clip. To mark IN and OUT points on audio tracks: 1. Load a clip or sequence into a monitor. 2.
Marking and Subcataloging Footage Ways to Use Locators Possible uses for locators and the Locators window include: • Color correction notations: Use locators to mark clips or specify frames that require color correction, noting the specific correction to perform if someone else does the job. • Visual track alignments: Use locators at matching points in synchronized audio and video tracks so that if the tracks lose sync, you can visually realign the locators in the Timeline to restore sync.
Chapter 9 Viewing and Marking Footage When you insert a locator, it appears as an oval in the Timeline, in the position bar, and at the bottom of the frame in the monitor. The color of the oval corresponds to the color of the locator button you used. Locator displayed in the monitor, the position bar, and the Timeline You can add locators to your source material while you are in an editing session, as described in “Adding Locators While Editing” on page 344.
Marking and Subcataloging Footage 5. Click the locator’s information line displayed in the top section of the Locators window. The locator’s information line is highlighted, and the user name appears in the bottom section of the Locators window. 6. Type your comments in the comment entry area of the Locators window. 7. To save your comments, press the Tab key or close the Locators window. You can also press the Enter key on the numeric keypad. The information is stored with the marked frame.
Chapter 9 Viewing and Marking Footage Marking an Area Using Locators You can mark the area between two locators by using the Mark Locator button. To mark the area between two locators: 1. Move the position indicator between two locators. 2. Click the Mark Locators button located in the Edit tab of the Command palette. The area between the two locators is selected.
Marking and Subcataloging Footage Understanding the Locators Window The Locators window allows you to quickly add comments, go to locator marks, delete locators, and print a list of locators in the currently loaded clip or sequence. Many features of the Locators window are similar to those of the Bin window. You can use the Locators window to: • Find information about each locator. • Access the Locators Fast menu, which allows you to: • - Modify and sort the display.
Chapter 9 Viewing and Marking Footage The following illustration shows a Locators window with three locators. Locator information area Comment entry area Fast Menu button To view locators in the Locators window: 1. Load the sequence containing the locators. 2. Select Tools > Locators. To explore the Locators window: • Press the Tab key to switch between the locator information area and the comment entry area.
Marking and Subcataloging Footage Sorting Information in the Locators Window You can sort or reverse-sort the locators by using the locator information area in the Locators window. To sort the locators in ascending order: 1. Select the column that you want to sort. The column is highlighted. 2. Click the Locators Fast Menu button, and select Sort. The locators are sorted. To sort the locators in descending order: 1. Select the column that you want to sort. The column is highlighted. 2.
Chapter 9 Viewing and Marking Footage Changing the Color of the Locator Icon You can change the color of the locator icon from the Locators window. The Avid system uses the same color in the Timeline, position bar, and monitor. To change the color of the locator icon: 1. Select a locator in the locator information area of the Locators window. 2. Click the Locators Fast Menu button, and select a color. The icon color of the selected locator changes to the new color.
Marking and Subcataloging Footage 3. Select File > Page Setup. The Page Setup dialog box opens, reflecting the specific options for your printer. 4. Select the Page Setup options. 5. Click OK. 6. Select File > Print. The Print dialog box opens, reflecting the specific options for your printer. 7. Select the Print options. 8. Click OK (Windows) or Print (Macintosh). The system prints the current view of locator information. To print the complete contents of the Locators window: 1.
Chapter 9 Viewing and Marking Footage Deleting Locators Using the Locators Window You can use the Locators window to delete a single locator or multiple locators. To delete locators using the Locators window: 1. Select the locators in the locator information area of the Locators window by doing one of the following: t Click a single locator. t Ctrl+click (Windows) or Shift+click (Macintosh) multiple locators. 2. Press the Delete key. The selected locators are removed.
Finding Frames, Clips, and Bins For more information on selecting the display of tracking information, see “Displaying Tracking Information” on page 304. The system interprets the numbers you type with the numeric keypad according to the type of tracking format you have selected from the Tracking Information menu (timecode or frames). If you have two rows of information displayed above the monitor, the system looks at the top row.
Chapter 9 Viewing and Marking Footage In this example, the interface displays master timecode. Use one of the following formats: t SMPTE timecode — Use two digits each for the hours, minutes, seconds, and frames. For example, type 01230200 to enter 01:23:02:00. t Current timecode — To find a timecode that starts at the same hour, minute, or second as the current timecode, type only the last digits.
Finding Frames, Clips, and Bins Searching for a Clip or Sequence You can use the Find feature to search for a clip loaded in the Source monitor or a sequence loaded in the Record monitor using: • Clip names • Locator text • Text displayed in the Timeline • Comment text To do a text search of a loaded clip or sequence using the Find feature: 1. Load the clip or sequence into the monitor. 2. Select Edit > Find. The Find Text dialog box opens. 3.
Chapter 9 Viewing and Marking Footage Using Match Frame The Match Frame feature allows you to locate the source clip (a master clip or subclip) for the frame currently displayed in either the Record monitor or the Source monitor. This feature is useful when you want to relocate and reedit source material, such as subclips and master clips. Match framing loads the source clip into the Source monitor for the frame currently displayed in the active monitor (Record monitor or Source monitor).
Finding Frames, Clips, and Bins 3. In the Track Selector panel, select the track for the frame that you want to match. For more information about track selection when matching frames, see “Selecting Tracks for Matching Frames” on page 358. 4. Do one of the following: t Click the Match Frame button. The source clip is loaded into the Source monitor, and any previous IN or OUT points are removed. A new IN point is marked at the matching frame.
Chapter 9 Viewing and Marking Footage The system cues the sequence to the matching frame on the record side. If the frame exists in more than one place, the sequence cues to the first location of the match frame and continues through the sequence to subsequent locations each time you click the Reverse Match Frame button. Selecting Tracks for Matching Frames Track selection determines the match frame. If you select a video track, the system matches a frame from the video.
Finding Frames, Clips, and Bins To find the bin in which a specific sequence is located: 1. Load a sequence into the Record monitor or Playback monitor. 2. Click the Record monitor or Playback monitor to activate it. 3. Click the Find Bin button. The system highlights the sequence in the bin. To find the bin in which a specific clip in a sequence is located: 1. Move the position indicator to the clip within the sequence. 2.
Chapter 9 Viewing and Marking Footage Finding a Frame The Find Frame button, located in the Other tab of the Command palette, allows you to trace a captured frame of footage displayed in a sequence or source clip back to its analog source on tape. This is useful for finding frames for color correction or for recapturing specific clips to lengthen them or alter capture parameters. To find a frame: 1. Make sure the source deck is properly connected to the system, and load the clip or sequence. 2.
Chapter 10 Editing in Source/Record Mode In addition to finishing projects created on offline systems, your Avid system provides tools designed to help you create new sequences. After you have viewed and marked your clips or created subclips, you are ready to create a sequence.
Chapter 10 Editing in Source/Record Mode Entering Source/Record Mode Source/Record mode is the default editing mode. It is composed of the screens and controls shown when the Source monitor and Record monitor are displayed in the Composer window. Use Source/Record mode to create new sequences from source clips. To enter Source/Record mode from another mode: t Alt+click (Windows) or Option+click (Macintosh) the Source/Record Mode button displayed in the Timeline toolbar or the monitor toolbars.
Setting Up a New Sequence Setting Up a New Sequence To establish a new sequence, do one of the following: t If you have specific parameters for the project that you want to establish first, you can create and name a sequence, set the start timecode, and determine the numbers and kinds of tracks to use before you make the first edit, as described in this section.
Chapter 10 Editing in Source/Record Mode 2. To rename the new sequence, type a new name while the Name field is active in the bin. n If you click anywhere in the interface after creating the new sequence, you deactivate the Name field. Click the sequence name again to rename the sequence. Changing the Sequence Name and Timecode The following optional procedure allows you to rename the new sequence and set a customized start timecode by using the Get Clip Info command.
Setting Up a New Sequence 2. Drag the pointer across the sequence name in the Name text box, and then type a new name. 3. Drag the pointer across the start timecode (Starting TC), and then type a new timecode. n You need to type only the first colon (non-drop-frame timecode) or semicolon (drop-frame timecode). For example, type 01:000000 for 01:00:00:00. For information about non-drop-frame and drop-frame, see Understanding Drop-Frame Timecode and Non-Drop-Frame Timecode” in the Help. 4.
Chapter 10 Editing in Source/Record Mode The following illustration shows the Timeline after one video and one audio tracks have been added, with no material loaded in the Source monitor. You can add a Meta track for MetaSync editing, up to 24 tracks. For information about MetaSync, see “Using MetaSync” in the Help.
Setting Up a New Sequence Alternatively, you can do the following: • Deselect the Auto-create New Tracks option to have the existing tracks in the sequence remain the same when you edit in new source material. This allows you to create new tracks selectively as you edit, which is often preferable at the more advanced stages of a project. • Deselect the Auto-enable Source Tracks option to leave the tracks of newly loaded material in whatever state they were in when they were last loaded.
Chapter 10 Editing in Source/Record Mode 3. In the Start Filler Duration text box, type the duration of the filler that you want added to the start of a sequence when using the Add Filler at Start command. 4. Click OK. To add filler anywhere in a sequence: 1. Click above the Source monitor, and select Load Filler from the Clip Name menu. The system loads a 2-minute clip of filler into the Source monitor. 2. Mark the length of filler, as needed. 3. Mark an IN point in the sequence as follows: a.
Making an Edit To begin editing: 1. Load the first clip into the Source monitor. If you have not already marked IN and OUT points for the clip in advance or created a subclip, view and mark the clip as necessary. Source tracks 2. Click buttons in the source Track Selector panel to select the tracks you want to include in the edit. Only the tracks that have been captured for the clip appear as source tracks in the Timeline.
Chapter 10 Editing in Source/Record Mode Screen display of the first edit in a sequence Source clip Splice-in button Sequence The end of the last frame of the first new edit Timeline generated by the edit Creating an Instant Rough Cut For additional information on editing directly from the bin into the Timeline, see “Bin Editing into the Timeline” on page 421.
Making an Edit To create a rough cut from a bin: 1. Click the Frame tab to enter Frame view. 2. In the bin, sort the clips in the order in which you want them to appear in the sequence. 3. Select the tracks for the edit. n If no sequences are loaded in the Composer monitor, the Timeline has no features. 4. Do one of the following: t Ctrl+click (Windows) or Shift+click (Macintosh) the clips. t Lasso the clips by dragging left to right and down to select more than one clip.
Chapter 10 Editing in Source/Record Mode Undoing or Redoing Edits You can undo or redo up to 32 previous actions listed in the Edit menu. You can quickly undo or redo a just completed command, or you can search through a submenu to undo or redo all commands leading back to a particular command. Undo/Redo commands for previous edit Prior Redo commands appear in the upper portion of the Undo/Redo List submenu. Prior Undo commands appear in the lower portion of the submenu.
Editing Additional Clips into the Sequence To undo or redo every edit and function back to a particular command: t Select Edit > Undo/Redo List, and then select a command. All the previous commands, including the command selected from the submenu, are undone or redone as appropriate. Editing Additional Clips into the Sequence The three primary edit functions for adding material to your sequence are the splice-in, overwrite, and replace edit commands.
Chapter 10 Editing in Source/Record Mode To perform a splice-in edit: 1. Load a clip into the Source monitor. 2. Mark an IN point and an OUT point. 3. Mark an IN point in the sequence as follows: a. Move the position indicator in either the Timeline or the position bar of the Record monitor to the point where you want to splice the clip into the sequence. b. Click the Mark IN button, or press the Mark IN key.
Editing Additional Clips into the Sequence 3. Click the Overwrite button (red) to complete the edit. Performing a Replace Edit For information about mapping buttons, see “Understanding Button Mapping” on page 149. You use the Replace Edit button (blue) to replace a clip in the sequence (video, audio, or both) with new material from the Source monitor, while maintaining the original IN and OUT points of the previous edit.
Chapter 10 Editing in Source/Record Mode Single-Mark Editing Single-mark editing (also called mark-and-park editing) allows you to establish a single mark, and then use the location of the position indicator to determine the second mark when making the edit. You can use this procedure in several ways to save steps: • You can mark an IN point in the Source monitor and then perform a splice-in, overwrite, or replace edit without marking an OUT point.
Using Phantom Marks 3. Click OK. When you enable phantom marks, the system displays blue mark IN or mark OUT icons in the position bars below both the Source monitor and the Record monitor. These phantom marks can indicate one, two, or sometimes three edit points calculated by the system to complete an edit. The following are sample scenarios. Setting One Mark In this example, you set only the mark IN on the source side.
Chapter 10 Editing in Source/Record Mode Lifting, Extracting, and Copying Material Extract/Splice-in and Lift/Overwrite are Segment mode functions you can also use to remove and reposition segments. For more information, see “Understanding Segment Mode” on page 409. Lifting, extracting, and copying allow you to remove or reposition material quickly in your sequence. For example, you can move a clip from the end of your sequence to the beginning; or you can remove the material from the sequence altogether.
Lifting, Extracting, and Copying Material Extracting Material The Extract function removes selected material from a track in the sequence and closes the gap left by its removal. As a result, when you extract material, you shrink the duration of the track or sequence. Extracted Clip Y Before extract Clip X After extract Clip X Clip Y Material is placed in the Clipboard. Clip Z Track is shortened. Clip Z To extract material: 1.
Chapter 10 Editing in Source/Record Mode 3. Click the Copy to Clipboard button in the Edit tab of the Command palette. The system copies the selected material to the Clipboard, and leaves the sequence untouched. Using the Clipboard The Avid Clipboard is a cut, copy, and paste tool adapted to the special needs of the editing environment. You can place a marked section of the sequence into the Clipboard at any time by clicking the Lift, Extract, or Copy to Clipboard buttons.
Lifting, Extracting, and Copying Material t Press the Alt key (Windows) or Option key (Macintosh) when you copy, lift, or extract the material. The contents appear as a clip in the Source monitor, and the name “Sequence name.Sub” appears above the monitor and in the Clip Name menu. Repeat these procedures each time you want to preserve copied, lifted, or extracted material during a session. All the clips remain available in the Clip Name menu until you select Clear Menu or close the project.
Chapter 10 Editing in Source/Record Mode Adding Comments to Sequence Clips You can add comments to sequence clips. These comments also appear in the Timeline or in lists that you create, such as an EDL or a cut list. Comments can include instructions for color correction or for adjusting an effect. To add comments to the clips in a sequence: 1. Click one of the Segment Mode buttons (located below the Timeline), and highlight the clip to which you want to add a comment in the Timeline. 2.
Playing the New Sequence To review your work so far: If you have several tracks of audio, you might need to mix them down and adjust levels before playback. For more information, see Chapter 13. 1. Make sure that the Video Track Monitor icon is located on the uppermost video track to display all video tracks and effects during playback. 2. Make sure the Audio Track Monitor button for the audio track is selected to ensure proper playback of the audio tracks. 3.
Chapter 10 Editing in Source/Record Mode Playback Performance Tips As you continue to edit, you might find the playback performance of the system diminishing as the sequence grows in length and layers. This can happen when you are using a great deal of system memory for playback of large and complex sequences. The following are a few tips for improving playback performance: • Check the number of media objects in use for your project in the Memory window, as described in “Viewing Memory” on page 110.
Playing the New Sequence Before you use the Play Length Toggle feature, do the following: • Map the Play Length Toggle button from the Play tab of the Command palette to a Monitor Command palette. For information about mapping buttons, see “Understanding Button Mapping” on page 149. • Set a value for the duration of the play used by the Play Length Toggle feature, as described in “Setting a Limited Play Length” on page 385.
Chapter 10 Editing in Source/Record Mode 3. Move the position indicator to the location where you want to start playing the sequence. 4. Click the Play Length Toggle button. The Play button and the Play Length Toggle button change to white, indicating the Play Length Toggle feature is active. 5. Click the Play button. The sequence plays from the position indicator forward for the play length set in step 2.
Chapter 11 Using the Timeline Your Avid system represents each edit and effect in a graphical timeline structure to help you track and manipulate the elements of your sequence. The Timeline continuously updates as you work, displaying an extensive array of icons and information that you can customize in various ways. In addition, the Timeline has its own set of editing tools that you can use to create and revise edits and transitions across multiple tracks.
Chapter 11 Using the Timeline Understanding Timeline Views There are also a number of on-the-fly procedures for changing your view of the Timeline (such as the Zoom and Focus functions) that are not saved as part of a Timeline view. 388 You can customize your view of the Timeline to display a variety of information about your sequence as well as the clips and transitions it contains. You use the Timeline Fast menu to change the display.
Understanding Timeline Views • Film and animation editing: If you are working on a film or animation project, you can display the film track, show several frames in the sequence, and display sync breaks where they occur. • Editing for online: If you are editing offline with plans to generate an EDL and finish the sequence in an online videotape suite, you can track detailed clip and dupe-reel information by displaying clip text and enabling Dupe Detection.
Chapter 11 Using the Timeline Using the Timeline Fast Menu To create a custom Timeline view, you select various options from the Timeline Fast menu. The Timeline Fast Menu button appears in the lower left corner of the Timeline toolbar. To use the Timeline Fast menu: t Click the Fast Menu button, and scroll through the menu to select or deselect an option. Selected options have check marks next to them. You can select some options only from submenus.
Understanding Timeline Views Table 19 Timeline Fast Menu Options Option Description Default Setup Returns Timeline display settings to the system default settings View Type Displays a submenu for selecting different segment display formats Wrap Around Allows the Timeline to wrap around in the Timeline window Track Panel Displays or hides the Track Selector panel Effect Icons Switches the display of effect icons Render Ranges Indicates unrendered or partially rendered effects; see “Customizin
Chapter 11 Using the Timeline Table 19 Timeline Fast Menu Options (Continued) Option Description Background Color Displays a palette for changing the color of the background in the Timeline n The Background Color command appears only when all tracks are deselected.
Understanding Timeline Views To enlarge or reduce the height of tracks: 1. Select the tracks in the Timeline that you want to resize. 2. Do one of the following: Pointer t Select Edit > Enlarge Track or Reduce Track. t Press and hold the Ctrl key (Windows) or Option key (Macintosh), and move the pointer to the bottom edge of the track selector until it appears as a bar intersected by a double-headed arrow. Drag the edge up or down to make the track narrower or wider.
Chapter 11 Using the Timeline Displaying the Timeline Top Toolbar You can display a top toolbar in the Timeline for easy access to editing buttons. You can also map additional buttons to the Timeline top toolbar. For information about mapping buttons, see “Mapping User-Selectable Buttons” on page 150. You can choose to show or hide the Timeline top toolbar. To show the Timeline top toolbar: 1. In the Project window, double-click the Timeline Setting. The Timeline Settings dialog box opens. 2.
Understanding Timeline Views To customize the tracks to be displayed in the Timeline: t n Click the Timeline Fast Menu button, select Show Track > tracks. The TC1 track represents the timecode of the project in which you are working. For example, when you are working in a 24p NTSC project, the TC1 track displays the same timecode as the TC30 track. Assigning Local Colors to Clips in the Timeline You can assign local colors to clips in the Timeline to indicate clips that should be grouped together.
Chapter 11 Using the Timeline 3. Select Edit > Set Local Clip Color > color. 4. Click the Segment button. The assigned local color appears in the clip in the Timeline. Displaying Local and Source Colors in the Timeline You can display source colors and local colors for clips in the Timeline. Source colors are assigned to clips in bins and local colors are assigned to clips in the Timeline. By default, the Timeline is set to display no colors.
Understanding Timeline Views To highlight the clips that have offline media: 1. Click in the Timeline to activate it. 2. Click the Timeline Fast Menu button, and select Clip Color > Offline. Any offline media is displayed in red in the Timeline. n When working with nested layers, a clip that contains offline media appears red even if the missing media is nested many layers deep. Changing the Timeline Background Color To change the background color of the Timeline: 1.
Chapter 11 Using the Timeline Showing Locators in the Timeline When you add locators to a sequence, the locators are displayed in the Timeline. You can modify which locators are displayed in the Timeline by selecting Show Locators from the Timeline Fast menu. When you select a color from the Show Locators submenu, only locators of that color appear in the Timeline.
Understanding Timeline Views To name a Timeline view or to change a view’s name: 1. Click the View Menu button, and select Save As. View pop-up menu View Menu button The View Name dialog box opens. 2. Type a name for the view, and click OK. Replacing a Timeline View If there are views you no longer use and would like to replace, use the following procedure. To replace a Timeline view: 1.
Chapter 11 Using the Timeline Timeline Settings Options In addition to the Timeline options available from the Timeline Fast menu, several options are available from the Timeline Settings dialog box. To open the Timeline Settings dialog box: t Double-click Timeline in the Settings scroll list in the Project window. The Timeline Settings dialog box opens. For information about the Timeline Settings options in the Display tab, see “Timeline Settings Options - Display Tab” in the Help.
Exploring the Timeline Figure 5 shows the Timeline window. Track Selector panel Position indicator Segment Mode buttons Step Out Scale bar Step In Video Quality Menu Resize box Timeline scroll bar/position bar Toggle Source/Record in Timeline button Focus button Timeline Fast Menu button Figure 5 Timeline Window Using the Position Indicator The position indicator in the Timeline marks your place in the sequence. It also determines how some of your commands are interpreted.
Chapter 11 Using the Timeline You can change the Timeline scroll bar to a position bar that acts like the position bar in the Record monitor and Playback monitor, except that you can manipulate it without deactivating the Timeline window. To use the Timeline position bar: 1. Double-click Timeline in the Settings scroll list in the Project window. The Timeline Settings dialog box opens. For more information on the Timeline settings, see “Restoring the Default Timeline View” on page 399. 2.
Exploring the Timeline Displaying Detail in the Timeline The scale bar stretches and contracts the Timeline area centered around the blue position indicator. This allows you to either zoom in to focus on a specific area of your sequence or zoom out to display your whole sequence. This feature is especially useful when you have a lengthy sequence with many edits.
Chapter 11 Using the Timeline Zooming In and Out The Zoom In and Zoom Back commands in the Timeline Fast menu stretch out the Timeline like an accordion to allow you to focus on detail, but with the following differences: • The Zoom In command does not expand the Timeline incrementally, but allows you to select a portion of the Timeline of any size to instantly expand to fill the window. • The Zoom Back command does not shrink the Timeline incrementally, but instantly restores it to its former size.
Exploring the Timeline The Focus button allows you to center the position indicator quickly and expand the Timeline. The Focus button always expands the Timeline to a scale of 90 pixels per second. The position indicator is centered in the window. When you click the Focus button again, the Timeline returns to its previous size. To focus the Timeline: 1. Move the position indicator to the frame or transition you want to expand. 2. Click the Focus button.
Chapter 11 Using the Timeline The Timeline expands to full-screen size. n To restore a resized Timeline window to its default position, click the Timeline and select Windows > Home. Resize box Notice that a Timeline with reduced tracks wraps around to show more of the sequence. As you reduce tracks in a full-screen Timeline, the sequence wraps around, allowing you to examine a long sequence in greater horizontal detail.
Exploring the Timeline You can click in either window to activate it and bring it forward at any time, or you can click in the title bar of the Timeline window and drag it to the Bin monitor to place each window in its own monitor. n If the Timeline or Composer window is hidden behind another window, select the window again from the Tools menu.
Chapter 11 Using the Timeline Viewing Full Quality and Draft Quality Using the Full Quality/Draft Quality button in the Timeline bottom toolbar, you can play back media in two ways: n t In Full Quality mode, that uses full-image resolution but can handle only limited effect complexity t In Draft Quality mode to view greater effect complexity in real time with a lower quality image For more information about the Full Quality/Draft Quality button, see the Effects guide for your system.
Understanding Segment Mode • To move frame-by-frame, press the Alt key (Windows) or Option key (Macintosh) as you drag either the position indicator or any segments selected in Segment mode. • To snap the selected segments to an edit point in the track above or below the current track, click a Segment Mode button, and then press Ctrl+Shift (Windows) or Ctrl (Macintosh) while dragging the segments.
Chapter 11 Using the Timeline Unlike traditional tape editing, Segment mode allows you to instantly reposition entire segments by using visual controls as though you were physically “dragging” portions of your sequence around on a tape. You can move clips separately or together, and on one track or across tracks. Observe the following guidelines when editing in Segment mode: • Transition effects on either side of a moved selection are deleted. Transition effects inside the selection are preserved.
Understanding Segment Mode Once you enter Segment mode by using either of these methods, you can continue to select or deselect additional segments. The selected segment or group of segments becomes highlighted, and remains in its original position during the move until you select its new position. Observe the following guidelines when selecting tracks: • You cannot simultaneously move segments that are separated along a track. You can, however, move segments separated on different tracks.
Chapter 11 Using the Timeline Lassoing One or More Segments You can use the mouse to lasso a single segment or a group of segments across one or more tracks. To lasso segments: t Draw a lasso beginning in the area above the tracks in the Timeline. Drag left to right and then down to select more than one segment. Begin Lasso box Segment End When you draw a lasso the previous mode (Extract/Splice-in mode or Lift/Overwrite mode) is enabled.
Understanding Segment Mode Deselecting Segments To deselect one or more selected segments, do one of the following: t To deselect an entire track, click the Track button in the Track Selector panel. For example, if you lasso segments on V1, V2, and A1, you can click the V2 and A1 Track buttons to leave only the segment on the middle track, V1, selected. t Use the Shift key and the Segment Mode pointer to deselect specific segments on any track, leaving the remaining tracks selected.
Chapter 11 Using the Timeline n When you enter Segment mode from the Playback monitor and you begin to drag the segments, the interface changes to a two-frame display. Only the outer two frames in the four-frame display appear in the Playback monitor. Four-frame display The two outer frames indicate ending and beginning frames of clips before and after the segment. Offset counter The two inner frames represent the start and end frames of the segment.
Understanding Segment Mode Slipping or Sliding Segments in a Four-Frame Display To slip and slide segments in a four-frame display: n You must display the dual Source/Record monitors to use four-frame display. 1. Click the Trim Mode button to enter Big Trim mode. 2. Place the position indicator on the segment you want to slip or slide. 3. Right-click (Windows) or Ctrl+Shift+click (Macintosh) in the Timeline, and select Select Slip Trim or Select Slide Trim. The four-frame display appears.
Chapter 11 Using the Timeline Maintaining Sync in Segment Mode When you use Lift/Overwrite in Segment mode, filler is added to the sequence to maintain sync. When you move segments in the Timeline using Extract/Splice-in, the sync is broken. To maintain sync when you use Extract/Splice-in, select the Segment Drag Sync Locks option in the Edit tab of the Timeline Settings dialog box.
Understanding Segment Mode This segment will be moved. Before segment drag sync lock After segment drag sync lock Filler added after segment is moved. Filler left after segment is moved. Extracting/Splicing Segments Use Extract/Splice-in to move the selected segments in the Timeline without affecting any of the adjacent material. The total duration of the sequence is unaffected. Like the standard Splice-in function, the Extract/Splice-in edit inserts the segment into the new position.
Chapter 11 Using the Timeline To perform an Extract/Splice-in edit: 1. Click the Extract/Splice-in button in the Timeline toolbar. 2. Select the segments you want to move. 3. Click the segment, and drag it to its new position. Use the four-frame monitor display, the offset counter, and the segment image in the Timeline to carefully determine the new position. 4. Release the mouse button.
Understanding Segment Mode To perform a Lift/Overwrite edit: 1. Click the Lift/Overwrite button in the Timeline toolbar. 2. Select the segments you want to move. 3. Click the segment, and drag it to its new position. Use the four-frame monitor display, the offset counter, and the segment image in the Timeline to determine the new position. 4. Release the mouse button.
Chapter 11 Using the Timeline n If the segment has an effect, the system deletes the effect first. You can also delete segments by using the cut, copy, and paste commands. See “Cutting, Copying, and Pasting in the Timeline” on page 423. Marking Clips and Sequences in Segment Mode As an alternative to marking sections of the Timeline in Source/Record mode for deleting, copying, subclipping, rendering, or creating an EDL or digital cut, you can use Segment mode to mark segments quickly.
Using Advanced Timeline Techniques Using Advanced Timeline Techniques There are several advanced techniques for displaying and editing in the Timeline that you can use in any combination, including: • Bin Editing into the Timeline • Bin Editing Directly into a Sequence Using the Keyboard • Cutting, Copying, and Pasting in the Timeline • Editing with the Film Track • Editing in Heads or Heads Tails View • Performing a Quick Edit Using the Top and Tail Commands Bin Editing into the Timeline For i
Chapter 11 Using the Timeline The pointer changes to the selected Segment mode icon, and the interface changes to the four-frame monitor display. As you drag, a white outline of the clip indicates the segment position. 4. When you find the right placement for the clip, release the mouse button. The Timeline reflects the new edit. n After the edit is completed, you remain in Segment mode until you click the active Segment Mode button again to deactivate it.
Using Advanced Timeline Techniques Cutting, Copying, and Pasting in the Timeline You can use the shortcut keys for cutting, copying, and pasting segments selected in the Timeline. To cut or copy and paste segments: 1. Select the segment by using one of the Segment Mode pointers. 2. Press Ctrl+C (Windows) or k+C (Macintosh) to copy, or Ctrl+X (Windows) or k+X (Macintosh) to cut. 3.
Chapter 11 Using the Timeline To adjust your view of the Timeline quickly for frame-by-frame viewing and editing: t n Click the Timeline Fast Menu button, and select Show Every Frame. The film track displays frames for the topmost video track only. You cannot display more than one film track at a time. To quickly view more frames as you scroll: t Drag the resize box in the lower right corner of the Timeline for a fullscreen view.
Using Advanced Timeline Techniques The Timeline changes to one of the following displays. Head frame for each clip Heads view Head and tail frames for each clip Heads Tails view 3. Press and hold the Alt key (Windows) or Option key (Macintosh), click the frames representing the clip you want to move, and drag the clip to its new position. The sequence is rearranged to match the changes you made.
Chapter 11 Using the Timeline For information about how the Mark Clip button works, see “Marking an Entire Clip or Segment” on page 339. To edit using the Top and Tail commands: 1. Load a sequence into a monitor. 2. Select the track or tracks you want to edit, and deselect all other tracks. 3. Move the position indicator to the location where you want to perform an edit. 4. Do one of the following: t Click the Top button to extract footage from the start of the clip or segment to the position indicator.
Working with Multiple Tracks Understanding Effects Editing Your primary use for multiple tracks of video is for effects. Effects editing techniques in the Avid system fall into the following basic categories: • Motion effects, such as freeze frame and slow-motion or fast-motion effects, involve applying frame-motion parameters to selected footage, usually on a single video track.
Chapter 11 Using the Timeline n For more information on all types of effects editing, see “Basics of Effects Editing” in the Help. Understanding Nesting Occasionally, effects editing involves a procedure known as nesting. Nesting involves stepping into existing tracks to reveal added layers for combining multiple images and digital video effects. When the effect is applied, you can step out to view and render the effect as one segment on the track.
Working with Multiple Tracks Figure 6 shows the Track Selector panel. Source Track Monitor buttons Source Track buttons Sync Lock and Lock buttons Record Track buttons Record Track Monitor buttons Track Selector panel Timecode button Sync Lock All button Figure 6 Track Selector Panel The source side of the panel displays only those tracks available for the clip currently loaded and displayed in the Source monitor.
Chapter 11 Using the Timeline There are five methods for selecting tracks: • Click the Track button of any inactive track to select the track. (To deselect the track, click the Track button of any active track.) • Drag a lasso around multiple tracks to select them at once. • With the Timeline active, select Edit > Select All Tracks to select all tracks on the record and source sides.
Working with Multiple Tracks Monitoring Video The Video Track Monitor button determines whether you see video during playback. You can turn it off at any time to monitor only audio during editing. When there are multiple video tracks, all tracks below the monitored track are active during playback. The Video Track Monitor button displays a Monitor icon when the track is monitored for playback and output.
Chapter 11 Using the Timeline • A gold Speaker icon on the Audio Track Monitor button indicates that the track will not be dropped when the play speed increases during scrubbing. By default, the two top Audio Track Monitor buttons display the gold Speaker icon. For more information about setting an audio track to ensure it is not dropped during scrubbing, see “Selecting Tracks for Scrubbing” on page 485.
Working with Multiple Tracks To select a track for solo monitoring: t Ctrl+click (Windows) or k+click (Macintosh) the Track Monitor button for the selected track. The Track Monitor button changes to green with a black Monitor icon (video track) or black Speaker icon (audio track) to indicate solo monitoring. Video track selected for solo monitoring Audio track selected for solo monitoring To deselect solo monitoring: t Click the Track Monitor button again.
Chapter 11 Using the Timeline To perform a patch: t Drag from a source track (audio or video) to the targeted record track (a white arrow appears during the patch). New source track order identifies the patch. Audio patch from a source track to an audio record track During patch After patch To undo a patch: 1. Click in the Record monitor, Playback monitor, or Timeline. 2. Select Special > Restore Default Patch, or manually repatch to the previous track.
Working with Multiple Tracks The Sync Lock and Lock buttons of the Track Selector panel display a Sync Lock icon for sync-locked tracks, and a Lock icon for locked tracks. The procedure for applying the locks is different in each case.
Chapter 11 Using the Timeline Sync Locking Tracks For more information on using the sync lock feature in Trim mode, see “Using Sync Lock” on page 589. Sync locking affects trimming and splice-in edits. This feature is especially useful when you are working with multiple tracks and want to maintain sync between two or more tracks. To sync lock the tracks, do one of the following: t Click a Sync Lock button to activate the Sync Lock icon for each synchronized track.
Working with Multiple Tracks The Add Track dialog box opens. New Track Type pop-up menu Track Number pop-up menu 2. (Option) Select the type of new track you want to add (for example, a new video or a new audio track) by clicking the New Track Type pop-up menu, and selecting that option. 3. (Option) Select a track number other than the default number displayed in the dialog box by selecting another number from the Track Number pop-up menu. 4. Click OK.
Chapter 11 Using the Timeline To remove a custom track name: 1. Right-click (Windows) or Ctrl+Shift+click (Macintosh) the Track Selector button, and select Rename Track. The Comments window opens. 2. Click Remove. The track name returns to the default track name, such as V1. Deleting Tracks You can remove one or more tracks from a sequence if you no longer need the tracks. To delete one or more tracks from the sequence: 1. Select the tracks, and press the Delete key.
Working with Multiple Tracks Adding an Edit (Match Framing) The add edit function places an artificial edit point between frames of a clip. The edit appears in the Timeline as a transition between two clips, but when you play the clip, the footage appears unchanged because the frames are continuous. Add edit placed between frames 1 2 3 4 5 6 7 Footage plays back continuously. This form of edit is also known as a match frame.
Chapter 11 Using the Timeline The edit appears in the sequence with an equal sign to indicate a match frame. Equal sign indicates a match frame. n By default, the match-frame indicator is white. If a change in level occurs, the match-frame indicator changes to red. Adding Edits to Filler Clips You can add an edit to all tracks with filler, regardless of the track selection. To add an edit to filler clips at the position indicator: 1. Move e the position indicator to the selected frame. 2.
Working with Multiple Tracks To remove match-frame edits: 1. Select the entire sequence or a portion of it as follows: t Select the entire sequence by removing any IN and OUT points. t Select a portion of the sequence by marking an IN point and an OUT point surrounding the match-frame edits (add edits) you want to remove. 2. Select the tracks from which you want to remove the edits. 3. Select Clip > Remove Match Frame Edits. The Avid system removes the edits.
Chapter 11 Using the Timeline • If you do not mark an OUT point in the clip and no OUT point is set in the sequence, the Avid system uses the end of the source clip as the OUT point. • If you mark OUT points in both the Source monitor and in the Record monitor, the Avid system uses the OUT point on the record side. To backtime an edit: 1. Mark an OUT point in the sequence where you want the edit to end. Also, mark an IN point where the edit is to start. 2. Select the appropriate tracks. 3.
Additional Offline Aids When you activate Dupe Detection, each set of duplicate frames is tagged with a different color. (Up to 10 color sets can be distinguished during a single detection process.) Matching frames have matching colors. You can use any of the Trim Mode options to remove the duplicate frames, if necessary. The colored bars that distinguish duplicate frames in the sequence are automatically drawn above the frames in the Timeline, as shown.
Chapter 11 Using the Timeline Adjusting Handle Length in Dupe Detection You change handle length information for the display of dupes in the Timeline. • In 35mm film editing (using the single-strand method), one extra frame, known as the safety frame, provides tabs for the negative cutter to use when cutting two segments of film together. However, this frame is always lost during the negative conform.
Additional Offline Aids Different labs have different standards depending on the equipment used; usually, a minimum of four frame handles is needed.
Chapter 11 Using the Timeline 3. Click OK. The selected value is applied to the head and tail of every event. When you enable Dupe Detection during editing, the handles are added to the colored dupe indicators that appear in the Timeline.
Additional Offline Aids To correct color-frame interruption as you edit: 1. Note any edits that cause the green lights to blink. You can adjust the edits now or place locators to return to these edits and correct them later. 2. To adjust the edit, enter Trim mode. In Trim mode, the Avid system displays small green boxes at the top corners of adjacent frames. When the color sync signals are in phase, the boxes are aligned horizontally.
Chapter 11 Using the Timeline Finding Black Holes and Flash Frames The following commands help you quickly find parts of your sequence that you might want to delete from the final sequence: • Find Black Hole • Find Flash Frame Black holes are segments of the sequence that consist of one or more frames of filler. Flash frames are clips that have an extremely short duration, for example, fewer than 30 frames. Finding Black Holes To find black holes: 1. Click the Timeline to activate it. 2.
Printing the Timeline c. In the option Find Flash Frames Shorter Than, type the maximum number of frames you want to detect. The default is 10, which indicates the system will detect clips with 9 or fewer frames. d. Click OK. 2. Click the Timeline to activate it. 3. Select the tracks you want to search. 4. Move the position indicator to the beginning of the sequence or before the part of the sequence you want to search. 5. Select Clip > Find Flash Frame.
Chapter 11 Using the Timeline 450
Chapter 12 Working in Trim Mode Basic editing in Source/Record mode and in the Timeline initially produces a rough cut, which can be loosely defined as a series of straightcut edits with many rough edges and few effects. After creating a rough cut, you can enter Trim mode and fine-tune the transitions between each clip or between whole segments. You can also trim edits as you build a sequence rather than create a rough cut first.
Chapter 12 Working in Trim Mode Understanding Trim Mode Trim mode provides a unique set of controls within the Composer window for fine-tuning edits with various trim procedures. There are three types of trimming modes: • Quick Trim Mode • Big Trim Mode • Small Trim Mode From these Trim modes, you can perform many of the same functions, such as removing or adding frames, or slipping or sliding segments. n You can render transition effects while in Trim mode but you cannot render segment effects.
Understanding Trim Mode Quick Trim Mode You can enter Quick Trim mode from the Playback monitor for making quick adjustments to transitions in your sequence. Quick Trim mode replaces the Playback monitor with smaller displays of outgoing and incoming frames.
Chapter 12 Working in Trim Mode Big Trim Mode Big Trim mode replaces the Source and Record monitors with displays of outgoing and incoming frames. Big Trim mode also shows transition playback loop parameters.
Understanding Trim Mode Small Trim Mode Small Trim mode leaves the Source monitor display intact but has smaller displays of outgoing and incoming frames. Outgoing frames Incoming frames Small Trim mode Frame offset counters Trim buttons Play Loop button Trim Settings Options There are several options available from the Trim Settings dialog box. To open the Trim Settings dialog box: t Double-click Trim in the Settings scroll list in the Project window.
Chapter 12 Working in Trim Mode For more information about the Trim Settings options in the Play Loop tab, see “Trim Settings Options - Play Loop Tab” in the Help. The Play Loop feature continuously replays the last trim you performed for review purposes. For information about the Play Loop feature, see “Reviewing the Trim Edit” on page 464. Entering and Exiting Trim Mode You can enter Trim mode in several different ways, depending on the type of trim you expect to perform.
Entering and Exiting Trim Mode t Alt+click (Windows) or Option+click (Macintosh) the Trim Mode button to select the previous trim roller configurations. By default, when you enter Trim mode, the trim rollers are set for dual-roller trimming. For more information about selecting trim sides, see “Selecting Trim Sides” on page 460. t Lasso the transitions in the Timeline. Draw the lasso by clicking at a point above the top track in the Timeline and dragging to surround the transitions.
Chapter 12 Working in Trim Mode t Click the Go to Previous Edit or Go to Next Edit button. By default, the system selects the nearest transition in either direction of the selected track for dual-roller trimming. If the transitions are a straight cut, the system selects all selected tracks. If the nearest transition is an overlap edit with staggered transition points, the system selects the next transition where all selected tracks have transitions at the same point.
Entering and Exiting Trim Mode To enter Small Trim mode: 1. Double-click Trim in the Settings scroll list in the Project window. The Trim Settings dialog box opens. 2. Select “Always use Small Trim mode” in the Features tab. Small Trim mode is displayed when you enter Trim mode. Exiting Trim Mode To exit Trim mode at any time, do one of the following: t Click the Trim mode button. t Click the Source/Record Mode or the Effect Mode button.
Chapter 12 Working in Trim Mode Using Basic Trim Procedures The following sections provide basic trim procedures you can use when working in Trim mode: • Selecting Trim Sides • Selecting Video Tracks in Trim Mode • Audio Solo in Trim Mode • Selecting Additional Transitions • Performing a Basic Trim • Reviewing the Trim Edit • Reviewing an Edit • Trimming On-the-Fly • Dual-Image Playback During Trims • Trimming During a Playback Loop Selecting Trim Sides To select the sides of a transiti
Using Basic Trim Procedures Trim Counter A-side B-side Purple highlight indicates active side. The selected parts of the transition are highlighted, and the corresponding rollers appear in the Timeline. Also, one or both of the frame counter indicators below the monitors are highlighted to reflect the active trim sides: A-side, B-side, or both. The number indicates how many frames have been added or subtracted from the transition.
Chapter 12 Working in Trim Mode Selecting Additional Transitions In Trim mode, you can select additional transitions for trimming in different contexts. To quickly select additional transitions on contiguous tracks for trimming on the same side: t Click the corresponding record-side track selectors in the Track Selector panel.
Using Basic Trim Procedures To quickly add multiple transitions to the currently selected transitions: t Press the Shift key and lasso the additional transitions. You can select and trim two heads or tails simultaneously, in any combination, for each track in the sequence. All selected transitions are trimmed the same number of frames. This allows you to save time and in some cases, maintain sync by performing a single-trim procedure across multiple tracks and transitions.
Chapter 12 Working in Trim Mode t Use controls in the Timeline by clicking a roller at the selected transition and dragging forward or backward in the sequence. For greater control while performing a basic trim: t Press Ctrl+Alt (Windows) or press the Option key (Macintosh) as you drag one frame at a time. t Press the Ctrl key (Windows) or k key (Macintosh) to snap to other transition points. As you trim, all selected transitions in the Timeline move in unison.
Using Basic Trim Procedures n You must display two rows of buttons in the Composer window to see the trim controls. For more information, see “Understanding Composer Settings” on page 314. 4. To stop the playback loop, click the Play Loop button again. 5. To exit Trim mode, click the Source/Record Mode button. Reviewing an Edit Edit Review button n The Edit Review command allows you to review an edit or other change that you made to a transition.
Chapter 12 Working in Trim Mode For convenience, this method isolates the trim controls to just three keys. To trim on-the-fly: 1. Click either the outgoing (A-side) or incoming (B-side) monitor to play in real time during the trim. 2. Select one or more transitions for single-roller or dual-roller trimming. 3.
Using Basic Trim Procedures 5. Press one or a combination of the J-K-L keys. As the transition plays, notice that both the A-side and B-side of the trim play back in the Trim monitors. 6. When you see or hear the point at which you want to trim, press the space bar to stop playback and update the transition in the sequence. n Real-time effects are disabled when using the Dual Image Play option.
Chapter 12 Working in Trim Mode Creating Overlap Edits You can use an overlap edit to smooth a transition by giving the viewer the illusion that the audio or video is shared between two separate but adjacent clips. Perform a dual-roller trim to create overlap edits. Audio overlap example Before trimming V1 A1 A2 Clip A Clip B Clip C After trimming V1 A1 A2 Clip A Clip B Clip C Clip B audio is extended. Clip C audio is trimmed in. To create an overlap edit: 1.
Extending an Edit Extending an Edit Use an extend edit to perform dual-sided (A-side and B-side) trims on selected tracks within Source/Record mode. An extend edit allows you to quickly create a split edit without entering Trim mode. It also allows you to establish the exact frame that you want to trim to by using the position indicator. (When you enter Trim mode, the position indicator moves to the nearest transition by default.) You can extend edits backward or forward in the Timeline.
Chapter 12 Working in Trim Mode 3. Click the Extend button. You can map the Extend button from the Trim tab of the Command palette. For information on the Command palette and button mapping, see “Understanding Button Mapping” on page 149. The adjustment appears in the Timeline. Video track is extended backward. Slipping or Sliding Segments Slip and slide procedures are two unique Trim mode techniques that allow you to make frame-accurate adjustments to a selected segment.
Slipping or Sliding Segments To drag a lasso around a segment on a lower track, press and hold the Alt key (Windows) or Ctrl key (Macintosh) while you drag a lasso. You enter slip trim by default. To switch to slide trim, press and hold the Alt key (Windows) or Option key (Macintosh) while you doubleclick the segment. You can also select two or more contiguous segments within a track for slipping or sliding as a whole by dragging the lasso around four or more transitions.
Chapter 12 Working in Trim Mode The Slip/Slide Display Once you select the clips for slipping or sliding, the Trim mode interface changes to a four-frame display. For more information, see “Understanding the Four-Frame Display” on page 413.
Slipping or Sliding Segments The type of trim you perform (slip or slide) determines which frames are updated, as follows: • In slip trimming, the two inner monitors for the head and tail frames of the clip change because only the contents of the clip are adjusted. The frames that precede and follow the clip are not affected. Surrounding material remains fixed. Before slip Slip 1 frame to the right.
Chapter 12 Working in Trim Mode t Use the trim keys or buttons to shift the selection by 1-frame or 10-frame (8-frame for 24p) increments. t Use the J-K-L keys. 2. Monitor the progress of the trim by using the monitors, the Trim counters, and the Timeline. When you reach the end of available material while slipping a shot, the trim stops. Similarly, when you reach the next transition while sliding a shot along a track, the trim stops. A red bracket at the transition indicates the limit.
Maintaining Sync While Trimming 3. Slip the shot by doing one of the following: t Click the Slip Left button to slip the shot one frame left (revealing later material from the source clip). t Click the Slip Right button to slip the shot one frame right (revealing earlier material from the source clip). t Alt+click (Windows) or Option+click (Macintosh) the Slip Left or Slip Right button to trim 10 frames (8 frames for 24p) at a time.
Chapter 12 Working in Trim Mode A black segment is added without changing the duration of sequence. No black is added and sync breaks appear in the Timeline. Trimming without adding black Black fills the trim duration and sync is maintained. Adding black while trimming After you have added black filler to a video track, you can replace the filler with footage by performing a replace edit. For more information, see “Performing a Replace Edit” on page 375.
Maintaining Sync While Trimming Trimming with Sync-Locked Tracks You can sync lock tracks to maintain a synchronized relationship when you perform a single-roller trim. Single-roller A-side trim Sync Lock icon Before trimming A1 A2 A3 Maintains the relationship After trimming n A1 A2 A3 Sync-locked tracks aid only single-roller trim functions in Trim mode because dual-roller trims do not cause sync breaks. To trim with sync-locked tracks: 1.
Chapter 12 Working in Trim Mode 2. Perform single-roller trims as necessary, with the following results: - When you trim the A-side of a transition forward, all other segments locked in sync move forward with the trim. If the transitions are staggered, this action might split one or more of the segments at the sync point established by the position indicator, leaving filler.
Using the Transition Corner Display Using the Transition Corner Display The Transition Corner Display is a Trim mode interface that shows six frames you can use as reference points when trimming a transition effect.
Chapter 12 Working in Trim Mode To trim a transition using the Transition Corner Display: 1. Select a transition effect for trimming: t Lasso the effect in the Timeline from right to left. t Click the Trim Mode button to enter Trim mode, and click in the transition in the Timeline. t Use the Go to Transition buttons to enter Trim mode, and step through transitions until you highlight the transition you want. 2. Click the Transition Corner Display button.
Chapter 13 Working with Audio You edit audio by using many of the same techniques and tools you use to edit video, including Source/Record mode, Segment mode, and Trim mode functions. Your Avid system also provides several unique features that facilitate audio editing, such as audio scrub, waveform displays, and tools for adjusting and mixing audio levels and pan between speakers. In addition, you can adjust the high, low, and midrange frequency ranges of segments by using the Audio Equalization (EQ) tool.
Chapter 13 Working with Audio Exploring the Audio Tools The Avid system provides a collection of tools for managing and finetuning audio volume, pan, equalization, and transitions. The general purpose of each tool is as follows: 482 • Audio tool: Use this tool primarily for adjusting and calibrating global input and output levels when you capture from analog sources or output to tape. For more information, see “Using the Audio Tool and Preparing for Audio Output” in the Help.
Accessing Audio Effect Tools Accessing Audio Effect Tools You can access the following tools from any of the audio effect tools: • Audio Mix (for adjusting pan and volume) • Automation Gain • AudioSuite • Audio EQ To access one of the audio effect tools: t Select Tools > tool name. To switch to another tool when one of the audio tools is already open: t Click the Effect Mode Selector pop-up menu, and select the new tool.
Chapter 13 Working with Audio Audio Editing Aids The Avid system provides audio scrub features and waveform plots specifically designed for frame-accurate cueing, marking, and editing of audio. You can use these features any time during editing or while making adjustments with the audio tools. Soloing Audio Tracks in the Timeline You can solo multiple tracks in the Timeline. Soloing audio tracks allows you to: • Listen to several tracks at once without turning the other audio tracks off or down.
Audio Editing Aids Using Audio Scrub The term audio scrub originated in the film industry. It describes the process of “scrubbing” a magnetic audiotape across the playback heads to monitor a portion of sound. This process isolates portions of audio to help you accurately mark edit points or analyze transitions for careful trimming.
Chapter 13 Working with Audio Table 20 shows how many tracks can be scrubbed at the varying speeds of play.
Audio Editing Aids Performing Smooth Audio Scrub You perform the smooth audio scrub procedure by using either the J-K-L keys or the mouse, as described in this section. Using the J-K-L Keys to Perform Smooth Scrub You can use three-button play with the J-K-L keys to perform smooth audio scrubbing of selected tracks of audio at variable speeds. You cannot activate digital audio scrub with three-button play.
Chapter 13 Working with Audio Using Digital Audio Scrub Digital audio scrub enables you to sample selected frames of incoming or outgoing audio as you move through the footage, without a change in pitch or speed. The following are unique characteristics of digital scrub: • The frames of audio you hear are always at your point of destination.
Audio Editing Aids To adjust the parameters for digital scrub: 1. Open the Audio Settings dialog box using one of the following procedures: t Double-click Audio in the Settings scroll list in the Project window. t If you have digital scrub parameters displayed in the second row of information above the Source or Record monitors, Alt+click (Windows) or Option+click (Macintosh) the digital scrub parameters.
Chapter 13 Working with Audio 3. Move through the material in one of the following ways to hear the scrub: t Drag the position indicator. t Click the Step buttons to step through in fixed increments: 1 frame backward, 1 frame forward, 10 frames (8 frames for 24p) backward, or 10 frames (8 frames for 24p) forward. When you find the correct frame, mark the location, trim the transition, or perform any other function you choose.
Audio Editing Aids Your choice of plot type is a matter of visual preference: - Energy plot: Displays only the peaks of the audio amplitude in the waveform from the baseline. It is a graphical representation of the mathematical Energy Function for audio waveforms. Waveform energy plot - Sample plot: Displays the entire amplitude of the audio waveform. This is the same as the sample voltage values you would see on an analog oscilloscope waveform.
Chapter 13 Working with Audio t To enlarge the height of selected audio tracks and subsequently the waveform displays, press Ctrl+L (Windows) or k+L (Macintosh). t To reduce the height of selected audio tracks and subsequently the waveform displays, press Ctrl+K (Windows) or k+K (Macintosh). t To enlarge the size of the sample plot image without enlarging its track, press Ctrl+Alt+L (Windows) or k+Option+L (Macintosh). This procedure is useful when you view detail in loud passages.
Audio Editing Aids Identifying the Sample Rate by Color If you have a sequence with several different sample rates, you can identify a specific sample rate by color. To apply a color coding to a sample rate: 1. Load a sequence with multiple sample rates into the Timeline. 2. Click the Timeline Fast Menu button, and select Sample Plot. 3. In the Project window, double-click Audio Project Settings. The Audio Project Settings dialog box opens. 4. Click the Main tab. 5.
Chapter 13 Working with Audio (48 kHz) will be displayed as black, and the sample plot of all other clips with different sample rates (32 kHz and 44.1 kHz) will be displayed as white. Depending on what sample rate you selected for your project, the color black will be displayed on those clips.
Using the Audio Mix Tool Using the Audio Mix Tool For additional information on audio levels for digital cut output, see the input and output guide for your Avid system. The default volume for master clips is set to zero (that is, with no attenuation) when you first capture the media. The pan option in the Audio Settings dialog box determines how the system plays back the default pan.
Chapter 13 Working with Audio To open the Audio Mix Tool, do one of the following: t Select Tools > Audio Mix. t If one of the audio tools is already open, click the Effect Mode Selector pop-up menu, and select Audio Mix.
Using the Audio Mix Tool With the tool collapsed, you can continue to adjust levels by selecting a track and typing values by using the numeric keypad on the keyboard, or by typing a value into the Volume Level display. You can resize the entire Audio Mix tool by dragging the edge or corner of the tool. You can resize the Audio Mix tool only when the sliders are displayed. Adjusting One Audio Track at a Time To adjust one audio track at a time in the Audio Mix tool: 1.
Chapter 13 Working with Audio 4. Select the audio track to be adjusted by doing one of the following: n t Click the Track Selection Menu button for the appropriate audio track. t Alt+click (Windows) or Option+click (Macintosh) the Track Selection Menu button, and then select a track. To verify or change the output channels, use the Audio tool (select Tools > Audio Tool). 5.
Using the Audio Mix Tool 10. Repeat steps 6 through 9 until you are satisfied with the volume and pan levels. The system uses the new settings whenever you play back or record the sequence. Changing an Audio Level To change an audio volume level value in the audio panel, do one of the following: t Click a number along the vertical edge of the Volume Level slider. t Click the Volume Level slider, and type a value. Values are cumulative until you press Enter (Windows) or Return (Macintosh).
Chapter 13 Working with Audio Applying Pan Value Adjustments To apply the adjustments: t Click the Audio Mix Tool Fast Menu button, and select one of the commands. - The Set commands (Set Pan on Track, Set Level on Track) apply the same pan or volume levels currently set in the Audio Mix tool to all segments in the marked regions of the tracks.
Using the Audio Mix Tool n The Clip Gain values set by the Audio Mix tool are the values for the entire segment; for example, you cannot set a subsection of a segment without affecting the entire segment. To set gain for a portion of a segment, use Audio Gain Automation. For more information, see “Using Audio Gain Automation” on page 506.
Chapter 13 Working with Audio Rendering an Audio Effect The Render Effect button allows you to render an audio effect without closing the Audio Mix tool. For example, if you change the level of a clip that contains a rendered audio dissolve, the effect becomes unrendered. You can use the Render button to rerender the audio dissolve directly from the Audio Mix tool. Then, you can play the clip back immediately to hear the effect of the level change with the dissolve in place.
Using the Audio Mix Tool Modifying How the System Interprets Pan During Playback To modify the way the system interprets pan during playback: t Set the default pan values in the Audio Settings dialog box. t Click the Mix Mode Selection Menu button in the Output tab in the Audio Project Settings dialog box, and select one of the following modes: - Stereo uses the default pan settings and allows you to create pan effects. - Mono pans all tracks to center during output. This mode ignores pan effects.
Chapter 13 Working with Audio You can perform the following operations while the system plays the loop: • Adjust audio effects. • Use the Peak Hold pop-up menu in the Audio tool to change between Peak Hold and Infinite Hold. • Use the Reset Peak button in the Audio tool. For more information on the Audio tool, see “Using the Audio Tool” in the Help. To adjust volume while playing an Audio Mix effect: 1. Do one of the following: t Select an existing Audio Mix effect.
Using the Audio Mix Tool Limitations on Adjusting Volume If there is not an existing Audio Mix effect on the clip before you start, you do not hear any changes until you click the Audio Loop Play button to stop and replay the effect. As you adjust the volume values on an existing Audio Mix effect, you might not hear the results immediately. It takes a few seconds for the Avid system to apply the changes to the clip.
Chapter 13 Working with Audio Using Audio Gain Automation Audio Gain Automation (also known as audio volume rubberbanding) allows you to change the volume of a segment by adding and manipulating gain keyframes in the Timeline. The following illustration shows an expanded audio track containing gain keyframe information. Gain values in decibels Graphic representation of keyframes and gain ramps in the Timeline The Avid system uses a linear ramp to change the volume from one gain keyframe to the next.
Using Audio Gain Automation For example, assume that you have copied an audio file from a CD-ROM. You want to equalize (EQ) the audio, but the overall volume is too loud. In this case, you would do the following: 1. Use the Audio Mix tool to lower the overall volume. See “Using the Audio Mix Tool” on page 495. 2. Apply an EQ effect and any other audio effects. See “Using the Audio EQ Tool” on page 523. 3. Use Audio Gain Automation to fine-tune the volume of different sections of the audio in the sequence.
Chapter 13 Working with Audio Adjusting Volume in the Timeline To use Audio Gain Automation to adjust volume: 1. Select an audio track for adjusting volume. 2. Click the Timeline Fast Menu button, and select Audio Data > Auto Gain. n n If there is audio volume data on a clip and Auto Gain is not selected from the Timeline Fast menu, the system displays a pink triangle on the clip to indicate that audio volume data is present but not displayed.
Using Audio Gain Automation The following illustration shows the expanded audio track with volume data. 4. Click the Add Keyframe button in the FX tab of the Command palette to add keyframes along the Timeline. The Avid system adds a keyframe to each enabled track. A straight line appears in the selected audio track. The line shows the current gain level for that track in the Audio Mix tool.
Chapter 13 Working with Audio n You don’t need to press the mouse button. If you press the mouse button, you might change the gain. If there are identical keyframes in other active tracks, the system deletes them also. To delete groups of audio gain keyframes: 1. Mark an IN point and an OUT point, or mark the entire segment. 2. Delete any keyframes in the marked area.
Using Audio Gain Automation t Move a keyframe horizontally to move the start or end of a ramp. Place the pointer over a keyframe. When the pointer changes to the hand pointer, Alt+click (Windows) or Option+click (Macintosh) the keyframe, and drag it. t Move several keyframes vertically on a track at the same time by moving IN and OUT points to select the area you want. When you move one keyframe up or down within the marked area, all keyframes within the marked area move in relation to each other.
Chapter 13 Working with Audio For information on using these external fader controllers or mixer, see “Recording Automation Gain Information” on page 519. Adjusting the Volume of Individual Keyframes To edit the volume for individual keyframes by using an external fader controller or mixer: Position indicator lights 1. Check the color of the position indicator lights.
Using Audio Gain Automation Understanding the Automation Gain Tool This section describes the Automation Gain tool in detail. The following illustration shows the Automation Gain tool.
Chapter 13 Working with Audio • Number of Mix Panes and Which Set of Tracks to Display in Mix Panes Menu buttons: These buttons allow you to display 4 or 8 panes and to select which enabled tracks are displayed. They are similar to the display options in the Audio Mix tool. For more information, see “Resizing the Audio Mix Tool” on page 496. • Render Effect button: This button is particularly useful for rendering audio effects.
Using Audio Gain Automation Track Solo Button The Track Solo button (Speaker icon) lets you mute and solo individual audio tracks during Audio Gain Automation recording. Button Color Description Purple (default) The audio track is on. Gray The audio track is muted. Green The track is soloed. You can solo more than one track at a time. To switch between solo and on, do one of the following: t Click the Track Solo button. t Press the number keys 1 to 8.
Chapter 13 Working with Audio You can also use the buttons above each fader on the external fader controller or mixer to solo or mute an individual audio track as follows: • FaderMaster Pro: Has one button that you can use to solo or mute an individual audio track during Audio Gain Automation recording: - Press the button above the fader once to switch between solo and on. - Press the button above the fader twice quickly to switch between mute and on.
Using Audio Gain Automation The position indicator lights are especially useful for the FaderMaster Pro because it is important to position the faders close to the track volume before you start recording. Otherwise, you might create an unwanted jump in the volume when you move the faders during recording. n The Avid system does not record values from a fader on the FaderMaster Pro until you move the fader. Then it reads the current position of the fader and adjusts the volume accordingly.
Chapter 13 Working with Audio Automation Gain Tool Fast Menu To make the Automation Gain Tool Fast menu active for a given track: t Click the Track Selection Menu button for that track in the Automation Gain tool. The commands vary depending on the types of points you set within the clip or sequence, as follows: • With IN and OUT points: Commands apply adjustments to selected tracks between the points.
Using Audio Gain Automation For example, if you type –1 in the Gain Adjustment text box, the audio level settings across all segments of the marked region of selected tracks will be lowered by exactly 1 dB when you click OK. - The Remove Automation Gain on Track removes all the audio keyframes within the marked region. - The Remove Pan on Track deletes all pan adjustments that have been applied to segments in the marked regions of selected tracks.
Chapter 13 Working with Audio Using the Automation Gain Tool Sliders to Record Gain Information This procedure describes how to record audio gain information without using an external fader controller or mixer. To record audio gain information by using the Automation Gain Tool sliders: 1. Select an audio track for adjusting volume. 2. Click the Timeline Fast Menu button, and select Audio Data > Auto Gain.
Using Audio Gain Automation 9. Repeat step 8 until you have decreased the number of keyframes to an acceptable level. You should remove as many excess keyframes as possible while still maintaining the desired volume changes. You can move, add, and delete keyframes individually or as groups to further adjust the volume. For details on how to adjust the keyframes, see “Adjusting Volume in the Timeline” on page 508.
Chapter 13 Working with Audio Position indicator lights 3. (FaderMaster Pro only) Note the colors of the position indicator lights for the track you want to adjust. Move the fader until both lights are blue. If you cannot adjust it to the exact position where both lights are blue, get it as close as you can. 4. Set Preroll and Postroll values, if necessary. 5. Click the Record button to start recording your actions. 6.
Using the Audio EQ Tool 10. Repeat step 9 until you have decreased the number of keyframes to an acceptable level. You should remove as many excess keyframes as possible while still maintaining the desired volume changes. Using the Audio EQ Tool The Audio Equalization (EQ) tool supports real-time, segment-based frequency equalization on individual clips. This feature allows you to adjust the high, low, and midrange frequency ranges of an audio clip.
Chapter 13 Working with Audio The Audio EQ tool opens.
Using the Audio EQ Tool • Audio Loop Play button: Allows you to make adjustments to an EQ effect while you play the effect. This button is also a mappable button on the Command palette. For more information about using this button, see “Adjusting Volume While Playing an Audio Mix Effect” on page 503. • Render Effect button: Allows you to render an effect without leaving the Audio EQ tool. • Effect icon: Allows you to create an EQ template. Drag the icon to an open bin to create the template.
Chapter 13 Working with Audio EQ-Specific Features The Audio EQ tool provides three bands of control: • The first band, the low shelf, has four turnover points (50 Hz, 80 Hz, 120 Hz, and 240 Hz). A turnover point is the point at which the curve starts to return to 0. A shelf affects all frequency values within the range of the shelf. The low shelf affects all frequencies from 20 Hz to the low shelf turnover point. • The second band is the parametric midrange.
Using the Audio EQ Tool The following illustration shows the Audio EQ tool with the frequency response curve displayed and identifies the related areas of the tool.
Chapter 13 Working with Audio 4. Select Tools > Audio EQ. 5. Click and hold the Track Selection Menu button in the Audio EQ tool, and select a track to be adjusted. Track Selection Menu button The Track Selector panel in the Timeline is updated to reflect your selection. n If multiple tracks are enabled in the Timeline, then plus signs (+) appear next to the enabled tracks in the Audio EQ tool. 6.
Using the Audio EQ Tool 8. Click the Audio EQ Tool Fast Menu button, and select Set EQ to apply the adjustments to the track. The command works as follows on the selected tracks: - With IN and OUT points: Apply the EQ effect to selected tracks between the points. - With an IN point (no OUT point): Apply the EQ effect to full clips from the IN point to the end of selected tracks. - With no points: Apply the EQ effect globally (across entire tracks).
Chapter 13 Working with Audio If there is no EQ setting on the currently selected clip, selecting Set EQ In/Out deletes the EQ settings on all clips within the IN to OUT range. For example, because there is no EQ setting on Audio Clip 3 in the following example, Set EQ In/Out deletes the EQ effect from Audio Clip 1 and Audio Clip 2. Before Set EQ In/Out After Set EQ In/Out – EQ effect is deleted from Audio Clip 1 and Audio Clip 2.
Using the Audio EQ Tool Saving Audio EQ Effects The Avid system treats an EQ setting as an effect. You can save EQ settings in a bin just as you save any other effect template. This makes it easy to save EQ settings and apply them whenever you need them. The following illustration shows an EQ Effect icon in a bin and in the Timeline. EQ effect icon in a bin EQ effect in the Timeline To save EQ settings in a bin: t Drag the effect icon in the Audio EQ tool to a bin.
Chapter 13 Working with Audio Removing Audio EQ Effects To remove an Audio EQ effect: 1. Move the position indicator to the effect in an active track. 2. Do one of the following: t In Source/Record mode, click the Remove Effect button. t In Trim or Effect mode, press the Delete key. You can also use the commands from the Audio EQ Tool Fast menu. Audio EQ Examples The following examples show two different ways to use the Audio EQ tool to remove excess bass from an audio track.
Using the Audio EQ Tool 3. Boost the midrange of the parametric curve to +7.7 dB. Small Octave Range Example This example isolates the particular frequency that we want to deemphasize. In this example, we do not use the low shelf, but instead use the parametric midrange to isolate the frequency. To isolate the frequency: 1. Use the ¼-octave influence range. 2. Set the midrange EQ parameter to –15 dB.
Chapter 13 Working with Audio 3. Use the EQ Range slider to move the midpoint of the parametric curve until it isolates the bass frequency. In this case, the bass frequency that we want to deemphasize is approximately 80 Hz. Use the EQ Range slider to move the center point of the parametric curve and locate a specific frequency. To locate a specific frequency and either emphasize or deemphasize it: • Use the ¼-octave influence range and a large negative decibel value.
Using the Audio EQ Tool Using Audio EQ Templates Your Avid system provides a set of predefined audio EQ templates. These templates address a number of common audio problems such as removing tape hiss or boosting the low frequency on a music track. The templates are accessible from the Fast menu on the Audio EQ tool. You can also add your own custom EQ templates to the Fast menu.
Chapter 13 Working with Audio Applying an EQ Template To apply an EQ template from the Audio EQ Tool Fast menu: 1. Move the position indicator to the audio clip in the Timeline. 2. Click the Audio EQ Tool Fast Menu button, and select the template. The Avid system places the EQ effect on the audio clip. The following illustration shows the contents of the Audio EQ tool when you select the Female Voice with Presence template in the Timeline.
Using the Audio EQ Tool Creating Your Own Templates If you create an EQ effect, you can use it again as a template in another sequence or on another track. To create your own EQ effect template: 1. Drag the effect icon from the Audio EQ tool to a bin. The system creates an EQ effect in the bin. 2. Rename the template by clicking the text and typing a new name. Effect icon Adding an EQ Template to the Audio EQ Tool Fast Menu You can add your own EQ templates to the Audio EQ Tool Fast menu.
Chapter 13 Working with Audio (Windows) To add an EQ template to Site_EQs_Bin: 1. Open the bin containing your EQ templates. 2. Select File > Open Bin. A dialog box opens. 3. Open the bin named Site_EQs_Bin.avb as follows: a. Open one of the following folders: drive:\Program Files\Avid\Avid Media Composer Adrenaline\ SupportingFiles\Site_Effects b. Click the Files of Type pop-up menu at the bottom of the dialog box, and select All Files. The Site_EQs_Bin.avb file appears. c. Double-click the Site_EQs_Bin.
Using the Audio EQ Tool 3. Open the bin named Site_EQs_Bin.avb as follows: a. Open the Macintosh HD/Applications folder. b. Open the Avid Media Composer Adrenaline folder. c. Open the SupportingFiles folder. d. Open the Site_Effects folder. e. Double-click the Site_EQs_Bin file. 4. Drag one of your EQ templates to Site_EQs_Bin. 5. If you have not already done so, name the template by clicking the text and typing a name. 6. Close the bin.
Chapter 13 Working with Audio As you adjust the EQ values on an existing EQ effect, you might not hear the results immediately. It takes a few seconds for the changes to be applied to the clip. To improve the response time, do one of the following: t Monitor as few audio tracks as possible. t Deselect the video track, if practical. t Use IN and OUT points to choose a narrow interval to adjust.
Understanding Digidesign AudioSuite Plug-Ins • A DAE Plug-Ins folder containing the following: - A set of basic plug-ins from Digidesign. - A file named AvidAppPlugIn.dpm. The Avid system requires this file; do not delete it. Several basic plug-ins are installed automatically. For a description of the plug-ins, see “Accessing the AudioSuite Plug-Ins” in the Help. When you purchase additional plug-ins, the third-party vendor provides instructions on how to load the plug-ins.
Chapter 13 Working with Audio Starting and Quitting the DAE Application (Macintosh Only) When you open the Digidesign AudioSuite window, the Avid system automatically starts the DAE application. The application continues running even after you close the window. To open the AudioSuite window and start the DAE application, do one of the following: t Select Tools > AudioSuite. t If an audio tool is already open, click the Effect Mode Selector pop-up menu, and select AudioSuite.
Understanding Digidesign AudioSuite Plug-Ins Using Digidesign AudioSuite Plug-Ins To use AudioSuite plug-ins, do one of the following: t Apply a plug-in to a clip in the Timeline. The end result is a rendered effect. t Use the controls in the AudioSuite window to create a new master clip. This method allows you to process more than one channel at a time and to create new media that is longer or shorter in duration than the source media. For more information, see “Creating New Master Clips” on page 547.
Chapter 13 Working with Audio Applying an AudioSuite Plug-in to a Clip in the Timeline The following illustration shows the default layout of the AudioSuite window. Effect Mode Selector pop-up menu Render Effect button Fast Menu button Audio Loop Play button Effect icon Display/Hide Master Clip Controls button Plug-In Selection pop-up menu Target Drive pop-up menu Status display Activate Current Plug-In button Track Selection Menu button To apply an AudioSuite plug-in to a clip in the Timeline: 1.
Understanding Digidesign AudioSuite Plug-Ins 3. Click the Plug-In Selection pop-up menu, and select a plug-in. The Avid system automatically applies the plug-in effect to the track or tracks in the Timeline. 4. Click the Activate Current Plug-In button. A dialog box associated with the plug-in opens. 5. Make any necessary adjustments, and click the Preview button to preview the effect. For more information, see “Using a Plug-In Dialog Box” on page 545. 6. To save the effect, click OK.
Chapter 13 Working with Audio • Preview: Plays back a portion or all of the currently selected audio clip with processing. Some plug-ins can preview in real time and some cannot. If the plug-in cannot preview in real time, the Avid system plays back the processed audio in 2-second intervals. The Avid system processes 2 seconds of audio, plays it, processes the next 2 seconds, plays it, and so on. • Render: Renders the effect and creates a new audio media file.
Understanding Digidesign AudioSuite Plug-Ins Rendering Plug-in Effects You need to render all AudioSuite plug-ins before you can play back the effect. If you do not render the effect manually, the Avid system automatically renders the effect before it creates an audio mixdown or audio dissolve containing the effect. For more information, see “Troubleshooting AudioSuite Plug-Ins” on page 554. Creating New Master Clips You can use AudioSuite plug-ins to create new master clips.
Chapter 13 Working with Audio The following illustration identifies the controls that appear when you expand the AudioSuite window.
Understanding Digidesign AudioSuite Plug-Ins n • Target Bin for New Master Clip pop-up menu: This menu allows you to choose the target bin. The system will place the new media and a corresponding AudioSuite effect template in the bin. The template allows you to modify the effect at a later time. • Toggle Master Clip Mode button: This button activates the master clip processing mode. The button is yellow when master clip processing mode is active.
Chapter 13 Working with Audio Mono, Stereo, and Multichannel Processing AudioSuite plug-ins allow you to select the following types of processing: n • Mono processing only: This option is available for plug-ins that operate on only one audio track at a time. The other option (Stereo) appears dimmed. The plug-in applies the effect to each source track individually, in a serial manner. • Mono and stereo processing: These options are available for plug-ins that can treat two tracks as a stereo pair.
Understanding Digidesign AudioSuite Plug-Ins Most AudioSuite plug-ins automatically select the appropriate processing mode and label the values in the Processing Mode Selection pop-up menu. For example, the Normalize plug-in offers two choices: Peak On Each Track and Peaks From All Tracks (default). You select the processing mode from a menu in the AudioSuite window as described in the next section.
Chapter 13 Working with Audio 8. Make any changes, and click the Preview button to preview the effect. 9. Either render the plug-in from the Plug-In dialog box, or return to the AudioSuite window. For more information on rendering, see “Rendering Plug-in Effects” on page 547. When you click the Render Effect button, the system creates a new master clip in the target bin.
Understanding Digidesign AudioSuite Plug-Ins (Windows) To add a template to the AudioSuite Fast menu: 1. Open the bin containing your AudioSuite templates. 2. Select File > Open Bin. A dialog box opens. 3. Open the bin named Site_AudioSuite_Bin.avb as follows: a. Open one of the following folders: drive:\Program Files\Avid\Avid Media Composer Adrenaline\ SupportingFiles\Site_Effects b. Click the Files of Type pop-up menu at the bottom of the dialog box, and select All Files. The Site_AudioSuite_Bin.
Chapter 13 Working with Audio e. Double-click the Site_AudioSuite_Bin file. 4. Drag one of your AudioSuite templates to Site_AudioSuite_Bin. 5. If you have not already done so, name the template by clicking the text and typing a name. 6. Close the bin. n The Avid system does not save the effect to the bin until you close the bin. 7. Click the AudioSuite Fast Menu button, and look for your new template.
Understanding Digidesign AudioSuite Plug-Ins the DAE folder. If you have many plug-ins (for example, more than 10), the application might not be able to allocate enough memory for all of them. To correct memory allocation errors, or if the screen does not redraw correctly the first time you use the AudioSuite plug-ins: 1. Quit the Avid application. 2. Locate the DAE folder in your System folder, and click the DAE application icon within the DAE folder. 3. Press k+I to open the Get Info dialog box. 4.
Chapter 13 Working with Audio Canceling a Render Operation To cancel a render operation: t n Press Ctrl+period (Windows) or k+period (Macintosh). Be careful not to press these keys multiple times. If you press Ctrl+period (Windows) or k+period (Macintosh) after the render operation has been stopped [from a previous Ctrl+period (Windows) or k+period (Macintosh)], the Avid system closes the window after it cancels the render operation.
Understanding Recording Voice-Over Narration Understanding Recording Voice-Over Narration Audio punch-in allows you to record audio directly into the Timeline for voice-over narration. This feature saves you the extra steps of recording the narration to tape first, capturing, and then editing the audio clip into the sequence. You can “rehearse” the voice-over while listening to the sequence. The voice-over is not recorded while you are rehearsing. You can continue to rehearse until you get it right.
Chapter 13 Working with Audio Features of the Audio Punch-In tool are as follows: • Play In/Out button: Starts playing with the ability to perform a realtime punch-in. The play loops from the IN point to the OUT point but stops looping once recording is done. This button blinks bright green while playing. • Record button: Starts and stops the recording. If an IN point and OUT point are set, recording automatically starts at the IN point and stops at the OUT point.
Understanding Recording Voice-Over Narration This feature applies only when you start recording with the Record button. You can record real-time punch-in only until the end of the handle. • n The selected input channels are not used for playback. Do not select the same channels as mix output on the Audio Mix tool. • n Input Channels buttons: Identify the channels on the audio hardware that are used for recording. Click the appropriate button to select the channel.
Chapter 13 Working with Audio Connecting the Hardware Before you can use the Audio Punch-In tool, you need to connect a microphone or other input device to your system. The following are typical examples: • Connect a microphone to a mixer, and connect the mixer to the audio interface I/O device on your Avid system. • Connect a microphone to a microphone preamplifier, and connect the preamplifier to the audio interface I/O device on your Avid system.
Understanding Recording Voice-Over Narration The Audio Punch-In tool opens. Record button Play In/Out button Stop button Input Source pop-up menu Timeline Track pop-up menus Input Channels buttons 3. Select the input source and input channels that correspond to your hardware setup, and set other values in the window as appropriate. To select the input channels you want, click and hold the appropriate Input Channels button. 4. Click the Timeline Track pop-up menus, and select an output track.
Chapter 13 Working with Audio Loop play begins over the entire sequence. If you set an IN point and an OUT point, loop play begins from the IN point to the OUT point. The Play In/Out button blinks bright green while playing. 6. When you are ready to start the voice-over, click the Record button or press the B key. The Record button blinks bright red while recording, and the Play In/Out button is a steady green. The Audio Meter Channel button in the Audio tool becomes an I and changes to orange. 7.
Understanding Recording Voice-Over Narration n There are three Undo functions that can be performed during one session. The first undo removes the most recent punch-in, the second undo removes the second-to-last punch-in, and the third undo removes all the punch-ins. To cancel an audio punch-in at any time: t Click the Cancel button, or press the Esc or the period (.) key.
Chapter 13 Working with Audio To monitor other audio tracks: 1. Select Tools > Audio Tool. The Audio tool opens. 2. Click the Output Options pop-up menu, and select Mono. 3. Select Tools > Audio Punch-In. The Audio Punch-In tool opens. 4. Follow the procedure in “Creating the Voice-Over” on page 560. 5. As you record, monitor the previously recorded audio tracks along with your current recording from the meters in the Audio tool and from the sound on the speakers.
Using a GPI Device with the Audio Punch-In Tool Using a GPI Device with the Audio Punch-In Tool Your Avid system can send signals to a V-LAN® VLXi® deck controller and a general-purpose interface (GPI) device that trigger GPI actions. These signals are sent when playback begins and ends, and also when recording with the Audio Punch-In tool begins and ends.
Chapter 13 Working with Audio Understanding GPI Trigger Signals Your Avid system sends three different GPI trigger signals under the following circumstances: Trigger Signal Sent When Play Out Playback begins. Recording with the Audio Punch-In tool ends but playback continues because a postroll value is set in the Audio Punch-In tool (that is, the signal is sent when the Stop button in the Audio Punch-In tool changes to blue). Record Out Recording with the Audio Punch-In tool begins.
Using a GPI Device with the Audio Punch-In Tool GPI Signal Sequence When Using the Audio Punch-In Tool with Preroll and Postroll When you use the Audio Punch-In tool with preroll and postroll, the sequence of signals is as follows: 1. Play Out is sent when preroll begins (the position indicator begins moving in the Timeline, and the Play In/Out button in the Audio Punch-In tool blinks green). 2. Record Out is sent when recording begins (the Record button in the Audio Punch-In tool blinks red). 3.
Chapter 13 Working with Audio Connecting a V-LAN VLXi Controller and GPI The V-LAN VLXi controller and VLXi-GT GPI connect to your Avid system through a direct serial connection as shown in Figure 7. For more information on connecting V-LAN equipment to your Avid system, see the Help. You must configure the V-LAN VLXi controller to work with the VLXi-GT GPI. Assign the VLXi-GT to a V-LAN node address between 16 and 19. LAN connections of more than 50 feet (15.24 meters) must have a terminator.
Using a GPI Device with the Audio Punch-In Tool Configuring a V-LAN VLXi Controller and GPI Once you have connected a V-LAN VLXi controller and VLXi-GT GPI to your Avid system, you can configure the system to communicate with the controller and the GPI, and create GPI settings appropriate to your needs. You must create a separate GPI setting for each trigger signal you want the GPI to recognize. For example, you would need one setting for the Record Out signal and another for the Stop Out signal.
Chapter 13 Working with Audio Creating a GPI Setting To create a GPI setting: 1. In the Project window, double-click the Deck Configuration Setting. The Deck Configuration dialog box opens. 2. Double-click the VLXi-GT text box. The GPI Settings dialog box opens. 3. Select the appropriate settings. For more information about GPI settings option, see “GPI Settings Options” in the Help. 4. Click Add. The GPI Node Settings dialog box opens. 5. Select the appropriate settings.
Fine-Tuning Audio Transitions 6. Click OK. 7. Click Apply. The GPI setting is updated. Deleting a GPI Setting To delete a GPI setting: 1. In the Project window, double-click the Deck Configuration Setting. The Deck Configuration dialog box opens. 2. Click the VLXi-GT text box. 3. Select the name of the GPI you want to delete. 4. Click Delete. 5. Click OK. 6. Click Apply. The GPI setting is deleted.
Chapter 13 Working with Audio 4. Find the end of the area where you want to change the pan or level, leaving your position indicator on that frame as a marker. 5. Select the appropriate track. 6. Click the Add Edit button. 7. Use the process described in “Using the Audio Mix Tool” on page 495 to change the level or pan within this new segment.
Fine-Tuning Audio Transitions To apply a fade or crossfade: 1. Move the position indicator to a transition. 2. Click the Quick Transition button (it appears by default in the second row of buttons below the Record monitor). The Quick Transition dialog box opens. 3. Do not select another effect from the Add pop-up menu at the top; only dissolves work with audio tracks. 4.
Chapter 13 Working with Audio Dipping Audio To dip audio from a higher level to a lower one — for example, when bringing music down and under a voice-over track: t Use the procedures described in “Using Audio Gain Automation” on page 506. t Use the procedure described in this section. To apply a dip in audio: 1. Play back the section of the sequence where the dip will take place to determine the start point for the dip, and apply an add edit to the audio track.
Mixing Down Audio Tracks To mix down several edited audio tracks to one or two audio tracks: 1. Load a sequence into the Record monitor. 2. Click the Track buttons in the Track Selector panel to select the audio tracks you want to mix down. 3. Mark an IN point and an OUT point at the start and end of the material you want to mix down. If you do not mark the section of audio you want to mix down, the system mixes down all of the selected audio tracks. 4. Select Special > Audio Mixdown.
Chapter 13 Working with Audio t Select Stereo, and select two target tracks for the mixed-down audio. 6. Select a drive and a bin. The drive is the media drive where the system stores the media files for the mixed-down audio. 7. Select Save Premix Sequence if you want to save the sequence before mixing down the audio. 8. Click OK. The audio is mixed down, and the Avid system displays the new master clip in the bin.
Displaying Audio Formats in Bins - Delete Original Media: When you select this option, the system automatically deletes the original media after the conversion process is complete. - Target Drive: Identifies the drive for the new media files. Make sure that you choose a target drive with enough storage space for the generated media files and the ability to play back media. 4. Click OK. For information on setting the sample rate for a project, see “Adjusting Audio Project Settings” in the Help.
Chapter 13 Working with Audio 578
Chapter 14 Syncing Methods Your Avid system provides special tools that help you establish and maintain sync relationships between various clips. This includes managing sync between unrelated clips or clips with the same timecode, ganging footage, matchframing footage, and using Sync Point Editing.
Chapter 14 Syncing Methods Autosyncing Clips For more information on tracking sync breaks, see “Displaying Sync Breaks” on page 587. When you capture footage that includes both audio and video, the system automatically establishes sync when it creates clips in the bin. Autosyncing applies to audio and video clips that have been captured separately, usually from two separate sources.
Autosyncing Clips • If you autosync according to common timecodes that are staggered (one clip starts later than the other), the later starting timecode becomes the start of the new subclip. The clip with the earlier starting timecode is trimmed accordingly. To create an autosynced subclip: 1. Highlight the two clips in the bin. 2. Select Bin > AutoSync™. The Sync Selection dialog box opens. 3.
Chapter 14 Syncing Methods Using the AutoSequence Command AutoSequence is used with 24p and 25p projects in which picture and sound are captured separately. AutoSequence allows you to add audio to the original videotape if it was transferred without sound. You can use the AutoSync command to create synchronized subclips of the video and audio. You can then use AutoSequence to build a sequence with timecode that matches your original videotape.
Resyncing Subframe Audio To add audio to your original videotape: 1. Create synchronized subclips from the videotape’s master clips and your audio clips by using the AutoSync command. 2. Open the bins that contain the autosynced subclips. 3. Select the subclips that you want to include in the sequence. 4. Select Bin > AutoSequence. A synchronized sequence is created that contains the clips you selected. The new sequence appears in the Record monitor and in the Timeline.
Chapter 14 Syncing Methods The following conditions apply to resyncing at the perforation level: • n You can adjust the sync between a single video and a single audio track within subclips only.
Managing Sync Breaks 4. Click the Toggle Source/Record in Timeline button in the Timeline toolbar to display a Timeline for the subclip. 5. Zoom in on the area of the subclip that contains the audio slate frame as follows: a. Click the Timeline Fast Menu button, and select Zoom In. b. Draw a box around the slate-frame area. 6. Move the audio sync either backward or forward in 1-perf increments by clicking the Slip Left One Perf or Slip Right One Perf button.
Chapter 14 Syncing Methods Editing to Avoid Sync Breaks One way to avoid breaking sync is to maintain the duration of the track when adding or removing material, as follows: • When adding material to a track, use the Replace or Overwrite functions instead of Splice-in, whenever possible. • When removing material from a track, use Lift instead of Extract. (The Lift function leaves filler of the same duration when you remove footage.
Managing Sync Breaks Displaying Sync Breaks By default, the Timeline displays sync breaks whenever they occur during editing. They appear at break points as white numbers indicating negative or positive offset values relative to zero. The Sync Breaks option also displays match-frame edits by displaying an equal sign (=) on the edits.
Chapter 14 Syncing Methods Fixing Sync Breaks Sync breaks are displayed only when the out-of-sync tracks overlap. If an overlapping portion of one of the tracks is deleted, replaced, moved, or trimmed, then the sync break disappears. You fix sync breaks in one of several ways, based on the type of break and the needs of your sequence. Fixing Sync in Trim Mode For more information about trimming, see Chapter 12.
Managing Sync with Multiple Tracks Fixing Sync in Segment Mode For more information on editing in Segment mode, see “Understanding Segment Mode” on page 409. In Segment mode, you can restore sync in some circumstances by selecting and moving the entire out-of-sync segment.
Chapter 14 Syncing Methods You activate sync locking by clicking a Sync Lock button in the Track Selector panel to display the Sync Lock icon. You can also switch all sync locks on or off by clicking the Sync Lock All button. There are several unique aspects to sync locking: • In Segment mode, sync locking is controlled by the Segment Drag Sync Locks option in the Edit tab of the Timeline Settings dialog box and the Sync Lock icons.
Managing Sync with Multiple Tracks With tail leader added to synchronized tracks, you can go to the end of the sequence after making a complicated edit and see whether the leaders are lined up. If they are out of line, this indicates a sync break that you can measure and eliminate. To eliminate a sync break when the leaders do not line up: 1. Move the position indicator to the black segment that follows the out-of-sync leader. 2. Select the track, and then click the Mark Clip button.
Chapter 14 Syncing Methods Syncing with Locators For more information on using locators, see “Using Locators” on page 342. Like tail leaders, you can add locators to material in the Timeline to track and adjust breaks in sync between any number of tracks. You can place locators anywhere in the sequence and you can add specific notes. To mark sync points with locators: 1. Move the position indicator to the point in the sequence where you want to maintain sync between two or more tracks. 2.
Managing Sync with Multiple Tracks 3. To restore sync, find the point at which the sync was lost. Add or remove frames by using the appropriate edit function, as described in “Fixing Sync Breaks” on page 588. Using Add Edit When Trimming When trimming with several audio tracks in sync, you can use the Add Edit button to create an edit in the silent or black areas of the synced tracks. They occur in line with the track you are trimming, and they trim all the tracks at once to maintain sync.
Chapter 14 Syncing Methods Using Sync Point Editing Sync Point Editing allows you to overwrite material onto your sequence in such a way that a particular point in the source material is in sync with a particular point in the sequence. For example, you can sync an action in the source video with an audio event, such as a musical beat in the Record monitor, and then edit it so that the action occurs on the beat.
Ganging Footage in Monitors 4. Move the source position indicator to the sync frame in the clip. This establishes the source sync point. 5. Move the record position indicator to the sync frame in the sequence. 6. Select Sync Point Editing (Overwrites) in the Edit tab of the Composer Settings dialog box or select Special > Sync Point Editing. The orange mark on the Overwrite button signals Sync Point Editing is active. Orange mark indicates Sync Point Editing. 7.
Chapter 14 Syncing Methods 3. Click the Gang button for each monitor that you want to synchronize (the Record monitor is always ganged). The button changes to green when the function is enabled. n The Gang button appears by default in the second row of buttons below the monitors and in the second row of information above the Source and Record monitors. 4. View the footage in any of the monitors using standard playback methods.
Chapter 15 MultiCamera Editing The Avid MultiCamera editing features allow you to incorporate multiple camera angle sources into the nonlinear editing process.
Chapter 15 MultiCamera Editing Understanding Grouping and Multigrouping Clips The grouping and multigrouping procedures gather selected clips into a single unique clip. Both procedures allow you to use special MultiCamera editing features, such as multi-split views in MultiCamera mode. The differences between the two procedures are summarized as follows: 598 • Grouping creates a separate group clip out of a single set of master clips, from the IN point to the OUT point of the longest clip.
Understanding Grouping and Multigrouping Clips Creating Group Clips In addition to the multicamera context, grouped clips can be useful in other circumstances. Unlike multigrouping, which requires clips with matching source timecode, you can group clips that were shot at different times, on different days, and on completely different source tapes. This means that you can: • Use group clips to create montage sequences quickly with fast-cutting between unrelated clips.
Chapter 15 MultiCamera Editing 4. Select an option, based on the following: - Film TC/Sound TC, if you are syncing clips with matching film and sound timecode recorded in the field. This option appears dimmed if you are not working in a 24p or 25p project. - Inpoints, if you are syncing according to IN points set in each clip. - Outpoints, if you are syncing according to OUT points set in each clip. - Source Timecode, if the clips have matching timecode.
Understanding Grouping and Multigrouping Clips To multigroup your material: 1. Sort the clips by name in the bin. 2. Select Edit > Select All to select the master clips. 3. Select Bin > MultiGroup. 4. The Sync Selection dialog box appears. 5. Select an option, based on the following: - Film TC/Sound TC, if you are syncing clips with matching film and sound timecode recorded in the field. This option appears dimmed if you are not working in a 24p or 25p project.
Chapter 15 MultiCamera Editing MultiCamera Displays There are several displays that allow you to view and edit with multiple camera angles. You can edit with either group clips or multigroup clips in all of the displays. • Full-Monitor Display—The Source monitor displays a single frame from one clip in the group clip. You can view each angle in fullmonitor size as you edit. Editing with this display is similar to editing in Source and Record modes.
MultiCamera Displays Full-Monitor Display When you first load a grouped or multigrouped clip, the Source monitor displays a single frame from one clip in the group in Source/Record mode. This is called Full-Monitor display when working with group clips because you can view each angle in full-monitor size as you edit. The basic features of Full-Monitor display are as follows: • Provides source-oriented control of multicamera material.
Chapter 15 MultiCamera Editing Quad Split Source View Quad Split button After loading a group clip into the Source monitor, you enter Quad Split Source view by clicking the Quad Split button located in the Command palette in the MCam tab. The Source monitor splits into four camera angles of the group clip. A Group Menu icon appears in the second row of information above the Source and Record monitors.
MultiCamera Displays Swap Cam Bank button • Allows you to use the Quad Split button to switch the Source monitor between Full-Monitor display and Quad Split Source viewing and editing modes (editing functions are the same in both displays). • Allows you to use the Swap Cam Bank button to switch the Quad Split Source view from one bank of four camera angles to another bank of four camera angles. The Multi-angle View menus allow you to change the camera angles of the split displays.
Chapter 15 MultiCamera Editing The basic features of Nine Split Source view are as follows: Swap Cam Bank button • Provides source-oriented control of multicamera material. You can switch camera angles, play back (one camera angle at a time), cue, and mark material without affecting the sequence. • Provides the same Source monitor controls that are available when you edit other clips in Source/Record mode.
MultiCamera Displays MultiCamera Mode After loading a group clip into the Source monitor and editing it to create a new sequence, select MultiCamera Mode from the Special menu to activate the features. The MultiCamera Quad Split Edit or MultiCamera Nine Split Edit is displayed, depending on whether you were in Quad Split Source view or Nine Split Source view before entering MultiCamera mode.
Chapter 15 MultiCamera Editing The basic features of MultiCamera mode are as follows: Swap Cam Bank button 608 • Provides sequence-oriented control of multicamera material, in contrast to Full-Monitor display, Nine Split Source view, and Quad Split Source view. Whenever you play back, cue, switch camera angles, or mark material, your changes occur in the sequence. • All camera angles displayed in the Source monitor are synchronized and updates when stopped or when scrubbing in the timeline.
MultiCamera Displays MultiCamera Editing Techniques When you load a group or multigroup clip into the Source monitor and begin editing, the Timeline adds a unique identifier to indicate the presence of a group. The system uses the name of the clip within the group to identify the clip in each cut, and adds a G in parentheses to indicate the group.
Chapter 15 MultiCamera Editing Using the Add Edit Button You can use the Add Edit button like a hot key to add edits while stepping through a sequence during playback. The only difference is that you are not switching camera angles until after you set the edit points. This method is especially useful when editing to music because it allows you to concentrate on the beats and ignore camera angles until the edits are placed. To use this method, you must first map the Add Edit button onto the keyboard.
MultiCamera Displays Click the Group Menu icon to display the pop-up menu. n The Second Row of Info option must be selected in the Composer Settings dialog box for the Group Menu icon to be displayed above the Source monitor. In addition, you can select the Audio Follow Video option from the Group menu to instruct the system to switch both audio and video for each camera angle or selective camera style. The Group Menu icon changes to green when you select the Audio Follow Video option.
Chapter 15 MultiCamera Editing Using the Multi-angle View Menus You can use the Multi-angle View menus to group up to 18 clips at a time, and select additional clips to be shown in any of the multi-split displays in the Source monitor. You can also select Sequence from the Multi-angle View menus to display the entire sequence. To select an additional clip from the group to appear in one of the multi-split displays: 1. Press the Ctrl key to activate the display of clip names in the multisplit displays. 2.
MultiCamera Workflow Using Match Frame in MultiCamera Editing You can use the Match Frame button to display the matching clip within the group when match framing from the sequence, or you can display the original clip when match framing from the source group. For more information on using the Match Frame feature, see “Using Match Frame” on page 356.
Chapter 15 MultiCamera Editing To perform selective camera cutting: 1. Load the group or multigroup clip into the Source monitor. 2. Using timecode notes and the numeric keypad, type the timecode for the first take to begin the sequence, and press Enter (Windows) or Return (Macintosh) to cue the clip in the Source monitor to the take. 3. Mark IN and OUT points for the entire scene. 4. Select a camera angle for the first clip, and then splice the entire scene into a sequence. 5.
Index ABCDEFGHIJKLMNOPQRSTUVWYZ Numerics 16:9 display for 24p editing 304 for 25p editing 304 option 303 24p editing projects creating 60 displaying timecodes in 201 25i PAL editing projects creating 61 25p editing projects creating 60 displaying timecode in 201 30i NTSC editing projects creating 61 A A2 timecode option described 306 Absolute timecode described 306 Add Alt Key button (Windows only) 151 Add Comments command (Clip Name menu) 382 Add Control Key button (Macintosh only) 151 Add Dissolve butto
Index Adjust Pan/Vols on Track command (Audio Mix Tool Fast menu) 500 Adjust Pan/Vols on Track command (Automation Gain Tool Fast menu) 518 Adjusting digital audio scrub parameters 488 dupe detection handle lengths 445 margins in the Script window 267 pan in the Audio Mix tool 495 take lines in the Script window 284 volume in the Audio Mix tool 495 in the Timeline 506 with a mixer 511 with an external fader controller 511 Alias, starting an application from (Macintosh) 56 Align Selected to Grid command (Bi
Index saving effects with 531 Audio File format displaying in bins 577 Audio Gain Automation Automation Gain tool 513 deleting keyframes in 509 enabling and adding keyframes in 508 moving keyframes in 509 recording 519 using an external fader controller or mixer for 511 Audio Mark buttons 342 Audio Mix command (Tools menu) 495 Audio Mix tool adjusting volume and pan on a single track 497 on multiple tracks 499 described 495 Fast menu options 500 resizing 496 Audio Mixdown command (Special menu) 575 Audio m
Index Avid Media Composer Adrenaline application starting (Macintosh) 56 starting (Windows) 55 Avid Media Composer Adrenaline folder 46 Avid Projects folder deleting folders from 50 described 48 renaming 49 Avid Unity environment 224 Avid Unity LANshare 226 Avid Unity MediaNetwork 133 Avid Unity MediaNetwork icons unmounting and mounting 78 Avid Unity PortServer Pro 226 Avid Users folder deleting folders from 50 described 48 renaming 49 B Background color, changing in bins 209 in the Composer window 118 i
Index displaying objects in 164 editing from, in Segment mode 421 Fast menu 173 finding 358 finding from the Script window 292 Info display 110 information in the Console 156 listing timecodes in 201 locking items in 185 managing 90 managing clip information in 193 opening 87 opening from a different project 87 opening in SuperBin 166 printing 213 rearranging clips in Frame view 210 rearranging clips in Script view 213 renaming 86 retrieving 51 retrieving (Macintosh) 53 retrieving (Windows) 52 saving manua
Index Buttons, user-selectable Add Alt Key (Windows only) 151 Add Control Key (Macintosh only) 151 Add Edit 439, 571 Add Locator 344 Add Option Key (Macintosh only) 151 Add Script Mark 287 Clear Both Marks 339 Clear IN Mark 338 Clear OUT Mark 339 Copy to Clipboard 379 Cycle Picture/Sound 430 Cycling Trim Sides 460 Extend 469 Extract 379 Extract/Splice-in (Segment mode) 418 Fast Forward 326 Find Bin 358 Find Frame 360 Find Script 292 Go to Next Edit 458 Go to Previous Edit 458 Lift 378 Lift/Overwrite (Segme
Index Changing background color in bins 209 in the Composer window 118 bin font 126 font in the Script window 126, 267 frame size 209 interface component shading depth 120 page and scene numbers in the Script window 273 representative frame in takes 283 the frame identifying a clip 210 track color in the Timeline 397 user profiles 73 Changing interface components button separation 122 button style 124 color 119 shading depth 121 Choosing bin headings 189 film format options 60 Clear Monitor command (Clip N
Index using buttons 326 rearranging in Frame view bin display 210 in Script view bin display 213 relocating with Match Frame 356 searching for text in 355 selecting 173 sifting 180 tracking the duration of 308 Closing bins 88 projects 74 the Project window 83 the Script window 265 Color assigning local colors in the Timeline 395 assigning source color in bins 179 changing in interface 119 displaying local colors in the Timeline 396 source colors in the Timeline 396 frame shifts 446 Color bars in Dupe Detec
Index to Clipboard 379 Creating See also Editing, Deleting a folder in a project 85 an emergency repair disk (ERD) (Windows only) 42 an instant rough cut 370 bins 85 group clips 599 leader 220 multigroup clips 600 overlap edits 468 playable sequence from clips with different target resolutions 238 projects 59 subclips 340 Criterion pop-up menu (Custom Sift dialog box) 181 Crossfading audio 572 Custom Sift command (Bin menu) 180 Custom Sift dialog box 180 Customizing appearance of user interface 118 bin vie
Index takes in the Script window 283 text in the Script window 271 tracks 438 unreferenced clips 231 Dialog in the lined script 259 Dialog box Consolidate/Transcode 235 Dialog boxes Add Scene/Page 272 Archive to Videotape 244 Audio Mixdown Parameters 575 Audio Settings 161, 489 Bin Column Selection 190 Change Scene/Page 273 Consolidate/Transcode 238 Custom Sift 180 Delete 177 Delete (script integration) 273, 283 Delete Media Files 230 exploring 142 Film Settings 62 Find 355 Group Clips 599 Left Margin 267
Index Duplicate command (Edit menu) duplicating bin column 191 clips or sequences 174 settings using 104 Duplicating a bin column using 191 bin columns 191 clips and sequences 174 clips and sequences using 174 settings 104 Duration tracking 308 E Edit Review button 465 Editing a new sequence 363 adding new tracks during 436 audio 484 deleting tracks during 438 directly from a bin 422 effects 427 in Heads and Heads Tails views 424 multicamera material 597 Sync Point 594 to avoid sync breaks 586 types of se
Index Errors viewing log of, in the Console window 155 Exiting Trim mode 459 Exploring dialog boxes 142 Export settings 96 Extend button 469 Extending an edit 469 External fader controllers adjusting volume with 511 External video sources configuring 334 Extract/Splice-in button 418 Extracting material 379 F FaderMaster Professional fader controller recording audio gain with 522 Fading audio 572 Fast Forward button 326 Fast Frame Display (Special menu) 318 Fast menus Bin 173 Bin display in the Project win
Index Folders Avid Projects 48 Avid Users 48 deleting 50 managing 90 Fonts changing in bins 126 changing in the Script window 126, 267 Footage clearing marks from 338 finding 352 loading and clearing 319 loading into monitors 319 loading multiple clips or sequences 320 marking and subcataloging 337 viewing 297 Format elements gathering 215 preparing leader for tracks 221 Four-frame display described 413 suppressing 415 Four-frame display, trimming in 415 Frame offset 354 Frame size, changing 209 Frame tab
Index H Hardware command (Tools menu) 156 Hardware tool displaying information with 112 using 156 HDTV displaying 16:9 303 Headings command (Bin menu) 178, 190 Heads and Heads Tails views in the Timeline 424 Help system, folder location 47 Hiding bin column headings 204 bin columns 190 slate frames 279 Timeline top toolbar 394 High shelf in Audio EQ tool 526 Holding slates on screen 278 Home command (Windows menu) 406 Home key 332 Info window opening from a monitor 310 from a Script window 266 Installing
Index L LANshare 226 Lassoing objects 173 Launching the application 58 Launching the Avid application (Macintosh) 56 Launching the Avid application (Windows) 55 L-cut edit (Overlap edit) 468 for audio clips 342 Leader creating 220 for managing sync breaks 590 Left Arrow key moving through footage with 332 navigating with 142 Left Margin command (Script menu) 267 Left Margin dialog box 267 Lift/Overwrite button 418 Lifting material 378 Lined script 258 Linking clips to script 274 Load Filler command (Clip N
Index Managing bins 90 folders 90 media files 223 Mapping buttons to Timeline top toolbar 394 menu commands 152 user-selectable buttons 149 Margins script, adjusting in Script window 267 Mark Locators button 346 Mark Subclip button 341 Mark-and-park editing See Single-mark editing Marking clips 339 entire segments 339 IN and OUT points 338 segments in Segment mode 420 with locators 342, 346 Marks clearing 338 IN and OUT points 338 phantom 376 Master clips consolidating 232 copying 175 creating new, with Au
Index Media tool basic features of 227 opening 228 Media Tool command (Tools menu) 228 Media Tool Display dialog box 228 Media Tool Fast menu 227 MediaManager settings for 225 specifying settings 225 using 224 MediaNetwork Avid Unity 133 Memory information 110 Memory window for checking system performance 384 for viewing memory 110 Menu commands Add Comments (Clip Name menu) 382 Add Filler at Start (Clip menu) 367 Adjust Pan/Vols on Track (Audio Mix Tool Fast menu) 500 Adjust Pan/Vols on Track (Automation
Index Print Timeline (File menu) 449 Read Audio Timecode (Special menu) 162 Redo (Edit menu) 373 Reduce Frame (Edit menu) 209, 277 Refresh Media Directories (File menu) 240 Relink (Clip menu) 251 Remove Automation Gain on Track (Automation Gain Tool Fast menu) 519 Remove Clip Gain on Track (Audio Mix Tool Fast menu) 500 Remove Pan on Track (Audio Mix Tool Fast menu) 500 Remove Pan on Track (Automation Gain Tool Fast menu) 519 Remove Pan/Vols on Track (Audio Mix Tool Fast menu) 500 Remove Pan/Vols on Track
Index Moving bin columns 189 clips and sequences 175 frames in the bin 210 In and OUT points 339 script marks 290 slates in the Script window 280 through clips 326 tracks in the Timeline 393 Moving settings between settings files 107 Multi-angle View menus 612 MultiCamera editing 597 Full-Monitor Display 602 Nine Split Source view 602 Quad Split Source view 602 MultiCamera mode Client monitor display 606 described 607 Group menu 610 grouping 599 Multi-angle menus 612 MultiCamera Nine Split Edit 602 MultiCa
Index OpenGL Hardware section 336 Opening bins 87 the application 58 the Project window 83 the Script window 265 Opening projects automatically 69 Orphans See Offline items Output timecodes displaying in bins 201 Overlap edits audio 342 creating 468 using extend edits 469 Overwrite edits 374 P Page and scene numbers (Script window) adding 272 changing 273 deleting 273 searching for 273 Page Down key, navigating with 142 Page Setup command (File menu) 214 Page Up key, navigating with 142 PAL (Phase Alterna
Index Pop-up monitor loading into 320 viewing in 317 PortServer Pro 226 Position bar described 325 in the Timeline 402 Position indicator in the Timeline 401 using 325 Postroll in Trim mode playback loop 464 Precompute media files, deleting 230 Prefilling for real-time effect preview 335 Preroll in Trim mode playback loop 464 Previous In Group button 609 Print Bin command (File menu) 214 Print Timeline command (File menu) 449 Printing bins 213 locators 351 statistics 112 the Timeline 449 Private project, s
Index Recording voice-over narration 557 Redo command (Edit menu) 373 Reduce Frame command (Edit menu) 209, 277 Reducing and enlarging frames in the bin 209 Reducing tracks in the Timeline 392 Refresh Media Directories command (File menu) 240 Relink command (Clip menu) 251 Relink dialog box 251 Relinking consolidated clips 253 media files and clips 250 moved projects 254 to selected clips 250 Remove Automation Gain on Track command (Automation Gain Tool Fast menu) 519 Remove Clip Gain on Track command (Aud
Index Save Bin command (File menu) 92, 93 Saving audio EQ effects 531 bins automatically 92 bins, manually 74 custom bin views 172 projects 74 the Script window 265 Timeline views 398 Scene and page numbers (Script window) adding 272 changing 273 deleting 273 searching for 273 Scene, creating a bin for 90 Screen resolution settings 45 settings (Macintosh) 46 settings (Windows) 46 Screenings interactive, in Script window 295 Script box in Script view 212 Script integration See also Color indicators, Off-scr
Index finding bins from 292 finding clips from 291 hiding slate frames in 279 holding slates on screen in 278 indicating off-screen dialog in 285 interactive screening in 295 linking clips to 274 loading takes from 284 moving slates in 280 opening, closing, and saving 265 playing takes from 284 removing text in 271 resizing slates in 277 screening and marking in 288 searching through 271–274 selecting slates in 277 text in 268 splicing a range of script from 294 Scripts importing into the Script windows 26
Index Sequences adding comments to 382 adding tracks to 365 changing start timecode for 364 changing the audio sample rate 576 consolidating 234 copying 175 creating playable 238 deleting 176 displaying information about 311, 364 duplicating 174 finding original bin for 359 locking in a bin 185 making the first edit in 368 marking IN and OUT points in 338 moving 175 playback loop in 383 playback performance tips for 384 playing 383 selecting 173 setting up 363 sifting 180 Set Bin Background command (Edit m
Index Deck Preferences 96 Digital Cut 96 DMS 96 Effect Editor 96 Export 96 Film 96 General 96 Grid 97 Import 97 Interface 97 Keyboard 97 Marquee Title 97 Media Creation 97 MM Host 97 MM User 97 PortServer 97 Render 97 Script 97 summary of contents 95 Timecode Window 98 Timeline 98 Timeline View 98 Trim 98 Video Display 98 Workspace 98 Shared project, selecting 63 Shortcut menus (Macintosh) 43 Shortcut menus (Windows) 43 Show All Takes command (Script menu) 279 Show Every Frame command (Timeline Fast menu)
Index Solo track monitoring in the Timeline 433 in Trim mode 461 Soloing audio tracks in the Timeline 484 Sorting clips 200 columns, multilevel 201 Source clips, finding with Match Frame 356 Source colors assigning custom colors to 179 assigning in bins 179 displaying in the Timeline 396 limiting available colors of 179 Source frames finding 360 Source material displaying in the Timeline 407 loading into monitors 319 Source monitor described 298 viewing in 316 Source/Record mode customizing window settings
Index moving clips and sequences in and out of 168 opening bins in 166 Supporting Files folder 47 Swap Cam Bank button 602 Switching multicamera angles 609 Sync autosyncing 580 ganging footage in monitors 595 maintaining during segment move 416 during trim 475 with Add Edit 593 with leader 590 with locators 592 with sync lock 589 sync-locked tracks trimming with 477 using Match Frame 596 Sync breaks displaying 587 fixing 588 Sync Breaks command (Timeline Fast menu) 587 Sync Lock icon in the Track Selector
Index Timecode window 98, 312 Timecodes changing 364 display options 24p and 25p projects 201 in the Timecode window 312 multiple 313 table of 306 finding frames with 352 setting multiple displays 313 SMPTE standard formats for entering 353 Timeline See also Segment mode adding new tracks to 436 offline media indicator to 396 assigning local colors to 395 changing background color in 397 controlling movement in 408 creating a view of 398 customizing 390 deleting tracks in 438 displaying detail in 403 local
Index Audio Gain Automation 506 Audio Mix 495 Audio Punch-In 557 Automation Gain 513 Calculator 154 Communication (Serial) Ports 157 Console 156 Deck Controller 145 Hardware 156 Media 228 Tools menu 145 Toolset customizing 143 linking to a workspace 144 selecting 143 Top button 426 Top command performing a quick edit with 425 Track color, changing in Timeline 397 Track Selector panel user preferences for 366 using 428–435 Tracking color-frame shifts 446 Tracking information displaying 304 options 306 Track
Index entering 456 exiting 459 in the editing workflow 39 playing transition loop parameters in 464 Quick Trim mode, entering 453 reviewing edits 464 selecting several transitions in 462 single transitions in 456 trim sides in 460 video tracks 461 Small Trim mode switching with Big Trim mode 458 using the four-frame display 415 using the Transition Corner Display 479 Trim roller configuration saving 457 Trim settings described 98 Trimming two heads or tails 463 video tracks 461 Turning off equipment 77 Tur
Index trimming 461 Video Display settings 98 Video Display settings (Client monitor) configuring 334 Video projects using script integration in 262 Video solo feature 433 Videotape archiving media files with 241 capturing bars and tone from 216 restoring media files from 247 View Name dialog box (bin) 172 View Name dialog box (Timeline) 399 View Type command (Timeline Fast menu) 424 View, bin customizing 171 saving 172 types of 170 View, Timeline customizing 388 Heads and Heads Tails 424 replacing 399 savi