
2.5


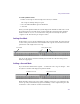


Table Of Contents
- Title Page
- Contents
- Tables
- Using This Guide
- Working with the Project Window: Advanced
- Working with User Profiles
- Managing Folders and Bins
- Using the Info Display
- Displaying Usage Information
- Customizing the Appearance of the Avid User Interface
- Customizing Your Workspace
- Sharing Bins and Projects in an Avid Unity Environment
- Using Tools
- Logging: Advanced
- Capturing Media: Advanced
- Advanced Capture Settings
- Understanding Drop-Frame and NonDrop-Frame Timecode
- Preparing for Audio Input: Advanced
- Preparing for Video Input: Advanced
- Using Function Keys When Capturing
- Special Capture Procedures
- Logging Errors to the Console Window
- Creating Subclips While Capturing
- Creating Timed Subclips While Capturing
- Adding Locators On-the-Fly
- Naming a New Tape from the Keyboard
- Controlling Decks from the Keyboard
- Mapping the Record Button
- Ejecting Tapes with a Button or Key
- Returning to the Previous Place in the Select Tape Dialog Box
- Understanding DV Capture Offset
- Capturing DV Material with Offset
- Delaying Audio
- Live Capture with External Timecode
- Capturing to the Timeline
- Capturing Video Without Pulldown into a 24p NTSC Project
- Remote Play, Capture, and Punch-In
- Relinking Clips by Key Number
- Modifying the Pulldown Phase After Capturing
- DV and HDV Scene Extraction
- Support for Panasonic VariCam
- Importing Files: Advanced
- Importing Photoshop Graphics
- Importing Media from XDCAM Devices
- Importing Editcam Files
- Importing Sequences from Pro Tools through Interplay
- Working with Bins: Advanced
- Advanced Bin Procedures
- Film Scene Workflow
- Displaying Custom Bin Views
- Assigning Colors to Bin Objects
- Sifting Clips and Sequences
- Sifting Timecodes or Keycode Ranges
- Locking and Unlocking Items in a Bin
- Selecting Offline Items in a Bin
- Selecting Media Relatives for an Object
- Selecting Sources Used by an Object
- Selecting Unreferenced Clips
- Using Text View: Advanced
- Working with Restricted Material
- Printing Bins
- Preparing Digital Bars and Tone
- Importing Color Bars and Other Test Patterns
- Creating Leader
- Advanced Bin Procedures
- Managing Media Files: Advanced
- Using Panasonic DVCPRO P2 Equipment
- Panasonic P2 Formats
- P2 Files and Folders
- Workflow for Editing with P2 Media
- Installing the Panasonic P2 Drivers
- Preparing to Mount P2 Cards as Drives
- Mounting P2 Cards as Drives
- Copying P2 Files to a FireWire or Network Drive
- Copying P2 Files to a Local Media Drive
- Changing P2 Cards in the Card Reader
- Importing P2 Clips and Media Directly from a P2 Card or a Copy of a P2 Card
- Dragging P2 Master Clips from the Media Tool to a Bin
- Working with Spanned Clips
- Sharing P2 Clips and Sequences
- Exporting Your Clip or Sequence to a P2 Card
- Deleting P2 Clips
- Finding a Related Media File
- Relinking Media Files
- Unlinking Media Files
- Using Videotapes for Archiving and Restoring Media Files
- Using Panasonic DVCPRO P2 Equipment
- Script-Based Editing
- Viewing and Marking Footage: Advanced
- Displaying the Info Window
- Displaying Timecode in the Timecode Window
- Adjusting the Play Delay Offset
- Using the Tool Palette
- Playing Selected Clips in a Loop
- Using Locators
- Creating and Editing Sequences: Advanced
- User Preferences for Creating Tracks
- Using Phantom Marks
- Adding Comments to Sequence Clips
- Playback Performance Tips
- Playing a Limited Duration of a Sequence
- Autosyncing Clips
- Using the AutoSequence Command
- Resyncing Subframe Audio
- Managing Sync with Multiple Tracks
- Ganging Footage in Monitors
- Using Sync Point Editing
- Synchronizing Metadata Using MetaSync
- Using the Timeline: Advanced
- Working in Trim Mode: Advanced
- Working with Audio: Advanced
- Audio Gain Staging and an Audio Editing Workflow
- Using External Fader Controllers
- Using the Digi 002 and Command|8
- Configuring USB-to-MIDI Software for External Controllers
- Using the FaderMaster Pro and MCS-3000X
- Using the Yamaha 01V/96 or the Yamaha 01V
- Using the Audio EQ Tool
- Recording Voice-Over Narration
- Using a GPI Device with the Audio Punch-In Tool
- Displaying Audio Formats in Bins
- Using AudioSuite Plug-Ins
- Understanding Digidesign AudioSuite Plug-Ins
- Installing AudioSuite Plug-Ins
- Using Digidesign AudioSuite Plug-Ins
- Applying an AudioSuite Plug-in to a Clip in the Timeline
- Using an AudioSuite Plug-In Dialog Box
- AudioSuite Fast Menu
- Rendering AudioSuite Plug-in Effects
- Creating New Master Clips with AudioSuite Plug-Ins
- Using AudioSuite Plug-Ins in Stereo
- AudioSuite Plug-in Limitations
- Troubleshooting AudioSuite Plug-Ins
- Core AudioSuite Plug-Ins
- Chorus AudioSuite Plug-In
- D-Verb AudioSuite Plug-In
- Compressor AudioSuite Plug-In
- Limiter AudioSuite Plug-In
- Expander-Gate AudioSuite Plug-In
- Gate AudioSuite Plug-In
- DeEsser AudioSuite Plug-In
- EQ AudioSuite Plug-Ins
- Flanger AudioSuite Plug-In
- Invert AudioSuite Plug-In
- Duplicate AudioSuite Plug-In
- Delay AudioSuite Plug-In
- Multi-Tap Delay AudioSuite Plug-In
- Normalize AudioSuite Plug-In
- Gain AudioSuite Plug-In
- Ping-Pong Delay AudioSuite Plug-In
- Reverse AudioSuite Plug-In
- DC Offset Removal AudioSuite Plug-In
- Signal Generator AudioSuite Plug-In
- Time Compression Expansion AudioSuite Plug-In
- Pitch Shift AudioSuite Plug-In
- Time Shift AudioSuite Plug-In
- Non-Core AudioSuite Plug-Ins
- Understanding Digidesign AudioSuite Plug-Ins
- Exporting Frames, Clips, or Sequences: Advanced
- Exporting Using Send To Templates
- Exporting OMFI and AAF Files
- Exporting Projects and Bins Using AFE Files (Windows Only)
- Exporting Video in DV Stream Format
- Exporting QuickTime Movies
- Exporting As an AVI File (Windows Only)
- Installing or Copying the Avid Codecs for QuickTime on Other Systems
- Exporting from a Third-Party QuickTime or AVI Application
- Exporting as Windows Media (Windows Only)
- Exporting Tracks As Audio Files
- Exporting As a Graphic File
- Exporting Media to XDCAM Devices
- Generating Output: Advanced
- Advanced Video Output Calibration
- Using the Digital Cut Tool: Advanced
- Output Mode Resolution Options
- Outputting DV 50 and DVCPRO HD Media Directly to a DV Device
- Selecting Output and Timecode Formats for 23.976p, 24p, and 25p Projects
- Performing an Insert Edit with Pulldown
- Digital Cuts and Audio
- Changing the Default Pulldown Phase for Sequences
- Understanding DV Digital Cut Delay
- Delaying the Sequence for a Digital Cut
- Using EDL Manager
- Using the Matchback Option
- Using FilmScribe
- Preserving Information in the Vertical Blanking Interval
- Preserving HD Closed Captioning and Ancillary Data
- MultiCamera Editing
- Using Settings
- Using the Settings List
- Understanding Settings
- Defining Settings
- Displaying Project Settings
- Working with Settings
- Selecting Another User
- Modifying Settings
- Working with Multiple Settings
- Duplicating Settings
- Naming Settings
- Selecting Among Multiple Settings
- Deleting Settings
- Restoring Default Settings
- Copying Settings Between Settings Files
- Using Site Settings
- Manipulating Settings by Importing User Profiles or Copying Files Manually
- Audio Settings
- Audio Project Settings
- Bin Settings
- Capture Settings
- Communication (Serial) Ports Tool Settings
- Composer Settings
- Controller Settings
- Correction Settings
- Deck Configuration Settings
- Deck Settings
- Deck Preferences Settings
- Effect Editor Settings
- Export Settings
- Export Settings Dialog Box Options
- Export Settings: QuickTime Reference Options
- Export Settings: QuickTime Movie Export Options
- Export Settings: QuickTime Movie Settings
- Export Settings: QuickTime Compression Settings
- Export Settings: HDV
- Export Settings: DV Stream
- Export Settings: OMFI, AAF, and AFE
- Export Settings: AVI (Windows Only)
- Export Settings: AVI Video Compression (Windows Only)
- Export Settings: Windows Media Export Options (Windows Only)
- Export Settings: Audio
- Export Settings: Graphic
- Export Settings: Graphic Format
- P2 Export Settings
- Export Settings: XDCAM
- Film and 24P Settings
- Full Screen Playback Settings
- General Settings
- Grid Settings
- Import Settings
- Interface Settings
- Interplay Folder Settings
- Interplay Server Settings
- Interplay User Settings
- Keyboard Settings
- Marquee Title Settings
- Media Creation Settings
- Media Services Settings (Windows Only)
- Mouse Settings
- PortServer Settings
- Remote Play and Capture Settings
- Render Settings
- Safe Colors Settings
- Script Settings
- Sound Card Configuration Settings (Windows Only)
- Timeline Settings
- Trim Settings
- Video Display Settings
- Video Input Tool Settings
- Video Output Tool Settings
- Workspace Settings
- Using the Settings List
- File Format Specifications
- Resolutions and Storage Requirements
- Working in a Film Project
- Working with 24p Media
- Working with 25p Media
- Planning a 24p or 25p Project
- Planning a 23.976p NTSC Project
- Film Project Considerations
- Understanding the Film-to-Tape Transfer Process
- Transferring 24-fps Film to NTSC Video
- Transferring 24-fps Film to PAL Video
- How Avid Editing Applications Store and Display 24p and 25p Media
- Film-to-Tape Transfer Guidelines
- Film-to-Tape Transfer Options
- Working with HD Media
- International Character Support
- Using a Local Language Operating System (Windows Only)
- Choosing a Locale on an English Language Operating System (Windows and Macintosh)
- Recommendations and Restrictions for International Character Support
- Avid Supports English Plus One Locale
- Entering ASCII Characters in Double-Byte Systems
- Characters to Avoid When Naming Avid Elements
- EDL Manager Does Not Save Diacritical Marks or Chinese Characters
- Traditional Chinese Big 5 Character Set
- Rebuilding the asifont.map File (Windows Only)
- Additional Tips and Limitations for International Character Support
- Numerics
- A
- B
- C
- D
- E
- F
- G
- H
- I
- J
- K
- L
- M
- N
- O
- P
- Q
- R
- S
- T
- U
- V
- W
- X
- Y
- Index
Chapter 10 Creating and Editing Sequences: Advanced
344
User Preferences for Creating Tracks
Your Avid editing application provides two options in the Edit tab of the Composer Settings
dialog box that help automate the way tracks are created and enabled as you edit. You can
adjust these settings in advance, based on personal preference.
For information on opening and changing settings, see “Using the Settings List” in the Help.
The default settings are:
• Auto-create New Tracks: Whenever you edit new source material from the Source
monitor, the system automatically creates any new tracks in the sequence that match
enabled tracks on the source side.
• Auto-enable Source Tracks: Whenever you load new source material into the Source
monitor, the system automatically enables all existing source tracks.
Alternatively, you can do the following:
• Deselect the Auto-create New Tracks option to have the existing tracks in the sequence
remain the same when you edit in new source material. This allows you to create new
tracks selectively as you edit, which is often preferable at the more advanced stages of a
project.
• Deselect the Auto-enable Source Tracks option to leave the tracks of newly loaded
material in whatever state they were in when they were last loaded. This allows you to
turn on the source tracks more selectively as you edit, which is often preferable at the
more advanced stages of a project.
Using Phantom Marks
Phantom marks provide visual guidance when editing according to the three-mark rules. For
information on editing using three marks, see “Editing Additional Clips into the Sequence”
in the Help.