
10.x


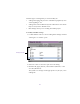
Table Of Contents
- Title Page
- Contents
- Figures
- Tables
- Editing Overview
- Desktop Basics (Windows)
- Desktop Basics (Macintosh)
- Starting a Work Session
- Opening and Closing a Project
- Backing Up Your Project Information
- Ending a Work Session
- Mounting and Ejecting Media Drives (Windows)
- Mounting and Ejecting Media Drives (Macintosh)
- Using Context Menus (Windows)
- Using Context Menus (Macintosh)
- Using Help
- Accessing Information from the Help Menu
- Session Check List
- Working with the Project Window
- Opening and Closing the Project Window
- Using the Bins Display
- Using the Settings Display
- Using the Info Display
- Customizing Your Workspace
- Using Basic Tools
- Organizing with Bins
- Before You Begin
- About Bin Display Views
- Basic Bin Procedures
- Bin Fast Menu
- Setting the Bin Font
- Selecting Clips and Sequences
- Duplicating Clips and Sequences
- Moving Clips and Sequences
- Copying Clips
- Deleting Clips, Subclips, Sequences, and Media Files
- Assigning Colors to Bin Objects
- Sifting Clips and Sequences
- Locking Items in a Bin
- Selecting Offline Items in a Bin
- Selecting Media Relatives for an Object
- Selecting Sources Used by an Object
- Selecting Unreferenced Clips
- Using Text View
- Using Frame View
- Using Script View
- Printing Bins
- Gathering Format Elements
- Storyboard Worksheet
- Managing Media Files
- Using Script Integration
- Viewing and Marking Footage
- Customizing the Composer Window
- Changing the Composer Window Background Color
- Using the 16:9 Display Format
- Using 16:9 for 24p and 25p Editing
- Displaying Tracking Information
- Tracking Format Options
- Setting the Font and Point Size for Monitor Displays
- Displaying the Info Window
- Displaying Timecode in the Timecode Window
- Displaying Multiple Timecodes
- Composer Settings Options
- Miscellaneous Composer Options
- Viewing Methods
- Fast Frame Display in 24p and 25p Projects
- Playing Selected Clips in a Loop
- Loading and Clearing Footage
- Resizing Monitors
- Controlling Playback
- Marking and Subcataloging Footage
- Marking IN to OUT Points
- Moving IN to OUT Points
- Marking an Entire Clip or Segment
- Creating Subclips
- Subclips and Audio Sync for 24p and 25p Projects
- Marking Audio Clips
- Using Locators
- Using the Locators Window
- Displaying Timecode or Footage in the Locators Window
- Sorting Information in the Locators Window
- Displaying Frames in the Locators Window
- Changing the Color of the Locator Icon
- Accessing a Locator in a Clip or Sequence
- Printing the Contents of the Locators Window
- Deleting Locators Using the Locators Window
- Finding Frames, Clips, and Bins
- Customizing the Composer Window
- Editing in Source/Record Mode
- Using the Timeline
- Customizing Timeline Views
- Using the Timeline Fast Menu
- Additional Procedures for Customizing the Timeline
- Displaying Timecode Tracks in the Timeline
- Assigning Local Colors to Clips in the Timeline
- Displaying Local and Source Colors in the Timeline
- Highlighting Offline Media Clips
- Changing the Timeline Background Color
- Changing the Timeline Track Color
- Showing Locators in the Timeline
- Saving a Customized Timeline View
- Replacing a Timeline View
- Restoring the Default Timeline View
- Setting the Scroll Option for the Timeline
- Timeline Settings Options
- Exploring the Timeline
- Using Segment Mode
- Using Advanced Timeline Techniques
- Working with Multiple Tracks
- Additional Offline Aids
- Printing the Timeline
- Customizing Timeline Views
- Working in Trim Mode
- Customizing Trim Mode
- Using Basic Trim Procedures
- Entering Trim Mode
- Exiting Trim Mode
- Switching Between Quick Trim Mode and the Playback Monitor
- Switching Between Big and Small Trim Modes
- Selecting Trim Sides
- Selecting Video Tracks in Trim Mode
- Selecting Additional Transitions
- Performing a Basic Trim
- Audio Solo in Trim Mode
- Reviewing the Trim Edit
- Reviewing an Edit
- Trimming On-the-Fly
- Dual-Image Playback During Trims
- Trimming During a Playback Loop
- Creating Overlap Edits
- Extending an Edit
- Slipping or Sliding Segments
- Maintaining Sync While Trimming
- Using the Transition Corner Display
- Working with Audio
- About Audio Tools
- Accessing Audio Effect Tools
- Audio Editing Aids
- Using the Audio Mix Tool
- Using Audio Gain Automation
- Using the Audio EQ Tool
- Digidesign AudioSuite Plug-Ins
- Installing AudioSuite Plug-Ins (Windows)
- Installing AudioSuite Plug-Ins (Macintosh)
- Starting and Quitting the DAE Application (Macintosh Only)
- Setting Playback Buffer Size (Macintosh Only)
- Using Digidesign AudioSuite Plug-Ins
- Applying an AudioSuite Plug-in to a Clip in the Timeline
- Using a Plug-In Dialog Box
- Rendering Plug-in Effects
- Creating New Master Clips
- Plug-in Limitations
- Troubleshooting AudioSuite Plug-Ins
- Recording Voice-Over Narration
- Fine-Tuning Audio Transitions
- Mixing Down Audio Tracks
- Displaying Audio Formats in Bins
- Syncing Methods
- MultiCamera Editing
- Using AudioSuite Plug-Ins
- Connecting an External Fader Controller or Mixer to Your Avid System
- Keyboard Shortcuts: Macintosh and Windows Equivalents
- Using the MCS3 Controller
- Index

109
Working with Settings
You can view and modify most of your current settings by
double-clicking them in the Settings scroll list of the Project window
and by selecting new options. You can duplicate, rename, copy, and
move settings among files or systems.
Selecting Another User
Because User settings are not project or site specific, you can display
another set of User settings within the Project window.
To select another user:
t Choose another name from the User pop-up menu.
The previous user’s settings are saved, and the new user’s settings are
loaded into the Avid system and the Project window.
Modifying Settings
You can alter the default options for various settings to reflect the
specific needs of a project or to customize the system based on
personal preferences.
User pop-up menu