
2020.6
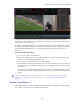


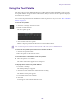
Table Of Contents
- Title Page
- Contents
- Editing Overview
- Getting Started
- Turning on Your Equipment
- Using the Keyboard for Navigating in Dialog Boxes and Menus
- Using the Mouse Scroll Wheel for Navigating
- Customizing Mouse Functions
- Optimum Performance (Windows)
- Optimum Performance (Mac)
- Antivirus Applications
- Starting Media Composer (Windows)
- Starting Media Composer (Mac)
- Avid Link
- Quitting and Turning Off Equipment
- Working with Projects
- Project Management Window
- Creating a New Project
- Avid Projects and Avid Users Folders
- Opening and Closing Existing Projects
- Deleting a Project
- Changing Project and User Names
- Backing Up Your Project Information
- Avid Attic Folder
- Retrieving Files from the Avid Attic Folder (Windows)
- Retrieving Files from the Avid Attic Folder (Mac)
- Windows and Panels in the User Interface
- The User Interface
- Customizing the Avid User Interface
- Changing Interface Component Colors
- Changing Font and Point Size
- Overriding Bin Font and Font Size
- Changing Timecode Window Brightness
- Changing Timeline and Viewers Brightness
- Blank Panel
- Multiple Monitor Support
- Using Workspaces
- Workspace Toolbar
- Linking User Settings and Workspaces
- Assigning a Workspace or Bin Layout Button
- Using Bin Layouts
- Using Tools
- Using the Tools Menu
- Using Tabs
- Using a Deck Controller
- Deck Controller Window Reference
- The Command Palette
- Understanding Button Mapping
- Mapping User-Selectable Buttons
- Mapping Menu Commands
- Mapping Bin Fast Menu Commands to the Keyboard
- Activating Commands from the Command Palette
- Using the Avid Calculator
- Using The Console Window
- Accessing Hardware Information
- Viewing Project Statistics
- Statistics File Structure and Layout
- Importing the Statistics File into a Spreadsheet
- Displaying Disk Space Statistics
- Using the Configuration Tab
- Logging
- Avid Log Specifications
- Global Titles
- Column Titles
- Data Entries
- Sample Avid Log
- Creating an Avid Log
- Double-Checking Log Files
- Logging Directly into a Bin
- Logging with Avid-Controlled Decks
- Pausing the Deck While Logging
- Using a Memory Mark When Logging
- Logging with Non-Avid-Controlled Decks
- Understanding the Pulldown Phase
- Setting the Pulldown Phase
- Film-Related Log Information
- Displaying Film Columns
- Entering Pulldown Information
- Determining the Pulldown Phase
- Modifying the Pulldown Phase Before Capturing
- Entering Frames-per-Second Rates for PAL Transfers
- Entering Key Numbers
- Entering Additional Timecodes
- Entering Ink Numbers
- Exporting Shot Log Files
- Preparing for Capture
- Logging and Shot Logs
- Importing Shot Log Files
- Preparing the Hardware for Capture
- Establishing Sync for Audio-Only Input
- Selecting Settings for Capture
- Selecting Video Resolutions and Media Drives
- Disabling Video Resolutions
- Setting Drive Filtering
- Selecting Settings for Preroll Method and for Capturing Across Timecode Breaks
- Capturing to Multiple Media Files
- General Settings for Capture
- Capture-Related Settings for Film and 24p Projects
- Configuring Decks
- Configuring a Deck or Multiple Decks
- Deleting Deck Configuration Elements
- Understanding Timecode
- Connecting a DV Device
- Setting Up the Capture Tool
- Opening the Capture Tool
- Selecting a Deck in the Capture Tool
- Activating Playback from an Available Deck
- Selecting a Source Tape
- Selecting Source Tracks and Audio Channels
- Setting the Video and Audio Input in the Capture Tool
- Detecting a Valid or Locked Sync Signal
- Setting the Pulldown Switch
- Film Project Pulldown and Transfer Settings
- Capturing Digital Audio in Film Projects
- Selecting a Resolution in the Capture Tool
- Selecting a Target Bin
- Selecting the Target Drives
- Selecting a Custom Preroll
- Preparing to Capture Audio
- Audio Project Settings for Capture
- Selecting the Audio Sample Rate and Controlling Audio Sample Rate Conversion
- Selecting the Audio File Format
- Selecting the Audio Input Source
- Configuring the Sound Card (Software-Only Systems)
- Understanding the Audio Tool
- Opening the Audio Tool
- Adjusting Audio Input Levels
- Creating Tone Media
- Using the Passthrough Mix Tool
- Using the Console Window to Check Audio Levels
- Preparing to Capture Video
- Opening the Video Input Tool
- Using the Factory Preset Buttons in the Video Input Tool
- Calibrating Video Input
- Luminance Settings for Video Input
- Limitations When Using Consumer Decks or Decks Without Time-Base Correctors
- Saving Video Input Settings
- Adjusting Video Levels for Tapes Without Color Bars
- Capture Preparations Check List
- Capturing Media
- Capturing and Logging at the Same Time
- Naming Clips and Adding Comments in the Capture Tool
- Capturing by Setting Both Marks
- Capturing by Setting Only One Mark
- Capturing On-the-Fly
- Preparing to Autocapture
- Autocapturing
- Capturing from a Non-Avid-Controlled Deck
- Capturing with Time-of-Day Timecode
- Capturing Directly from a DV Device
- Capturing DV 50, DVCPRO HD, or HDV Media
- Understanding DV Capture Offset
- Capturing DV Material with Offset
- Capturing Audio from a Music CD
- Frame Chase Capture
- Understanding Frame Chase Capture
- Enabling Frame Chase Capture
- Requirements and Guidelines for Frame Chase Capture
- Batch Capturing from Logged Clips
- Preparing to Batch Capture
- Batch Capturing Clips
- Recapturing and Decomposing
- Understanding Recapturing
- Understanding Decompose and Expert Decompose
- Decomposing Sequences
- Using Expert Decompose
- Recapturing a Sequence Without Using Decompose
- Alternate Source Capture
- Using Capture Function Keys
- Handling Errors During the Capture Process
- Creating Subclips While Capturing
- Adding Markers On-the-Fly While Capturing
- Naming a New Tape from the Keyboard While Capturing
- Controlling Decks from the Keyboard
- Adding Extra Text Fields in the Capture Tool
- Ejecting Tapes with a Button or Key
- Delaying Audio During Capture
- Working in Quick Record Mode
- Capturing in Satellite Mode or No Device Control
- Scheduling a Capture Session
- Capturing to the Timeline
- Capturing Video Without Pulldown into a 24p NTSC Project
- Remote Play, Capture, and Punch-In
- Selecting Remote Play and Capture Settings
- Enabling Remote Capture
- Enabling Remote Play
- Setting up Your System for Remote Punch-In
- Relinking Clips by Key Number
- Modifying the Pulldown Phase After Capturing
- DV and HDV Scene Extraction
- Using the Panasonic VariCam
- Importing Files
- Preparing to Import Files
- Creating and Modifying Import Settings
- Importing Media Files
- Importing with Multichannel Audio
- Adjusting Gain Before Importing Audio Files
- Sample Rate Conversion and Audio Import
- Setting Sample Rate Conversion Options Before Importing Audio Files
- Photoshop Graphics Import
- Support for Multilayered Photoshop Graphics Import
- Importing Photoshop Files
- Digital Bars and Tone
- Importing Color Bars and Other Test Patterns
- Setting XDCAM Import Options
- Importing XDCAM Media
- Importing XDCAM EX Media
- Automatically Importing Proxy Media from an XDCAM Device
- Copying XDCAM Proxy Media to a Local Drive or a Server
- Manually Importing XDCAM Media from the XDCAM Disk
- Importing Essence Marks as Markers in XDCAM Media
- Editing XDCAM Proxy Media
- Batch Importing High-Resolution XDCAM Media from the XDCAM Disk
- Editing and Finishing High-Resolution XDCAM Media
- Importing Sequences from Pro Tools through Interplay
- Importing Scenarist Closed Caption Files
- Using the Drag-and-Drop Method to Import Files
- Reimporting Files
- Batch Import Dialog Box
- Sequence Report for AAF Imports
- Working with Bins
- The Bin Container
- Project Bin Container
- Object Icons in Bins
- Bin Map
- Bin Views
- Using Text View
- Sorting in Bins
- Sorting Clips and Sequences
- Understanding Bin Views
- Saving a Custom Bin View
- Using Frame View
- Using Script View
- Bin Procedures
- Using Bin Tabs
- Using the Bin Fast Menu
- Selecting Clips and Sequences
- Duplicating, Copying, and Moving Clips and Sequences
- Copying Clips and Sequences
- Deleting Items from a Bin
- Changing the Bin Background Color
- Assigning Colors to Objects in a Bin
- Accessing the Custom Color Picker for Color Palettes
- Locking and Unlocking Items in a Bin
- Selecting Offline Items in a Bin
- Selecting Media Relatives for an Object in a Bin
- Selecting Sources Used by an Object in a Bin
- Selecting Unreferenced Items in a Bin
- Displaying Faster Thumbnails
- Working with Bin Columns
- Moving, Aligning, and Deleting Bin Columns
- Duplicating Bin Columns with Timecode Information
- Adding Customized Columns to a Bin
- Changing a Custom Bin Column Heading
- Applying the Same Text to a Column for Multiple Items
- Adding a Metadata Bin Column Heading
- Moving Within Column Cells
- Bin Left Lock
- Copying Information Between Columns
- Displaying Timecodes in a 24p or 25p Project
- Adding Timecode Columns to a Bin or the Media Tool
- Frame Counting for Timecodes
- Adding Timecode Values to the Timecode Columns
- Modifying Clip Information
- Bin Column Headings
- Modifying Data in Bins
- Modify Command Options
- Copying Information from Another Cell in a Custom Bin Column
- Applying the Same Text to a Custom Column for Multiple Items
- Bulk Edit
- Working with Film Information in Bins
- Film Scene Workflow
- Tracking Frames Based on File Name
- Selecting a Film Gauge
- Tracking 3-Perf Counts
- Selecting an Edgecode Type
- Creating a Storyboard
- Setting the Bin Display
- Sifting Clips and Sequences
- Understanding Sifting Timecodes or Keycode Ranges
- Sifting Timecodes or Keycode Ranges
- Working with Restricted Material
- Printing Bins
- Favorite Bins
- Filtering Items in the Bin
- Using the Bin Container
- Viewing a List of Bins
- Creating a New Bin
- Renaming a Bin
- Opening and Closing Bins
- Show Bin in Sidebar
- Displaying Folders of Bins in the Bins List
- Creating a Folder
- Deleting a Bin or Folder
- Viewing and Emptying the Trash
- Saving Bins
- Saving Bins Manually
- Filtering Bins in the Bin Container
- Working with Bins and Projects in an Avid Shared Storage Environment
- Sharing Bins and Projects in Avid Shared Storage
- Opening a Shared Project
- Working with Locks and Shared Bins
- Refreshing Locked Bins
- Considerations for Working with Shared Bins and Projects
- Drive Filtering in Networked Workflows
- Managing Bins and Memory
- Setting the Media Cache
- The Inspector
- Linking File-Based Media
- Viewing the Installed Plug-Ins
- Avid Universal Media Engine (UME)
- Automatically Linking Media from a Third Party Device
- Linking File Based Media through the Source Browser
- Source Browser Overview
- Previewing File Based Media
- Collapse and Expand Source Browser
- Linking Files to a Bin
- Linking a Volume to a Bin
- Linking to QuickTime Media
- Relinking to Linked QuickTime Files
- Linking to AVCHD Media
- Linking to MXF Media
- Linking to RED Media
- Preparing your RED Clip for Transcode, Mixdown, or Render
- Linking to DPX Media
- Linking to OpenEXR
- Linking to an AS-02 Bundle
- Linking to an AS-11 Sequence
- Linking to Broadcast Wave and AIFF Files
- Linking with Multichannel Audio
- Linking Clips with Ancillary Data
- Managing Media Files
- Working with Media Files in an Avid Interplay Environment
- Understanding Unmounting Drives
- Unmounting Drives
- Using the Media Tool
- Basic Media Tool Features
- Using the Media Tool in an Avid Interplay Environment
- Opening the Media Tool
- Deleting Media Files with the Media Tool
- Consolidating Media
- Using the Consolidate Command
- Using the Transcode Command
- Background Consolidate and Transcode
- The Background Queue Window
- Using Background Consolidate and Transcode
- Loading the Media Database
- Refreshing Media Directories
- Deleting Unreferenced Clips and Media
- Backing Up Media Files
- Finding a Related Media File
- Relinking Media Files
- Relinking by Resolution
- Relinking to Selected Clips
- Relinking Tape and File Based Media
- Relinking Consolidated Clips
- Relinking Moved Projects
- Unlinking Media Files
- Sequence and Clip Information Summary
- Creating a Summary of Effects and Source Information
- Summary Information Options
- Creating Dynamic Media Folders
- Starting and Stopping Avid Background Services
- Viewing and Marking Footage
- Viewing Methods
- Customizing the Composer Window and Monitors
- Resizing the Composer Window and Monitors
- Setting the Source/Record Highlight Colors
- Displaying a Second Row of Buttons
- Displaying Tracking Information
- Tracking Format Options
- Using the Info Window
- Using the Timecode Window
- Playing Video to the Client Monitor
- Activating and Deactivating the Client Monitor Display
- Selecting the Video Display Settings
- Playing Video to a Full-Screen Monitor
- Adjusting the Play Delay Offset
- Using the Tool Palette
- Playing Selected Clips in a Loop
- Loading and Clearing Footage
- Loading Clips or Sequences into Monitors
- Switching Between Loaded Clips
- Clearing Clips from Monitors
- Controlling Playback
- Using Position Bars and Position Indicators
- Playback Control Buttons
- Stepping Forward and Backward by Field
- Playback Control Using the Keyboard
- Playing Footage with the J-K-L Keys (Three-Button Play)
- Using Dynamic Play Forward and Dynamic Play Reverse for Playback
- Using the Mouse for Playback
- Video Quality Options for Playback
- Setting the Video Quality for Playback
- Marking and Subcataloging Footage
- Marking IN and OUT Points
- Marking an Entire Clip or Segment
- Creating Subclips
- Creating Subsequences
- Subclips and Audio Sync for 24p and 25p Projects
- Marking Audio Clips
- Using Markers
- Suggested Uses for Markers
- Adding Markers While Editing
- Adding Spanned Markers While Editing
- Adding Markers On-the-Fly while Playing
- Finding Markers
- Finding Marker Comment Text
- Editing Marker Information
- Copying Markers from Source Clips
- Marking an Area Using Markers
- Moving to the Previous or Next Marker
- Deleting Markers
- Using the Markers Window
- Viewing Markers in the Markers Window
- Working in the Markers Window
- Exporting and Importing Markers
- Creating a Marker Text (.txt) File
- Copying and Pasting Markers Using the Markers Window
- Printing the Contents of the Markers Window
- Disabling the Marker Edit Window
- Finding Frames, Clips, and Bins
- Using Timecode to Find a Frame
- Searching for a Clip or Sequence with Text Find
- Setting Font and Font Size in the Find Window
- Searching for Items in the Timeline
- Setting the Location of the SearchData folder
- Using Match Frame
- Performing a Reverse Match Frame
- Selecting Tracks for Matching Frames
- Finding a Bin
- Locating a Master Clip from a Subclip in a Sequence
- Finding a Frame
- Sequence and Clip Information Summary
- Creating a Summary of Effects and Source Information
- Summary Information Options
- PhraseFind
- Creating and Editing Sequences
- Entering Source/Record Mode
- Creating a New Sequence
- Changing the Name and Timecode for a Sequence
- Track Display for New Sequences
- User Preferences for Creating Tracks
- Adding Filler
- Making a First Edit
- Creating an Instant Rough Cut
- Undoing or Redoing Edits
- Editing Additional Clips into the Sequence
- Performing an Insert or Splice-in Edit
- Performing an Overwrite Edit
- Performing a Replace Edit
- Enabling Single-Mark Editing
- Mixing Frame Rates and Field Motion Types
- How Media Composer Handles Mixed Rate Clips
- Viewing Mixed Rate Clips in the Timeline
- Viewing and Adjusting Motion Adapter Parameters
- Modifying the Field Motion Attribute for a Clip
- Considerations When Working with Mixed Rate Clips
- Mixing Frame Sizes and Aspect Ratios
- How Media Composer Reformats Clips in Sequences
- Changing the Aspect Ratio for a Project
- Modifying the Reformat Attribute for a Clip
- Reformatting Options Reference
- Refreshing Sequences to Use Current Clip Attributes
- Lifting, Extracting, and Copying Material
- Using the Avid Clipboard
- Strip Silence
- Adding Notes to Clips in the Timeline
- Playing Back a Sequence
- Playback Performance Tips
- Setting Video Memory and Video Frame Cache
- Playing a Limited Duration of a Sequence
- Understanding Sync Breaks
- Fixing Sync Breaks
- Understanding Sync Lock
- Syncing with Tail Leader
- Syncing with Markers
- Using Add Edit When Trimming
- Ganging Footage in Monitors
- Sync Point Editing
- Autosyncing Clips
- Understanding Autosyncing
- Creating an Autosynced Subclip
- Understanding AutoSequence
- Adding Audio or Video to Original Videotape Using AutoSequence
- Resyncing Subframe Audio
- Resyncing Audio for a Selected Subclip
- Working with Phantom Marks
- Creating Video and Audio Leaders
- Performing Audio Slip
- Performing an Insert Edit to an Exported Sequence
- Performing an OP1a MXF Mixdown
- Script-Based Editing
- Understanding Lined Scripts
- Script Integration — Lining in the Digital Realm
- Understanding the Script Window
- Working with the Script Window
- Working with Script Text
- Editing a Script
- Working with Page or Scene Numbers and Searching in a Script
- Linking Clips to a Script
- Interpolating Position for Script Integration
- Working with Slates in the Script Window
- Working with Takes in the Script Window
- Indicating Off-Screen Dialog in a Script
- Using Color Indicators in the Script Window
- Script Marks
- Placing Script Marks Manually
- Using Real-Time Screening and Marking
- Marking with ScriptSync
- Loading and Playing Marked Segments
- Moving or Deleting a Script Mark
- Finding Clips and Script
- Editing From the Script Window
- Assembling a Rough Cut From the Script Window
- Splicing a Script Range
- Setting Pre-Roll for Script Window
- Refreshing Locked Scripts
- Using the Timeline
- Customizing Timeline Views
- Using the Timeline Fast Menu
- Timeline Fast Menu Options
- Enlarging and Reducing Timeline Tracks
- Moving Timeline Tracks
- Displaying Clip Colors in the Timeline
- Changing the Track Color
- Assigning Local Colors to Clips in the Timeline
- Clip Color for Proxy Clips in Timeline
- Displaying Timecode Tracks in the Timeline
- Showing Markers in the Timeline
- Showing Adapter Icons in the Timeline
- Changing the Background Color the Timeline
- Setting the Playback Option for the Timeline
- Using the Full-Screen Timeline
- The Track Control Panel
- Using the Track Control Panel
- Displaying Source Material in the Timeline
- Displaying the Timeline Top Toolbar
- Managing Customized Timeline Views
- Using Timeline View Buttons
- Customizable Buttons in the Timeline
- Mapping Buttons at the Bottom of the Timeline
- Timeline Sequence Map
- Navigating in the Timeline
- Switching to the Timeline Position Bar
- Zooming and Focusing in the Timeline
- Vertical Scrolling in the Timeline
- Controlling Movement in the Timeline
- Working with Segments
- Guidelines for Segment Editing
- Selecting and Deselecting Segments
- Live Dragging in the Timeline
- Move Clips Up and Down in the Timeline
- Creating a Sequence Based on Selection
- Linked Clips
- Selecting Linked Clips
- Selecting Multiple Segments
- Excluding Filler when Selecting Multiple Segments
- Selecting Filler with Segment Tools
- Four-Frame Display
- Suppressing Four-Frame Display
- Maintaining Sync with Segment Edits
- Moving Segments with Drag and Drop
- Copying and Dragging Segments
- Dragging Nonadjacent Segments
- Deleting Segments
- Marking Segments in the Timeline
- Cutting, Copying, and Pasting in the Timeline
- Setting the Default Segment Edit Tool
- Enabling Only One Segment Edit Tool at a Time
- Bin Editing into the Timeline
- Working with Multiple Tracks
- Understanding the Track Selector Panel
- Selecting Tracks
- Understanding Track Monitoring
- Monitoring and Soloing Tracks
- Patching Tracks
- Performing an Alternate Edit
- Muting Individual Clips in the Timeline
- Selecting Muted Clips
- Disabling a Video Track
- Understanding Locking and Sync Locking
- Locking and Sync Locking Tracks
- Adding and Deleting Tracks
- Splitting Stereo Tracks to Mono Tracks
- Backtiming Edits
- In to Out Highlighting in the Timeline
- Editing in Heads or Heads Tails View
- Performing a Quick Edit Using the Top and Tail Commands
- Working with Add Edits (Match Frames)
- Dupe Detection
- Activating Dupe Detection
- Methods for Changing Handle Length in Dupe Detection
- Adjusting Handle Length in Dupe Detection
- Editing with the Film Track
- Tracking Color Frame Shifts
- Finding Black Holes and Flash Frames
- Printing the Timeline
- Activating and Deactivating I/O Hardware
- Activating and Deactivating I/O Hardware
- Support for NewTek® NDI Video over IP
- Searching for Text in the Timeline
- Working with Trim Edits
- Trimming with the Timeline Palette
- Understanding Trim Displays
- Setting Small Trim Display
- Trim Settings Overview
- Timeline Trim States
- Selecting Trim Sides
- Selecting Video Tracks for Trimming
- Selecting Additional Transitions
- Soloing Audio while Trimming
- Overwrite Trimming
- Ripple Trimming
- Dual-Roller Trimming
- Trimming with Sync Locks On
- Refining Trims
- Reviewing Trim Edits
- Trimming with the J-K-L Keys
- Trimming On-the-Fly
- End of Trim Indicators
- Using Dual-Image Playback During Trims
- Trimming During a Playback Loop
- Creating Overlap Edits
- Extending an Edit
- Maintaining Sync While Trimming
- Slipping or Sliding Segments
- Selecting Segments for Slip or Slide Trimming
- Performing a Slip or Slide Trim
- Trimming in Two Directions
- Using the Transition Corner Display
- Working with Audio
- Overview of Audio Tools
- Accessing Audio Effect Tools
- Using Audio Timecode
- Working with Multichannel Audio Tracks
- Displaying Track Formats in Bins
- Modifying Track Formats in Bins
- The Track Control Panel
- Using the Track Control Panel
- Soloing Audio Tracks
- Making Tracks Inactive
- Using Audio Scrub
- Selecting Tracks for Audio Scrubbing
- Performing Smooth Audio Scrub
- Adjusting Digital Scrub Parameters
- Performing Digital Audio Scrub
- Audio Displays in the Timeline
- Displaying Audio Waveforms
- Displaying Volume and Pan Values
- Identifying Sample Rates by Color
- Using Audio Meters in the Timeline
- Adjusting Volume
- Displaying Audio Formats in Bins
- Working with Surround Sound Audio
- Surround Mixing
- Surround Monitoring
- Assigning Surround Sound Mix Output
- Adjusting the Play Buffer Size for Audio (Software-only Models)
- Using the Audio Mixer Tool
- Accessing the Audio Mixer and Audio Mixer Modes
- Audio Mixer Tool Controls
- Resizing the Audio Mixer Tool
- Audio Grouping
- Track Selection in the Audio Mixer Tool and in the Timeline
- Using the Track Solo and Track Mute Buttons
- Interpreting Position Indicator Lights
- Rendering and Unrendering Order for Audio Effects
- Audio Volume Staging and an Audio Editing Workflow
- Using Clip Volume and Pan Mode
- Adjusting Clip Volume and Pan for Audio Tracks
- Surround Sound Pan Controls
- Using the Pan Grid for Surround Panning
- Using the Advanced Panner for Surround Sound Panning
- Using the Center Percentage and LFE Controls
- Audio Mixer Fast Menu: Clip Volume and Pan Mode
- Bypassing Existing Volume Settings
- Adjusting Volume While Playing a Clip Volume Effect
- Improving Response Time When Adjusting Volume
- Modifying How Media Composer Interprets Pan
- Using the Center Pan Command
- Isolating Clip Portions for Audio Adjustment
- Using Volume and Pan Automation
- Using Volume and Pan Automation in the Timeline
- Volume and Pan Automation Mode
- Understanding Volume or Pan Automation Recording
- Using the Audio Mixer Tool for Volume and Pan Automation
- Audio Mixer Tool Fast Menu: Volume and Pan Automation Mode
- Using Keyboard Shortcuts with Audio Keyframes
- Copying, Pasting and Moving Audio Keyframes
- Creating a New Keyframe
- Copy and Paste Individual Keyframes
- Copy and Paste by Lassoing an Area of Audio Keyframes
- Copy and Paste a Whole Region or Marked Region of Audio Keyframes
- Moving Keyframes in the Timeline
- Removing Hidden Keyframes
- Using Live Mix Mode
- Entering Live Mix Mode
- Using Live Mix Mode with an External Controller
- Using Live Mix Mode Without an External Controller
- Switching Between Live Mix Mode and Other Audio Mixer Modes
- Audio Mixer Tool Fast Menu: Live Mix Mode
- Live Mix Mode Example
- Fading and Dipping Audio
- Adjusting Audio Clip Gain in the Timeline
- Audio Sample Rate Conversion
- Changing the Audio Sample Rate for Sequences and Audio Clips
- Mixing Down Audio Tracks
- Mixing Down Multiple Audio Tracks
- Splitting Multichannel Tracks to Mono Tracks
- Using the Audio EQ Tool
- Audio EQ Tool Features
- Applying Audio EQ Effects
- Saving Audio EQ Effects
- Removing Audio EQ Effects with the Fast Menu
- Removing Audio EQ Effects with the Remove Effect Button
- Audio EQ Examples
- Using Audio EQ Templates
- Adjusting EQ While Playing an Audio Effect
- Recording Voice-Over Narration
- Recording Voice-Over Narration Using the Capture Tool
- Audio Punch-in Tool Features
- Audio Punch-in Tool Scenarios
- Recording Voice-Over Narration Using Audio Punch-in
- Extended Audio Punch-In
- Monitoring Previously Recorded Tracks While Recording Voice-Over Narration
- Audio Punch-In Support for Open I/O Devices
- Using Peak Hold While Recording Voice-Over Narration
- Using Automatic Voice-Over
- Audio Ducking
- Audio Grouping
- Using External Audio Devices
- Configuring an External Controller
- Configuring External Controller Settings
- Using an External Fader Controller or Mixer to Record Volume Automation
- Adjusting the Volume or Pan of Individual Keyframes
- Using the 002 and the Command|8
- Using the Command|8 with Media Composer
- Configuring the Command|8
- Mapping Buttons and Menu Commands for the Avid 002 or Command|8
- Mapping Controller Menu Commands for the 002 or Command|8
- Using 002 or Command|8 Buttons to Change Focus in Media Composer Interface
- Using a Foot Pedal as a Foot Switch with the 002 or Command|8
- Switching Between the 002 and Command|8
- Using a 002 or Command|8 to Record Pan
- Using the Latch Mode Feature on the 002 and Command|8
- Using Mbox Family Audio Devices
- Configuring the Mbox Device
- Setting Up the Mbox Pro for Passthrough Monitoring (Windows Only)
- Configuring USB-to-MIDI Software for External Controllers
- Testing External Fader Controller Connections
- Switching Between MIDI Connections on the USB-to-MIDI Converter
- Troubleshooting MIDI Connections
- Avid HD Native and Pro Tools|HD Hardware Configuration for Media Composer
- Configuring the ASIO Driver (Windows)
- Configuring the Core Audio Driver (Macintosh)
- Using a GPI Device with the Audio Punch-In Tool
- Understanding GPI Trigger Signals
- GPI Signal Sequences
- Example of Linking GPI Actions to Trigger Signals
- Connecting a V-LAN VLXi Controller and GPI
- Configuring a V-LAN VLXi Controller and GPI
- Working with GPI Settings
- GPI Settings Options
- Using Avid Media Controllers
- Installing EuControl Software
- Configuring EUCon Settings in Media Composer
- Configuring Ethernet Connections (Macintosh)
- Setting the IP Address
- Configuring EuControl Settings
- Avid Media Controller Button Mappings
- Moving Through Footage with Avid Media Controllers
- Volume Automation and Pan on Avid Media Controllers
- Recording Volume Automation and Pan with Artist Series Controllers
- Using the Latch Mode Feature on Artist Series Controllers
- Using the Artist Series Controller for Editing Media
- Controller Application Sets
- Using Audio Plug-Ins
- Audio Effects Plug-Ins Installation
- Audio Track Effect Plug-Ins
- Inserting an Audio Track Effect Plug-In on a Track in the Timeline
- Editing an Audio Track Effect Plug-In on a Track in the Timeline
- Moving and Copying Audio Track Effect Inserts
- Ordering Audio Track Effect Inserts on a Track
- Removing Audio Track Effect Inserts on a Track
- Using Audio Track Effect Templates
- Avid AudioSuite Plug-Ins
- Using Avid AudioSuite Plug-Ins
- Applying an AudioSuite Plug-in to a Clip in the Timeline
- Common Buttons in the AudioSuite Plug-In Dialog Box
- AudioSuite Fast Menu
- Real-time EQ and AudioSuite Effects
- Rendering AudioSuite Plug-in Effects
- Creating New Master Clips with AudioSuite Plug-Ins
- AudioSuite Controls for Creating New Master Clips
- Mono, Stereo, and Multichannel Processing in AudioSuite Plug-Ins
- Using AudioSuite Plug-ins to Create New Master Clips
- Using AudioSuite Effect Templates
- Using AudioSuite Plug-Ins in Stereo
- AudioSuite Plug-in Limitations
- Troubleshooting AudioSuite Plug-Ins
- Core Avid Audio Plug-Ins
- AIR Chorus (Audio Track Effect)
- AIR Distortion (Audio Track Effect)
- AIR Dynamic Delay (Audio Track Effect)
- AIR Enhancer (Audio Track Effect)
- AIR Ensemble (Audio Track Effect)
- AIR Filter Gate (Audio Track Effect)
- AIR Flanger (Audio Track Effect)
- AIR Frequency Shifter (Audio Track Effect)
- AIR Fuzz-Wah (Audio Track Effect)
- AIR Kill EQ (Audio Track Effect)
- AIR Lo Fi (Audio Track Effect)
- AIR Multi-Chorus (Audio Track Effect)
- AIR Multi-Delay (Audio Track Effect)
- AIR Non-Linear Reverb (Audio Track Effect)
- AIR Phaser (Audio Track Effect)
- AIR Reverb (Audio Track Effect)
- AIR Spring Reverb (Audio Track Effect)
- AIR Stereo Width (Audio Track Effect)
- AIR Talkbox (Audio Track Effect)
- AIR Vintage Filter (Audio Track Effect)
- Bomb Factory BF76 (Audio Track Effect and AudioSuite)
- Channel Strip (Audio Track Effect and AudioSuite)
- Compressor/Limiter III — Dynamics III (Audio Track Effect and AudioSuite)
- D-Verb (Audio Track Effect and AudioSuite)
- DC Offset Removal (AudioSuite)
- DeEsser III — Dynamics III (Audio Track Effect and AudioSuite)
- Dither (Audio Track Effect)
- Down Mixer (Audio Track Effect)
- Duplicate (AudioSuite)
- Eleven Free (Audio Track Effect and AudioSuite)
- EQ (AudioSuite)
- Expander/Gate III — Dynamics III (Audio Track Effect and AudioSuite)
- Funk Logic Mastererizer (AudioSuite)
- Gain (AudioSuite)
- Invert (AudioSuite)
- Lo-Fi Plug-In (Audio Track Effect and AudioSuite)
- Maxim (Audio Track Effect and AudioSuite)
- Mod Delay III (Audio Track Effect and AudioSuite)
- Normalize (AudioSuite)
- Pitch Shift (AudioSuite)
- Pow-r Dither (Audio Track Effect)
- Recti-Fi (Audio Track Effect and AudioSuite)
- Reverse (AudioSuite)
- SansAmp PSA-1 (Audio Track Effect and AudioSuite)
- Sci-Fi (Audio Track Effect and AudioSuite)
- Signal Generator (Audio Track Effect and AudioSuite)
- Time Compression Expansion (AudioSuite)
- Time Shift (AudioSuite)
- Trim (Audio Track Effect)
- Exporting Frames, Clips, or Sequences
- Understanding Export
- Preparing to Export a Sequence
- Exporting With the Send To Templates
- Send To Templates Reference
- Creating a Custom Send To Template for Exporting to Third-Party Applications
- Exporting With the Export Command or the Drag-and- Drop Method
- Customizing Export Settings
- Guidelines for Exporting AAF Files
- Exporting QuickTime Movies
- Installing or Copying the Avid Codecs for QuickTime on Other Systems
- Exporting from a Third-Party QuickTime or AVI Application
- Exporting as Windows Media (Windows Only)
- Creating a Custom Profile for Windows Media Export (Windows Only)
- Exporting to XDCAM
- Exporting a Simplified AAF
- Exporting XDCAM OP1a Media
- Export OP1a MXF file as Panasonic AVC Long-GOP (H.264)
- Exporting MXF OP1a
- Exporting DNxHR Media as MXF OP1a
- Exporting as DPX
- Exporting as AS-11
- MOV Export
- OpenEXR Export
- Export with Mask Margins
- Exporting Your Clip or Sequence to a P2 Card
- Creating an AS-02 Export Volume
- Creating an Export Volume
- Moving Assets to an Export Volume
- Committing Assets to an Export Volume
- Archiving the AS-02 Bundle
- Exporting an IMF Package
- Working with Apple ProRes
- Working with BXF Files
- AMA File Export with Media Offline
- Generating Output
- Preparing for Output: Overview
- Selecting the Device for Output
- Selecting the Sync Source for Output
- Sync Options for HD Formats
- Using LTC Timecode for Output
- Adding LTC Out During Preroll
- Selecting a Video Output Signal
- Calibrating for Video Output
- Using the Factory Preset Buttons in the Video Output Tool
- Basic Video Output Calibration
- Using Test Patterns
- Calibrating the System with Passthrough Signals
- Luminance Settings for Video Output
- Adjusting Phase Controls
- Preparing for Converting HD Formats
- Crossconversion and Downconversion Formats
- Considerations for Crossconversion and Downconversion
- Preparing for Audio Output
- Setting the Calibration Tone
- Calibrating Global Output Levels
- Setting Audio Output Options
- Enabling 16-Channel Audio Output
- Embedded Audio and Output Sample Rate Conversion
- Using an XLR Adapter for Consumer-Level Analog Output
- Preparing Record Tapes
- Striping Record Tapes (Recording Black with Timecode)
- Recording Bars and Tone
- Enabling Assemble-Edit Recording
- Using ExpertRender to Prepare Effects for a Digital Cut
- Using the Digital Cut Tool
- Selecting a Deck in the Digital Cut Tool
- Previewing a Digital Cut
- Recording a Digital Cut to Tape (Remote Mode)
- Crash Recording Through Remote Deck Control
- Recording a Digital Cut to Tape (Local Mode)
- Output Mode Resolution Options
- Selecting Output and Timecode Formats for 23.976p, 24p, and 25p Projects
- Selecting Output Formats for 23.976p, 24p, and 25p Projects
- Output Format Reference for 23.976p, 24p, and 25p Projects
- Selecting the Timecode Format for Output
- Outputting Drop-Frame and Non-Drop-Frame Timecode Simultaneously for Downstream Encoding
- Indicating the Destination Timecode Rate
- Selecting the Video Pulldown Cadence
- Performing an Insert Edit with Pulldown
- Digital Cuts and Audio
- Changing the Default Pulldown Phase for Sequences
- Understanding DV Digital Cut Delay (or Offset)
- Delaying (Offsetting) the Sequence for a Digital Cut
- Understanding Passthrough
- Using the List Tool
- The List Tool
- Creating a List
- Editing a List
- Viewing the EDL Source List in the Source Table
- Importing an EDL
- Creating a Cut List for Multiple Sequences
- Creating Change Lists Across Multiple Reels
- Appending All Markers to EDLs, Cut Lists, and Change Lists
- Copying Options Between List Types
- Changing the Options
- Using Settings to Save, Recall, and Remove Options
- Special-Purpose Templates
- EDL: List Options
- EDL: Formatting Options
- Cut List: List Options
- Change List: List Options
- Cut List or Change List: Formatting Options
- Cut List and Change List Icons
- Change List Icons
- Bad Clip Icon
- Sample Workflow for Stages of Generating Cut Lists and Change Lists
- Displaying Frame Count Numbers in Cut Lists
- Editing and Troubleshooting EDLs
- Avoiding Problems in EDLs
- Understanding Matchback
- Vertical Blanking Information
- Vertical Blanking Interval Line Ranges
- Displaying and Preserving Vertical Blanking Information
- Editing a Sequence with Vertical Blanking Information
- Effects of Preserving Vertical Blanking Information on Compressed Video Quality
- Preserving HD Closed Captioning and Ancillary Data
- Data Track Method
- Adding a Data Track
- Adding the Active Format Description to the Data Track
- Ancillary Data and AMA
- Moving from Legacy Method to Data Track Method
- Ancillary Data and Avid Editing Functions
- Legacy Method
- Controlling Ancillary Data through a Settings Window - Data Track Method
- Controlling Ancillary Data through a Settings Window - Legacy Method
- Controlling Ancillary Data with a Console Command (Legacy Method only)
- Capturing Ancillary Data with a Data Track
- Performing a Data Mixdown
- Exporting a Sequence with Data Tracks
- Previewing Closed Captioning
- Searching for Closed Captions Text in the Timeline
- Exporting Closed Captions Text
- Multi-Format Workflows in Media Composer
- Conforming and Transferring Projects
- Understanding Conforming
- Preparations for Conforming
- Delivery Requirements for Final Masters
- Offline Formats for HD
- File Transfer for the Online Session
- System Compatibility for the Online Session
- Preparing Graphics for the Online Session
- Preparing Effects for the Online Session
- (Symphony Option) Preparing Titles for the Online Session
- Preparing Audio for the Online Session
- Conforming Workflow
- Step 1: Transfer Files
- Step 2: Open the Project
- Step 3: Measure the Video Signal
- Step 4: Recapture Media
- Step 5: Import and Lay in the Final Audio Mix
- Step 6: Batch Import Graphics
- Step 7: Re-create Title Media
- Redefining a Font Replacement
- Step 8: Refine Effects and Perform Color Correction
- Step 9: Render Effects as Needed
- Step 10: Create the Final Masters
- Conforming Sequences with Color Correction
- Conforming Color Correction Sequences with Media Composer
- Transferring Color Corrections with Color Correction Templates
- Transferring Project and Media Files Between Media Composer Systems
- Transferring Audio Files
- Transferring and Working with Sound Designer II Audio Files from Macintosh Systems
- Transferring a Project Using Shared Storage
- Transferring Project Files and Media Files Using Nonshared Storage
- Nonshared Storage Issues for Cross-Platform Collaboration
- Using the NRCS Tool (Media Composer | NewsCutter Option)
- Configuring the NRCS Tool
- Configuring the ENPS Server for Avid Clients
- Configuring the NRCS Settings
- Starting the NRCS Tool
- NRCS Tool Components
- Using the Directory Panel
- Opening a Story
- Using Shortcuts with Directories (iNEWS Only)
- Deleting a Story (iNEWS Only)
- Changing the Text Display
- Editing Story Text (iNEWS Only)
- Rearranging Text in a Story (iNEWS Only)
- Marking Text (iNEWS Only)
- Formatting Text (iNEWS Only)
- Adding a Production Cue (iNEWS Only)
- Using Loaded Cues (iNEWS Only)
- Finding the Read Time of a Story
- Sequences and Stories
- Building a Sequence from a Story
- Script-Based IN and OUT Points
- Setting Timeline IN and OUT Points Based on Story Timing
- Associating a Sequence with a Story
- Adjusting the Story Timing (iNEWS Only)
- Adjusting the Story Timing with a Time Marker (iNEWS Only)
- Adjusting the Story Timing with a Time Pad (iNEWS Only)
- Using Associated Sequences
- Saving Changes to a Story (iNEWS Only)
- Using the Post to Web Feature
- Processing the Script for Post to Web
- Creating a Web Page for Post to Web
- Linking Clips for Post to Web
- Understanding Post to Web Templates
- Using the Story Tag in Post to Web Templates
- Using the Text Tag in Post to Web Templates
- Using the Clip Tag in Post to Web Templates
- Using the Videoformat Tag in Post to Web Templates
- Using the Hyperclip Tag in Post to Web Templates
- Using a Template with Post to Web
- Posting a Story to the Web
- Sending and Receiving NRCS Mail (iNEWS Only)
- Sending NRCS Tool Mail (iNEWS only)
- Receiving NRCS Tool Mail (iNEWS only)
- Disconnecting from Your NRCS Server
- Working with MediaCentral | Production Management from Media Composer
- Do’s and Don’ts for Editors Working with MediaCentral | Production Management
- Checklist for Editors Working with Production Management
- Working with Production Management and Production Management Assets
- Connecting to a Shared Storage System
- Logging in to MediaCentral | Production Management
- Configuring Production Management Settings in Media Composer
- Additional Production Management Settings in Media Composer
- Defining the Media Creation Settings
- Administrator Settings for Media Composer Clients
- Editing with Production Management Assets
- Checking Avid Assets Out From the Production Management Database
- Checking Avid Assets In to the Production Management Database
- Updating Production Management Assets in Bins
- Loading Production Management Assets and Editing Sequences
- Working with Assets in the Production Management Window
- Understanding Reservations
- Understanding Restrictions
- Understanding Access Control for Avid Assets
- Moving, Copying, Duplicating, and Deleting Avid Assets
- Creating Folders and Shortcuts in the Production Management Window
- Modifying the Appearance of the Production Management Window
- Understanding Column Display in the Production Management Window
- Modifying Column Display in the Production Management Window
- Selecting Values for a Custom Property
- Selecting Asset Types
- Media Objects in the Production Management Window
- Renaming Clips in the Production Management Window
- Adding Comments in the Production Management Window
- Updating the Display in the Production Management Window
- Navigating to a Folder that Contains a Selected Asset
- Updating Writable Properties in the Property Merge Dialog Box
- Using Custom Layouts for the Production Management Window
- Opening Multiple Tabs in the Production Management Window
- Selecting Font Options from the Context Menu in the Production Management Window
- Finding Production Management Assets
- Working with Assets in the MediaCentral | Panel for Media Composer
- Working with MediaCentral | Cloud UX
- Capturing Media to Production Management Folders
- Working with In-Progress Clips
- Editing with In-Progress Clips
- Limitations When Working With In-Progress Clips
- Using the MediaCentral | UX Messages Window
- Viewing Messages and Linked Media Assets
- Sending Messages
- Performing a Send-to-Playback as a Background Process from Media Composer
- Interplay Synced Projects
- Using Media Composer with Media Composer | Cloud Remote
- Setting Up Remote Editing
- Installation and Configuration for Remote Editing
- Credentials for the Media Composer | Cloud Remote Playback
- Configuring Production Management Settings on the Remote Editing System
- Playing Back Remote Media
- Setting Playback Quality for Remote Media
- Using the Disk Cache to Manage Cached Media
- Suggestions for Working with Remote Playback
- Uploading Media Using the Remote Upload Service
- Administrator Settings for Remote Upload
- Uploading Media
- Syncing Sequences
- Upload/Download Queue Dialog Box
- Media Composer | Cloud Remote and Dynamic Relink
- Limitations for Remote Upload
- Using Remote Download
- Send-to-Playback and Media Composer | Cloud Remote (Windows Only)
- Supported Project Types and Formats
- Stopping and Starting Media Indexer on a Mac OS X System
- Using Interplay Transfer to Export Media
- Installing the Interplay Transfer Client Software
- Setting Transfer Settings in the Avid Editing Application
- Send to Playback with Multichannel Audio Tracks
- Mapping Audio Tracks to Output Channels
- Transferring Avid Assets from an Avid Editing Application
- Transferring Avid Assets to a Playback Device
- Working with Rundowns (NewsCutter Option)
- Creating a Rundown Schedule File (NewsCutter Option)
- Transcoding of Mixed Resolution Clips During a Send to Playback
- Monitoring Transfers from Within the Avid Editing Application
- Transfer Status Window Options
- Sorting the Transfer Status Columns
- Clearing the Transfer Status Window
- Using MultiRez and Dynamic Relink
- Understanding MultiRez and Proxy Editing
- Acquiring Media at Multiple Resolutions
- Batch Capturing Media at a Different Resolution
- Batch Importing File-Based Media at Different Resolutions
- Transcoding Media to Low-Res Proxies
- Understanding How Clips are Associated with Multiple Resolutions
- Options for Clip and Media Association
- Understanding Dynamic Relink
- Using Dynamic Relink with Media Composer | Cloud Editing Systems
- Workflow: Editing a Film or HD Project using MultiRez
- Considerations When Working with Dynamic Relink
- Using the Dynamic Relink Settings Dialog Box
- Opening the Dynamic Relink Settings Dialog Box
- Enabling Dynamic Relink
- Applying Working and Target Settings for Dynamic Relink
- Dynamically Relinking to the Target Settings
- Using Dynamic Relink with Mixed Rate Clips
- Cross Rate Dynamic Relink
- Relinking in Frame Chase Editing
- Using the Relink Dialog Box in an Avid Interplay Environment
- Displaying Whether Media Is Available for Dynamic Relinking
- Using the MultiRez Button to Show Available Media
- Using Clip Coloring to Show Available Resolutions
- Examples of MultiRez Clip Coloring
- MultiRez Button Menu
- MultiRez Bin Headings
- Understanding Options for Deleting MultiRez Clips and Media
- Deleting MultiRez Clips and Media from a Bin
- Working with Partially Online Files
- Consolidating and Transcoding a Portion of a Clip
- Viewing a Source Clip in the Timeline
- Consolidating and Deleting Original Media
- Partially Restoring from an Archive
- Quality Matching
- Quality Matching Reference
- Example of Quality Matching
- MultiCamera Editing
- Understanding Grouping and Multigrouping Clips
- Creating Group Clips
- Grouping Stereoscopic Clips
- Creating Multigroup Clips
- Editing Group Clips
- Waveform Sync
- MultiCamera Displays
- Real-time Playback in MultiCamera Mode
- Limitations on Playback of MultiCamera Media
- MultiCamera Editing Techniques
- Switching Clips with the Arrow Keys During Multicamera Editing
- Numeric Keypad and Mouse Support for MultiCamera Editing
- Editing and Playing Back a Linecut in MultiCamera Mode
- Using the Add Edit Button During Multicamera Editing
- Using the Group Menu for Multicamera Editing
- Using the Multi-angle View Menus During Multicamera Editing
- Using Match Frame in MultiCamera Editing
- Committing MultiCamera Edits
- Selective Camera Cutting
- Settings
- Understanding Settings
- Working with Settings
- Viewing and Modifying Settings
- Switching to Another Set of User Settings
- Duplicating Settings
- Naming Settings
- Selecting Among Multiple Settings
- Deleting Settings
- Restoring Default Settings
- Copying Settings Between Settings Files
- Using Site Settings
- Understanding User Profiles
- Managing User Profiles
- Options for Moving User Settings Files
- Using the Format Tab
- Settings
- Audio Ducking
- Audio Settings
- Audio Multiple Mix Settings
- Audio Project Settings
- Bin Settings
- Capture Settings
- Cloud Download Settings (Media Composer Cloud Clients Only)
- Cloud Playback Settings (Media Composer Cloud Clients Only)
- Cloud Upload Settings (Media Composer Cloud Clients Only)
- Color Management Settings
- Communication (Serial) Ports Tool Settings
- Composer Settings
- Controller Settings
- Correction Settings
- Deck Configuration Settings
- Deck Preferences Settings
- Deck Settings
- Desktop Play Delay
- Dynamic Relink Settings
- Effect Editor Settings
- E-mail Settings
- Export Settings
- Film and 24P Settings
- Full Screen Playback Settings
- General Settings
- Grid Settings
- Import Settings
- Interface Settings
- Keyboard Settings
- Link Settings
- Media Cache
- Media Creation Settings
- MediaCentral Production Mgmt Folder
- MediaCentral Server Settings
- MediaCentral User Settings
- MediaCentral Production Mgmt Services
- Mouse Settings
- NRCS Settings (Media Composer | NewsCutter Option)
- Passthrough Mix Tool
- Remote Play and Capture Settings
- Render Settings
- S3D Settings
- Safe Colors Settings
- Script Settings
- Sound Card Configuration Settings (Windows Only)
- Timeline Settings
- Title Tool Settings
- Tool Palette
- Transfer Settings
- Trim Settings
- Video Display Settings
- Video Input Tool Settings
- Video Output Tool Settings
- Video Satellite Settings
- Workspace View Settings
- File Format Specifications
- Project Formats and Resolutions
- Working in HD and High-Resolution Projects
- Delivery Methods for Cinema and Television
- Transferring Film to Tape
- Transfer of 24-fps Film to NTSC Video
- Transfer of 24-fps Film to PAL Video
- Viewing Video Dailies
- HD Workflow: Video-Based Television
- Producing Graphics for Broadcast
- Creating a Film-Based Project
- Selecting a Project Format during Capture
- Selecting a Project Format during Output
- Changing the Project Format
- Changing the Sequence Format
- (Media Composer | Symphony Option) Converting a 24p NTSC Sequence to 1080p/23.976
- Converting a 23.976p NTSC Sequence to 720p/23.976
- Editing at 60 fps
- Displaying 24p and 25p Media
- Outputting a Sequence
- (Media Composer | Symphony Option) Using HD Universal Mastering
- (Media Composer | Symphony Option) Converting Audio for HD Universal Mastering
- (Media Composer | Symphony Option) Performing a Digital Cut with HD Universal Mastering
- Working with HDV
- Understanding HDV
- HDV Workflow
- Capturing and Importing HDV
- Playing Back HDV Media
- Outputting HDV
- Long-GOP Splicing for HDV Encoding
- Outputting HDV through Avid Input/Output Hardware
- Exporting an HDV Transport Stream
- Exporting HDV as Windows Media
- Raster Dimensions
- Raster Sizes
- International Character Support (ICS) in Avid Editing Applications
- Open I/O Support
- Index

Customizing the Composer Window and Monitors
381
Tracking information in the Composer window. Left to right: First row of information (bottom) and second row of
information (top). center duration display, and Tracking Information menu. Click anywhere in the information display area
to display the Tracking Information menu.
By default, the tracking information area displays no data until you select a tracking format. There is
no display of tracking data when there is no material loaded in the monitor. If you load a clip and no
information is currently displayed, you can still open the menu by clicking in the area above a
monitor.
To display tracking information:
1. Load a clip or sequence into the monitor.
2. Click in the information display area in either the first or second row of information above the
monitor to open the Tracking Information menu.
3. Select the type of tracking information you want to display.
If you select the option for two information rows above the monitors in the Composer settings (in
the Window tab), you can display two different types of tracking information for the footage in
each monitor.
For example, you can display both running timecode and IN to OUT durations for clips loaded in
the Source monitor. You can display similar information for the sequence shown in the Record
monitor.
n
To move through footage by entering timecode, make sure the top row of information displays
timecode (for example, V1). For more information, see “Using Timecode to Find a Frame” on
page 421.
Tracking Format Options
The Tracking Information menu contains options for information to be displayed above the monitors.
The contents of the menu varies, depending on the monitor.