Avid MediaCentral® Platform Services Upgrading Guide Version 2.4.0 This document is a guide to upgrading to MediaCentral Platform Services (MCS) 2.4.0 from a previous version of MCS or Interplay Central Services (ICS). Important Information Avid® recommends that you read all the information in this upgrade guide thoroughly before installing or using the corresponding software release.
MediaCentral Services 2.4 Upgrading Guide Contents Important Information ....................................................................................................................... 1 Revision History .................................................................................................................................. 1 Contents .....................................................................................................................................................
MediaCentral Services 2.4 Upgrading Guide Removing the Gluster Metadata Cache Replication Volume ............................................................... 21 Upgrading a Single Server RHEL 6.3 System to MCS 2.4 .......................................................................... 22 Backing-up System Settings.................................................................................................................. 22 Installing RHEL 6.5 and MCS 2.4 ........................................
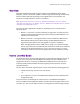
MediaCentral Services 2.4 Upgrading Guide Overview Upgrading to MediaCentral Platform Services (MCS) 2.4 for MediaCentral UX, Media Composer | Cloud, and Interplay | MAM, involves the migration of settings and data along with the software upgrade. Depending on the upgrade path you are faced with, the migration of settings and data is manual or automated. Note: Beginning with version 2.0, the term “MediaCentral Platform Services” replaces “Interplay Central Services.
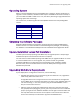
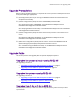
MediaCentral Services 2.4 Upgrading Guide Operating System MCS 2.4 requires Red Hat Enterprise Linux (RHEL) v6.5. In addition, whether performing an upgrade or a full installation, the MCS installer requires the RHEL 6.5 ISO to be mounted, so you must obtain the RHEL 6.5 ISO. This is true, even when performing an upgrade where the operating system does not change. For convenience, the following table lists the ICS/MCS releases and corresponding RHEL versions. ICS/MCS Version RHEL Version ICS 1.2.3 – 1.5.
MediaCentral Services 2.4 Upgrading Guide Upgrading Media | Index Deployments If your deployment is configured for Media Index, note the following: • Systems configured for Media Index require additional steps for certain upgrade paths. Review and complete the following steps as appropriate for your installation: If you are upgrading from MediaCentral v2.1 or earlier, you must delete the indexes in all zones before the upgrade. Deleting the indexes reverts the index table to a clean (empty) state.
MediaCentral Services 2.4 Upgrading Guide An Important Note on SSL Certificate Passwords Interplay Central uses the Secure Sockets Layer (SSL) for its server to browser connections. Default passwords may have been used by the system to automatically generate a selfsigned certificate. Customized certificates can also be used, including those that have been issued by a Certificate Authority (CA).
MediaCentral Services 2.4 Upgrading Guide Backing Up and Restoring SSL Private Keys Upgrading can be a “true” (non-destructive) upgrade, or can involve a fresh install of RHEL. For fresh installs, the system-backup script has been provided to back up and restore system settings related to MCS, including SSL data (the Jetty keystore and certificates it contains). However, if you are using a Trusted CA-signed Certificate, a private key (jettyPrivateKey.
MediaCentral Services 2.4 Upgrading Guide Migrating User Settings from UMS to USS During an Upgrade MediaCentral 2.0 introduced a new user database scheme. Upgrades of systems prior to 2.0 need to complete a user database migration using the supplied avid-uss-import script. • For upgrades from 1.8.0 (RedHat 6.3) or earlier, a backup and restore of the MCS database is required.
MediaCentral Services 2.4 Upgrading Guide Upgrade Prerequisites Before starting any MCS upgrade, it is important to ensure you have a healthy environment. Verify the following as appropriate: (All configurations) Ensure you can log into MediaCentral UX via a web browser and verify basic functionality. (Cluster configurations) Verify the status of RabbitMQ and the ACS Bus. See “Verifying the Status of RabbitMQ” in the MediaCentral Platform Services Installation and Configuration Guide for details.
MediaCentral Services 2.4 Upgrading Guide Upgrading a Single Server RHEL 6.5 System to MCS 2.4 Installing MCS 2.4 on a single server already operating under RHEL 6.5 is a simple automated update of the affected packages. All MCS system settings are preserved. Expected downtime: 30 min. Note: Prior to upgrading, ensure you have verified the Upgrade Prerequisites on page 10. Installing MediaCentral Platform Services 2.4 1. Prepare the v2.4 MCS Installation USB Drive and connect it to your MCS server.
MediaCentral Services 2.4 Upgrading Guide During the installation process, progress is displayed. The update completes with an indication of success: INSTALLATION FINISHED If any errors were encountered during the upgrade, you can obtain more information in the installation log at: /var/log/MediaCentral_Services__Build__Linux.log 6. Check the installation was successful using the ics_version script: ics_version Service version numbers are returned as follows: UMS Version: 2.4.x.
MediaCentral Services 2.4 Upgrading Guide Upgrading a Cluster RHEL 6.5 System to MCS 2.4 Installing MCS 2.4 on a cluster already operating under RHEL 6.5 involves an automated update of the affected packages. All MCS system settings are preserved. All nodes must be taken offline to perform the update.
MediaCentral Services 2.4 Upgrading Guide Verifying Gluster File Replication The MCS v2.4 installation includes the Gluster v3.6.4 software packages to enable file replication across the cluster nodes. If your cluster is already configured with Gluster and you are running an earlier version of Gluster, the packages will be automatically updated during the MCS software installation. If your system is not configured with Gluster, the packages will still be installed, but the software will not be activated.
MediaCentral Services 2.4 Upgrading Guide Backing-up the User Database and System Settings Although the upgrade is non-destructive, it is a good idea to back-up the MCS database. This is an optional, but recommended step. To back up the database and settings: 1. Prepare the v2.4 MCS Installation USB Drive and connect it to the cluster master node. See “Creating the MCS Installation USB Drive” in the MediaCentral Platform Services Installation and Configuration Guide for details. 2.
MediaCentral Services 2.4 Upgrading Guide To bring the cluster into standby mode: 1. Begin by putting the Corosync load-balancing nodes into standby mode and then stopping the rabbitmq service. Complete this process one node at a time, waiting 30 seconds between each node: crm node standby service rabbitmq-server stop 2. Wait 30 seconds and put the Corosync slave node into standby: crm node standby service rabbitmq-server stop 3.
MediaCentral Services 2.4 Upgrading Guide If your system is configured for Media Index, you will receive a message indicating that “A Media | Index configuration has been detected on this system”. Select one of the following options: • Type IGNORE if you have already upgraded your Media | Index data or want to upgrade your system without completing the migration. • Type QUIT if you have not yet upgraded your Media | Index data and need to exit the installer.
MediaCentral Services 2.4 Upgrading Guide b. Regenerate the volfile names on all bricks: glusterd --xlator-option *.upgrade=on –N c. Start the glusterd service: service glusterd start d. Remount the Gluster volumes: mount /cache/download mount /cache/fl_cache mount /cache/render Stopping the RabbitMQ Service and Rebooting the Cluster Installing the software update restarted the RabbitMQ service. The services need to be stopped again before rebooting the cluster.
MediaCentral Services 2.4 Upgrading Guide Bringing the Corosync Cluster Online To complete the upgrade process, the Corosync cluster must be manually brought online. To bring the cluster back online: 1. Reactivate the cluster by running the following command on the master node only: sh /opt/avid/cluster/bin/reactivate-cluster Note: If after running the reactivate-cluster script you observe that a node is the state of “Offline - Unclean Node”, restart Pacemaker on that node.
MediaCentral Services 2.4 Upgrading Guide 4. (Media Index configurations only) If you are upgrading a system that includes Media Index, you will need to run a script to restart the appropriate services. /opt/avid/cluster/bin/search-cluster rsc-start This command only needs to be run once on any node in the cluster. 5.
MediaCentral Services 2.4 Upgrading Guide 4. Change the group ownership of the gluster volume to maxmin using the group ID: gluster volume set gl-cache-dl storage.owner-gid gluster volume set gl-cache-fl storage.owner-gid Note: Do not alter the gl-cache-mcam (multicam) volume. It uses the default root ownership. 5.
MediaCentral Services 2.4 Upgrading Guide Upgrading a Single Server RHEL 6.3 System to MCS 2.4 The upgrade to MCS 2.4 on a RHEL 6.3 system involves a fresh OS and MCS software installation. This process consists of the following procedures: Backing-up System Settings Installing RHEL 6.5 and MCS 2.4 Restoring System Settings and Migrating User Settings Additional Upgrade Procedures Note: Before proceeding, back up any private key used to generate a Certificate Signing Request.
MediaCentral Services 2.4 Upgrading Guide Installing RHEL 6.5 and MCS 2.4 1. Unmount the USB drive (if you have not already done so). See “Appendix C: Mounting and Unmounting a USB Drive” for details. 2. If your configuration includes a RAID 5 array, delete and recreate the RAID 5. Destroying and re-creating the RAID 5 eliminates (in advance) problems with cache permissions that can arise as a result of the RHEL update. See “Appendix E: Deleting the RAID 5” for details on deleting the RAID 5.
MediaCentral Services 2.4 Upgrading Guide Restoring System Settings and Migrating the User Database 1. Re-insert and re-mount the USB drive. See “Appendix C: Mounting and Unmounting a USB Drive” for details. Warning: The MCS Installation USB Drive contains all software used to image a new MediaCentral server. Do not reboot the server with this USB drive attached. 2. Restore the system settings and MCS database using the restore script.
MediaCentral Services 2.4 Upgrading Guide The system returns the following: Loading properties.. Fetching zone UUID.. Importing settings for zone UUID: 00000000-0000-0000-0000000000000000 Importing setting_domain_class.. Importing setting_class.. Importing setting_instance.. SUCCESS Additional Upgrade Procedures The backup and restore procedure saves many system settings which provides the user with a more streamlined upgrade. However, some configuration steps must be manually recreated.
MediaCentral Services 2.4 Upgrading Guide 9. Once the system is running to your satisfaction, Avid suggests creating a final backup of the system settings and MCS database. See Appendix F: Backing Up and Restoring System Settings and the ICS/MCS Database for details.
MediaCentral Services 2.4 Upgrading Guide Upgrading a Cluster RHEL 6.3 System to MCS 2.4 The upgrade to MCS 2.4 on a RHEL 6.3 system involves a fresh OS and MCS software installation.
MediaCentral Services 2.4 Upgrading Guide Backing Up the System Settings Note: Ensure the master node should is not in standby when you run the backup script. If it is in standby, only the system settings will be backed up – not the database. All other nodes can be in standby if desired. On the slave node the database is present, but not mounted. Load balancing nodes do not have a database. To back up the system settings: 1. Prepare the v2.
MediaCentral Services 2.4 Upgrading Guide Taking the Cluster Offline Prior to upgrading the cluster, all nodes must be taken offline. To avoid accidental cluster failover, make sure to follow the order represented below. To take the cluster offline: 1. Take the cluster offline by putting the load-balancing nodes into standby mode: crm node standby 2. Next, put the slave node into standby mode: crm node standby 3.
MediaCentral Services 2.4 Upgrading Guide Note: For precise version numbers for this release, see the Avid MediaCentral Platform Services 2.4 ReadMe. Note: If you receive a “command not found” error, logout and log back into the server or SSH session (PuTTY). This will refresh the login for the upgraded system and should allow the command to run properly. 7. Install any RHEL security updates. See the Avid MediaCentral Platform Services v2.4 ReadMe for more information.
MediaCentral Services 2.4 Upgrading Guide Note: For Interplay | MAM system the filesystem table contains an entry to automatically mount the Interplay | MAM filesystem. 5. Verify if DRBD is set to run at system startup: chkconfig –-list drbd This command includes two dashes (“--“) with no space between them. 6. If set to run, disable DRBD (since it will interfere with setting up the cluster): chkconfig drbd off 7. Reboot and note the restored host name at the login prompt (e.g. wavd-mcs01).
MediaCentral Services 2.4 Upgrading Guide b. Verify the availability of the in-house NTP server, synchronize the System Clock, and set up a cron job to keep the clock synchronized. 4. Reconfigure the cluster and cache replication. See “PART V: CLUSTERING”. 5. Test the cluster. See “PART VI: VERIFYING THE INSTALLATION”. 6. If you are deploying MCS for Interplay | MAM or Media Composer | Cloud, you must update Interplay Central configuration settings.
MediaCentral Services 2.4 Upgrading Guide Appendix A: Post Upgrade Notes The following notes may or may not apply to your configuration. Reconfiguring MCS for Upgrades from ICS 1.7 or Earlier In previous releases, the MCPS Player embedded in the MediaCentral | UX UI required its own user name and password for communicating with the MCS server (from which it receives video). In MCS 2.4 this is no longer the case. As of ICS 1.8 the MCPS Player uses the credentials of the logged-in user.
MediaCentral Services 2.4 Upgrading Guide Reconfiguring MCS for Use with Interplay | MAM 1. With the MCS server up and running, log in to MediaCentral as the Administrator user. 2. Select Users from the Layout selector. 3. Create a special role for the MAM user by clicking on the Create Role button in the Roles pane. 4. Click the Create Role button. 5. In the Details pane, type the properties for the new role: • • • Role name (e.g. MAM) Advance License Do not assign the MAM role any layouts 6.
MediaCentral Services 2.4 Upgrading Guide Resetting Layouts After Upgrading from V2.0 to V2.4 Three panes used in MediaCentral UX v2.0 were dropped as of MediaCentral UX v2.1: • Markers pane: redesigned as Logging pane. • Layouts pane in Users Layout: replaced by drag-and-drop functionality. • Search pane in Users Layout: replaced by Filter field. After Media Central UX is upgraded to v2.4, users who had signed out of V2.
MediaCentral Services 2.4 Upgrading Guide Appendix B: Migrating the UMS Database to a Test Node MediaCentral Platform Services maintains a database containing information for the following subsystems: • ACS - Avid Common Services • ICPS - Interplay Central Playback Services • UMS - User Management Services In some situations you might need to extract just the UMS data.
MediaCentral Services 2.4 Upgrading Guide For example: avid-ums-restore backup.sql -pu postgres Once you confirm the restore operation, the operation begins. It can take a minute or two. The system responds with an indication of success: UMS database was restore successfully. 4. Confirm the UMS service was restarted by the avid-ums-restore utility: service avid-ums status In the case of a cluster, issue the following command instead: crm resource status AvidUMS Migrating the 1.4.x/1.5.
MediaCentral Services 2.4 Upgrading Guide Appendix C: Mounting and Unmounting a USB Drive Refer to the instructions below to mount the USB drive. To mount and unmount a USB drive: 1. Insert the USB drive into the MCS server. 2. Verify the name of the device using the dmesg command: dmesg Linux information relating to hardware appears on the screen. Information for the USB drive will appear near the end of the output, near the list of SCSI devices.
MediaCentral Services 2.4 Upgrading Guide If you receive an error message that the USB device is busy, it typically indicates the Linux ISO on the USB drive was auto-mounted. Verify what is mounted using the df -h command and/or the mount command. Then, dismount the Linux ISO first, followed by the USB device: umount /sysinstall umount /media/usb 9. Remove the USB drive from the server. Removing the USB drive prevents accidental rebooting and re-imaging of the system disk.
MediaCentral Services 2.4 Upgrading Guide Appendix D: Copying Software to the MCS Server At various times during the upgrade, you will need to copy software to the MCS server. This task can be performed using one of two methods: Using a Windows system and a SFTP tool such as WinSCP Connecting a USB drive directly to the server While the SFTP method may be preferred for ease of access, the USB method may be required for some operations such as backing-up MCS files during a system upgrade.
MediaCentral Services 2.4 Upgrading Guide Note: When copying the MCS installer to the MCS server, the installer should be contained in its own folder within the installers folder. Create sub-folders as necessary. Example: /media/installers/MCS_v2.4.0. 12. After all desired files or folders have been copied, close WinSCP. Copying Software Using a USB Drive For simply mounting and unmounting a USB drive, follow the process below and eliminate steps 7 and 8. 1. Insert the USB drive into the MCS server. 2.
MediaCentral Services 2.4 Upgrading Guide 9. Copy files to the MCS server: For a single file: cp filename /media/installers For a folder: cp -R foldername /media/installers 10. Once you have finished copying all necessary files, unmount the USB drive. cd Note: In Linux the “cd” command without any arguments takes you directly to the user’s home directory. If you are logged in as root, it takes you to the /root directory. RHEL will not unmount the USB drive if it is the current active directory.
MediaCentral Services 2.4 Upgrading Guide Appendix E: Deleting the RAID 5 When upgrading from one version of RHEL to another, it is recommended that you delete the RAID 5 prior to installing the new OS and MCS software. Deleting and re-creating the RAID 5 eliminates (in advance) problems with cache permissions that can arise as a result of the RHEL update. This section provides instructions for deleting the RAID 5.
MediaCentral Services 2.4 Upgrading Guide Deleting the RAID 5 on an HP Gen8 1. Reboot the server. 2. Press any key when prompted (spacebar recommended) to display the HP ProLiant “Option ROM” messages. 3. As soon as you see the prompt to enter the Option ROM Configuration for Arrays utility, press F8. Note: The prompt to press F8 can flash by very quickly. If you miss it, reboot and try again.
MediaCentral Services 2.4 Upgrading Guide 4. From the Main Menu, select Delete Logical Drive and press Enter. 5. Select the RAID 5 and press F8 to delete.
MediaCentral Services 2.4 Upgrading Guide 6. A warning appears asking you to confirm your choice. Press F3 to delete the RAID. 7. The RAID 5 is removed, and can now be re-created. In the MediaCentral Platform Services Installation and Configuration Guide, see “Configuring the Onboard RAID”.
MediaCentral Services 2.4 Upgrading Guide Deleting the RAID 5 on an Dell Server Deleting and recreating the RAID sets using the DELL BIOS utility does not erase data, nor does it delete existing partitions. That is, deleting a RAID does not delete the partition table — unless you initialize the disk at the same time. However, initializing the disk is a slow process.
MediaCentral Services 2.4 Upgrading Guide 6. Select No in the Setup Networking window; as networking is not needed at this time. 7. Select “Skip” in the Rescue window.
MediaCentral Services 2.4 Upgrading Guide 8. At the next screen, choose “shell Start shell” and select Ok. 9. At the system prompt, use the RHEL fdisk utility to examine the current partitions: fdisk -cul This command will display the available disks and partitions on the system. Use Shift-Pg Up and Shift-Pg Down to view the entire output, since scroll bars will not be present in the rescue shell.
MediaCentral Services 2.4 Upgrading Guide You will need to delete the any partitions on the RAID 1 volume and the RAID 5 volume (if applicable). This process will assume “sdb” is the RAID 1 and “sdc” is the RAID 5. 10. Use the RHEL fdisk utility to select the sdb volume: fdisk /dev/sdb 11. Type: p to print the current filesystem partition table. This will show you a similar output as the fdisk –cul command you used earlier. 12. Type: d to begin deleting the partitions. 13.
MediaCentral Services 2.4 Upgrading Guide Appendix F: Backing Up and Restoring System Settings and the ICS/MCS Database Before performing an upgrade it is recommended — and sometimes required — that you back up the ICS/MCS server system settings using the system-backup script. Depending on the upgrade path, you may also be required to restore the backed up system settings after.
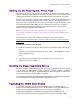
MediaCentral Services 2.4 Upgrading Guide Directory/File Description /etc/rsyslog.d/ Configuration file pertaining to the ICPS service /etc/security/ /etc/snmp/ Simple Network Management Protocol (network monitor) /etc/sudoers.d/ List of users with sudo privileges /etc/sysconfig/ Network settings and more /etc/udev/rules.d/70-persistent-net.rules NIC card settings /opt/avid/etc/avid/avid-interplaycentral/ssl/jetty.keystore /opt/avid/etc/avid/avid-interplaycentral/config/application.
MediaCentral Services 2.4 Upgrading Guide Note: The following message indicates the system-backup script has already been run on the current machine: File /root/pcmk.conf exists. Do you want to overwrite it? Type “yes” or “y” to overwrite the file and continue with the backup. A backup file is written to the USB drive: /media/usb/sys-backup/ics_setup_files.tar.
MediaCentral Services 2.4 Upgrading Guide 4. Restore the ICS/MCS settings and database using the backup script. ./system-backup.sh –r You are asked to confirm the restoration of the ICS/MCS database: Would you like to restore the database now? (y/n) 5. Type “y” (without the quotes) to confirm the action. You are asked to confirm the shutting down of the Avid services: All Avid services will be shut down before performing a database restore operation. Would you like to continue? [yes/no] 6.
MediaCentral Services 2.4 Upgrading Guide Copyright and Disclaimer Product specifications are subject to change without notice and do not represent a commitment on the part of Avid Technology, Inc. The software described in this document is furnished under a license agreement. You can obtain a copy of that license by visiting Avid's Web site at www.avid.com. The terms of that license are also available in the product in the same directory as the software.