
11.7

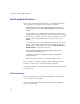
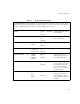


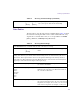

Table Of Contents
- Avid MediaLog User’s Guide
- Contents
- Tables
- Using This Guide
- Understanding MediaLog
- Getting Started
- Working with the Project Window
- Exploring the Project Window
- Opening and Closing the Project Window
- Using the Bins Display
- Using the Settings Scroll List
- Using the Info and Usage Displays
- Changing Font and Point Size
- Customizing Your Workspace
- Viewing Keyboard Settings
- Using the Avid Calculator
- Using the Communications (Serial) Ports Tool
- Using the Console Window
- Logging Source Material
- Organizing with Bins
- Preparing to Work with Bins
- Understanding Bin Display Views
- Basic Bin Procedures
- Using Text View
- Creating MediaLog Output
- Avid Log Specifications
- Working with a Film Project
- Index

Avid Log Specifications
159
Data Entries
The data entries come after the Custom column headings. Table 19 shows
the format for entering data. Enter a line of data in this format for every
clip. Be sure to start the data section for each clip with the word
Data
[Enter] (Windows) or
Data
[Return] (Macintosh).
[Enter]
or
[Return]
[Enter]
or
[Return]
Press [Enter] (Windows) or [Return] (Macintosh)
twice (do not press Tab) after the last heading.
Table 18 Avid Log Column Headings (Continued)
Table 19 Avid Log Data Headings
DATA HEADINGS: The word Data marks the start of the data for each clip.
Data [Enter]
or
[Return]
Required Enter the word Data to mark the start of the logged clip
entries.
DATA FOR EACH CLIP: Enter a line of data for each clip. Enter the data so it aligns with its column
heading. (The data that goes with the ninth column heading must be the ninth data entry.) Be sure to
enter data for all the required values. To leave a data position unfilled, press the Tab key instead of
typing data. Press Enter (Windows) or Return (Macintosh) at the end of each line. Your Avid system
supports up to four audio tracks in imported and exported logs.
<clip name> [Tab] Required Under Name heading. Enter a clip identifier
(32 characters maximum).
<V>
<VA1>
<VA2>
<VA1A2>
<A1A2>
<A1>
<A2>
[Tab] Required Under Tracks heading. Enter the tracks you want
digitized for the clip. Enter V for MOS takes. Enter A1,
A2, or A1A2 for wild sound.
<timecode> [Tab] Required Under Start heading. Enter the video timecode for the
sync point, the first frame of the clip. Use colons for non-
drop-frame (for example, 01:00:12:20). Use one or more
semicolons for drop-frame (for example, 01;18;00;02).