
2.0

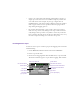


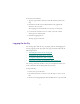
Table Of Contents
- Title Page
- Contents
- List of Tables
- Understanding MediaLog
- Getting Started
- Logging Source Material
- Organizing Clips and Bins
- Creating MediaLog Output
- Avid Log Specifications
- Using Help
- Opening and Closing the Help System
- How Help Windows Work
- Finding Information with the Help Topics Dialog Box
- Using Buttons in a Help Topic
- Printing Help Topics
- Copying Information from a Help Topic
- Changing the Font Size of Help Topics
- Keeping Help on Top
- Changing the Color of Help Windows
- Adding a Note to a Help Topic
- Regulatory and Safety Notices
- Index

57
The Logging tool provides flexibility in the way you mark your clips
for l ogging, as the following illustration shows.
Marking and Logging
The basic logging procedure involves marking IN and OUT points.
You mark IN and OUT points either by using the Mark buttons or by
typing IN and O UT timecodes.
The icon in the Logging button changes according to the stage of log-
ging you are in. When the Logging button appears as a pencil,
MediaLog is ready to log the clip.
To log clips directly from a source tape to a bin:
1. Insert your tape in the deck.
Logging
button
Timecode entry
text boxes
Mark IN button
Mark OUT button
Duration Mark button
Mark MEMORY button
Clear MEMORY button
Go To MEMORY button
Go To IN button
Go To OUT button
Clear IN button
Clear OUT button
LoggingMessages
bar
Channel Selection
area
Clip name and
Comment heading
Source tape
display
Bin name