
2.0

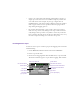


Table Of Contents
- Title Page
- Contents
- List of Tables
- Understanding MediaLog
- Getting Started
- Logging Source Material
- Organizing Clips and Bins
- Creating MediaLog Output
- Avid Log Specifications
- Using Help
- Opening and Closing the Help System
- How Help Windows Work
- Finding Information with the Help Topics Dialog Box
- Using Buttons in a Help Topic
- Printing Help Topics
- Copying Information from a Help Topic
- Changing the Font Size of Help Topics
- Keeping Help on Top
- Changing the Color of Help Windows
- Adding a Note to a Help Topic
- Regulatory and Safety Notices
- Index

59
5. Log the clip by clicking the Logging button.
The clip is logged to the bin.
The clip name, which the system chooses and numbers, i s high-
lighted in the bin and is ready to be changed. The default
clip name is the bin name plus a number.
6. Type a new name for the logged clip in the bin, and press Enter.
n
You should change the clip name immediately. Forgetting the contents of each
clip among the dozens you log is easy to do.
7. Repeat these steps until you have logged all your clips.
Logging While Marking an OUT Point or an IN Point
If you have already marked an IN point, the timecode for the IN point
is displayed and the icon in the Logging button changes to a mark
OUT and a pencil.
To mark an OUT point and log at the same t ime:
1. Move to where y ou want to mark an OUT point.
2. Click the Logging button.
The clip is logged to the bin.
If you have already marked an OUT point but have not marked an IN
point, the timecode for the OUT point is displayed and the icon in the
Logging button changes to a mark IN and a pencil.
Using the Go To Buttons
You can use the Go To buttons to the right of the timecode entry text
boxes t o cue the tape to that point.
Mark OUT
and pencil
Mark IN
and pencil