
6.1


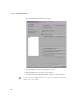
Table Of Contents
- Title Page
- Contents
- Tables
- Using This Guide
- Desktop Basics
- Starting a Project
- Working with the Project Window
- Changing, Closing, and Reopening the Project Window
- Using the Bins Display
- Viewing a List of Bins
- Displaying Bins
- Displaying Folders of Bins in the Bins List
- Creating a Folder in a Project
- Creating a New Bin
- Renaming a Bin
- Opening and Closing a Bin
- Deleting a Bin or Folder
- Viewing Contents in the Trash
- Emptying the Trash
- Managing Folders and Bins
- Managing Bins and Memory
- Saving Bins Automatically
- Saving Bins Manually
- Retrieving Bin Files from the Avid Attic Folder
- Conserving Screen Real Estate with the SuperBin
- Using the Settings Scroll List
- Viewing the Effect Palette
- Using the Format Display
- Using the Info Display
- Customizing Your Workspace
- Navigating in Dialog Boxes and Menus
- Sharing Bins and Projects on Avid Unity MediaNetwork
- Using Basic Tools
- Organizing with Bins
- Setting the Bin Display
- Basic Bin Procedures
- Using Bin Display Views
- Changing the Bin Display View Size
- Custom Bin Views
- The Bin Fast Menu
- Setting the Font and Point Size
- Selecting Clips and Sequences
- Duplicating Clips and Sequences
- Moving Clips and Sequences
- Copying Clips and Sequences
- Deleting Clips and Sequences
- Assigning Colors to Bin Objects
- Sifting Clips and Sequences
- Locking and Unlocking Items in the Bin
- Selecting Offline Items in a Bin
- Selecting Media Relatives for an Object
- Selecting Unreferenced Clips
- Using Brief View
- Using Text View
- Using Frame View
- Using Script View
- Printing Bins
- Gathering Format Elements
- Managing Media Files
- Working with Media Files in an Avid Unity Environment
- Using the Media Tool
- Consolidating and Transcoding Media
- Loading the Media Database
- Refreshing Media Databases
- Using Panasonic DVCPRO P2 Media
- Backing Up Media Files
- Finding a Related Media File
- Relinking Media Files
- Unlinking Media Files
- Using Videotapes for Archiving and Restoring Media Files
- Viewing and Marking Footage
- Customizing the Source/Record Monitor
- Expanding the Source/Record Monitor
- Changing the Pop-up Monitor Size
- Using the 16:9 Display Format
- Using 16:9 for 24p and 25p Editing
- Displaying Tracking Information
- Tracking Format Options
- Displaying Clip Information
- Copying Text from the Info Window
- Displaying the Timecode Window
- Displaying Multiple Timecodes
- Setting the Font and Point Size for Monitor Displays
- Pop-up Monitors
- Displaying a Second Row of Buttons
- Viewing Methods
- Playing Selected Clips in a Loop
- Loading and Clearing Footage
- Playing Back Footage
- Resizing Monitors
- Controlling Playback
- Playing Video to the Client Monitor
- Marking and Subcataloging Footage
- Marking IN and OUT Points
- Marking an Entire Clip or Segment
- Marking Audio Clips
- Using the Tool Palette
- Displaying the Timeline Top Toolbar
- Creating Subclips
- Subclips and Audio Sync for 24p and 25p Projects
- Using Locators
- Using the Locators Window
- Viewing and Navigating in the Locators Window
- Displaying the Timecode, Footage, or Frame Number in the Locators Window
- Displaying MetaSync Information
- Sorting Information in the Locators Window
- Enlarging and Reducing Columns in the Locators Window
- Displaying Frames in the Locators Window
- Exporting Locators from the Locators Window
- Importing Locators from the Locators Window
- Creating a Locator Text (.txt) file
- Copying and Pasting Locators Using the Locators Window
- Changing the Color of the Locator Icon from the Locators Window
- Accessing a Locator in a Clip or Sequence
- Printing the Contents of the Locators Window
- Deleting Locators Using the Locators Window
- Finding Frames and Clips
- Using Frame Offset Timecode to Cue a Frame
- Using Timecode to Find a Frame
- Searching for a Clip or Sequence
- Using Match Frame
- Performing a Reverse Match Frame
- Selecting Tracks for Matching Frames
- Using Match Frame to Locate the Source Clips of Motion Effects
- Finding a Bin
- Locating a Master Clip from a Subclip in a Sequence
- Customizing the Source/Record Monitor
- First Edits
- Using the Timeline
- Customizing Timeline Views
- Navigating in the Timeline
- Editing in the Timeline
- Segment Mode Editing
- Bin Editing into the Timeline
- Bin Editing Directly into a Sequence
- Using the Top and Tail Commands
- Setting the Duration for Filler at the Start of a Sequence
- Cutting, Copying, and Pasting in the Timeline
- Effects Editing
- Nesting
- Using the Track Selector Panel
- Selecting Tracks
- Monitoring Tracks
- Cycling Through a Selection of Tracks
- Performing an Alternate Edit
- Locking Tracks
- Patching Tracks
- Sync Locking Tracks
- Deleting Tracks
- Adding an Edit
- Removing Match Frame Edits
- Backtiming Edits
- Printing the Timeline
- Working in Trim Mode
- Customizing Trim Mode
- Using Basic Trim Procedures
- Creating Overlap Edits
- Extending an Edit
- Maintaining Sync While Trimming
- Working with Audio
- Audio Tools
- Accessing Audio Effect Tools
- Audio Editing Aids
- Using the Audio Mixer Tool to Adjust Volume and Pan in the Timeline
- Adjusting Clip Gain and Pan Values
- Understanding Automation Gain and Pan
- Using the Audio EQ Tool
- Digidesign AudioSuite Plug-Ins
- Recording Voice-Over Narration
- Creating the Voice-Over with the Capture Tool
- Using the Audio Punch-In Tool
- Using a GPI Device with the Audio Punch-In Tool
- Understanding GPI Trigger Signals
- GPI Signal Sequence When Using the Audio Punch-In Tool with Preroll and Postroll
- Voice-Over Media Files
- Monitoring the Recording
- Monitoring Previously Recorded Tracks While Recording a Voice-Over Narration
- Using Automatic Voice-Over
- Fine-Tuning Audio Transitions
- Mixing Down Audio Tracks
- Changing the Sample Rate
- Identifying the Sample Rate by Color
- Displaying Audio Formats in Bins
- Syncing Methods
- MultiCamera Editing
- Understanding Grouping and Multigrouping Clips
- MultiCamera Displays
- Full-Monitor Display
- Quad Split Source View
- Nine Split Source View
- MultiCamera Mode
- Limitations on Playback of MultiCamera Clips
- MultiCamera Editing Techniques
- Switching Clips with the Arrow Keys
- Using the Add Edit Button
- Using the Group Menu
- Using the Multi-angle View Menus
- Using Match Frame in MultiCamera Editing
- MultiCamera Workflow and Selective Camera Cutting
- Index

Using the Media Tool
191
Opening the Media Tool
To open the Media tool:
1. Select Tools > Media Tool.
The Media Tool Display dialog box opens.
2. Select the display options as follows:
- You can select individual media drives or all drives.
n
The Media tool loads the media database only for the drives you select. The
more drives you select, the more memory is required for the Media tool to
open.
- You can display files for the current project, for selected projects, or
for all projects.
n
Only projects with associated online media and the current project appear in
the Project(s) list in the Media Tool Display dialog box.