
2022.12


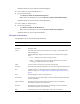
Table Of Contents
- Avid NEXIS® Client Manager Installation and User’s Guide Version 2022.12.0
- Contents
- Using This Guide
- Installing the Network Adapter and Driver
- Installing Avid NEXIS Client Software
- Configuring the Avid NEXIS Client Manager
- Using the Avid NEXIS Client Manager
- Connecting to an Avid NEXIS System
- About Bandwidth Reservations
- Mounting and Unmounting Workspaces
- Changing Your Password
- Opening the Management Console from the Client Manager
- Disconnecting from an Avid NEXIS System
- Troubleshooting Connection, Workflow, or Performance Problems
- Clearing Cached Data
- Managing Logs and Messages
- Closing and Exiting the Client Manager
- Performing Operations Without the Client Manager
- Avid PathDiag Tool
- Avid NEXIS Log Utility
- Index

32
If you manage your lettered or UNC Workspace mounts outside of the Client Manager application
(for example, Map Network Drives) you can create multiple mount points to the same Workspace.
Client Manager will display the multiple mounts properly.
To configure the drive letter for mounting Workspaces:
1. Open the Client Manager.
2. Select a Workspace from the Workspace list.
3. Right-click the selected Workspace, and select Assign Mount Point from the context menu.
The Assign Mount Point dialog box opens.
n
On Mac and Linux clients, UNC does not apply but you can select the default or manually entered
mount point.
4. Click Select drive letter, and select the drive letter you want to use for mounting Workspaces.
5. Click the green check mark to apply the settings or the red X to close the dialog box without any
changes.
Displaying Workspace Details
When you connect to an Avid NEXIS system, only the names of the accessible Workspaces are
displayed. You can show additional details for mounted and unmounted Workspaces, such as their
size, free space, and other attributes.
To retrieve details for one or more selected Workspaces:
1. Do one of the following:
t Select a single Workspace by clicking on a Workspace row.
t Select multiple non-contiguous Workspaces with Control+click.
t Select a range of contiguous Workspaces by clicking on the first Workspace row in the
range, then Shift+clicking on the last.
2. Right-click in the Workspace list, and select Retrieve Details, Selected Workspaces.
Option Description
Next available drive letter (letter:) Mounts the Workspace to the next available drive letter, working
backward from drive Z:
Select drive letter Mounts the Workspace to the selected available drive letter.
UNC (\\path) (Windows) Uses a Universal Naming Convention (UNC) path
for the mounted Workspace instead of a drive letter.