Avid® NEXIS™ File Gateway Setup and User’s Guide Version 7.
Legal Notices Product specifications are subject to change without notice and do not represent a commitment on the part of Avid Technology, Inc. This product is subject to the terms and conditions of a software license agreement provided with the software. The product may only be used in accordance with the license agreement. Part of the software embedded in this product is gSOAP software. Portions created by gSOAP are Copyright (C) 2001-2004 Robert A. van Engelen, Genivia inc. All Rights Reserved.
The following disclaimer is required by Paradigm Matrix: Portions of this software licensed from Paradigm Matrix. The following disclaimer is required by Ray Sauers Associates, Inc.: “Install-It” is licensed from Ray Sauers Associates, Inc. End-User is prohibited from taking any action to derive a source code equivalent of “Install-It,” including by reverse assembly or reverse compilation, Ray Sauers Associates, Inc.
Contents Using This Guide . . . . . . . . . . . . . . . . . . . . . . . . . . . . . . . . . . . . . . . . . . . . . . . . . . . . . . . . . . . . . . . . . 7 If You Need Help . . . . . . . . . . . . . . . . . . . . . . . . . . . . . . . . . . . . . . . . . . . . . . . . . . . . . . . . . . . . . . . . . . . . . . . . . . . 7 Accessing the Online Documentation . . . . . . . . . . . . . . . . . . . . . . . . . . . . . . . . . . . . . . . . . . . . . . . . . . . . . . . . . . . 7 Avid Training Services. . . .
Setting CIFS User Permissions . . . . . . . . . . . . . . . . . . . . . . . . . . . . . . . . . . . . . . . . . . . . . . . . . . . . . . . . . . . 32 Mapping Network Workspaces on CIFS Clients . . . . . . . . . . . . . . . . . . . . . . . . . . . . . . . . . . . . . . . . . . . . . . . . . . 33 Chapter 5 Configuring the Server for FTP Access . . . . . . . . . . . . . . . . . . . . . . . . . . . . . . . . . . . . . . . . . 35 About the FTP Server . . . . . . . . . . . . . . . . . . . . . . . . . . . . .
Taiwan EMC Regulations . . . . . . . . . . . . . . . . . . . . . . . . . . . . . . . . . . . . . . . . . . . . . . . . . . . . . . . . . . . . . . . . . . .
Using This Guide The Avid NEXIS File Gateway server enables network users to access the Avid NEXIS workspaces in a non-realtime scenario. The Avid NEXIS media network provides a high-performance distributed file system that contains high-capacity shared media storage for workgroups of connected workstations. n This document describes the features for all Avid NEXIS shared storage networks. Therefore, your system might not contain certain features that are covered in the documentation.
Avid Training Services 8
1 Avid File Gateway Server Overview The Avid NEXIS File Gateway server enables network users to access Avid ISIS and Avid NEXIS workspaces in a non-realtime scenario. Depending on the access permission, network users can read, write, and delete files on workspaces without using up Avid NEXIS client licenses. This chapter provides an overview of the Avid NEXIS File Gateway server. The File Gateway is a separate server that is attached to a switch connected to your Avid NEXIS system.
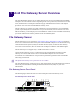
File Gateway Server The following table describes the control panel shown in the previous figure. File Gateway Server Panel Letter Component Description A Universal Serial Bus (USB) port USB 2.0 device port on the front of the system supports one USB device. Recommended for use when re-imaging the system drives or loading software. Two more USB ports are located on the back of the system.
File Gateway Server Client File Gateway Server Rear View Power supplies Intel Pro Ethernet ports Slots not used USB Video Serial File Gateway Server Client A File Gateway uses a 10 Gb Ethernet connection to a switch to communicate with the Avid NEXIS architecture. The File Gateway server displays, creates, and delete files within the Avid NEXIS shared storage network system through the Windows operating system as shares that are mapped to drive letters.
Network Configuration Customer-Supplied Components You must supply the following components in Avid shared storage environments and workgroups: • Avid qualified or approved Gig-E Ethernet switch with 10 Gb ports • Industry 19-inch standard rack • Uninterruptible Power Supply (UPS) • A keyboard, video, and mouse switch (KVM) Security Considerations Address all security concerns for the Avid hardware during site planning.
Network Configuration Extended Network Environments In an Avid NEXIS environment, if your network extends beyond switched or routed connections, you must configure a Layer 3 switch/router to communicate between the two subnetworks.
2 Connecting the File Gateway Equipment This chapter explains how to rackmount and connect the system hardware. Rack Mounting the File Gateway The File Gateway server is designed for 19-inch (483-mm) rack configurations and requires one EIA rack unit (1U), or 1.75 inches (44.45 mm) of rack space. The rail kit installs into rails that are between 23 inches (584.2 mm) to 31 inches (787.4 mm) inches deep. An optional rail kit is available for racks that are up to 37 inches deep.
Rack Mounting the File Gateway • For normal operation, maintain approximately 2 feet (0.6 meters) of open space in front of and behind the rack. This allows free access to the components in the rack for operating changes or adjustments. For service, maintain approximately 3 feet (1 meter) of open space in front of the rack and 2 feet (0.6 meters) of open space behind the rack. This allows for the removal of any component that needs to be replaced. • Allow at least 0.5 in (1.
Rack Mounting the File Gateway Separating the Slide Rails 3. Pull and separate the two halves. 4. Repeat these steps to separate the second slide rail. Attaching Inner Slide Rails to the File Gateway Server Attach the inner slide rails that were separated from the outer slide rails to the File Gateway server. To attach the inner slide rails: 1.
Rack Mounting the File Gateway Attaching the Outer Rails to a Square-Hole Rack If your mounting rails have round holes, see “Attaching the Outer Rails to a Round-Hole Rack” on page 18. To attach the outer slide rails to the rack with square holes: 1. Align the outer slide rail bracket assembly with the front rack-mounding holes. n Have someone help you hold the slide rails level while you are positioning them in the rack. 2.
Rack Mounting the File Gateway Securing the Outer Slide Rail to the Rear Rack-Mounting Rail 6. Repeat this procedure to attach the second outer slide rail on the other side of the rack. Attaching the Outer Rails to a Round-Hole Rack To attach the outer slide rails to the rack with round holes: 1.
Rack Mounting the File Gateway 3. Slide the outer slide rail bracket assembly onto the side rack-mounting rail so that the round hole adapter is over the rack rail. n Have someone help you hold the slide rails level while you are positioning them in the rack. Insert the Outer Slide Rail to the Front Rack-Mounting Rail 4. Insert the small (10-32) Phillips-head screws through the round-hole adapter and mounting rail, into the bracket. If the rack holes are different size, you must supply your own screws.
Keyboard, Monitor, and Mouse Connections To secure the server to the rack enclosure: 1. Lift and position the server so that the inner slide rails (secured to the File Gateway server) are aligned with the outer slide rails secured to the rack. 2. Push the front of the File Gateway server flush against the front mounting rail. The holes in the server front panel align with the holes in the front mounting rail. 3.
Network Connection File Gateway Server USB and Monitor Ports Power supplies Intel Pro Ethernet ports Slots not used USB Video Serial To connect a keyboard, monitor, and mouse to the File Gateway server: 1. Install your KVM switch in a suitable slot next to the File Gateway server in the rack. You can also place the monitor on a shelf, and the keyboard and mouse on a sliding tray in the rack. These items are optional and can be purchased locally or from Avid.
Network Connection The overall process for setting up the File Gateway server is as follows: 1. Configure the IP addresses for the File Gateway server. n The ghost image on the File Gateway servers does not set the IP addresses of the two onboard network ports; the system is set for DHCP. 2. Install the File Gateway software: t To install and configure the CIFS software, see “Configuring the Server for CIFS Access” on page 29. t To install and configure FTP, use the Windows Creation Wizard.
Network Connection 2. Click “Change adapter settings” on the left side of the window. The Control Panel/Network Connections window opens. 3. Right-click Local Area Connect 2 and select Rename. 4. Rename the connection to CIFS_FTP Traffic. 5. Right-click the CIFS_FTP Traffic connection and select Properties. a. In the Properties dialog box, double-click Internet Protocol version 4 (TCP/IPv4). b. Select “Use the following IP address:” and enter the following: — An IP address (172.20.115.
Network Connection 9. Right-click the Avid NEXIS Traffic connection and select Properties. a. In the Properties dialog box, double-click Internet Protocol version 4 (TCP/IPv4). b. Select “Use the following IP address:” and enter the following: — An IP address (172.20.115.13 used in the following example) — A subnet mask (255.255.255.255 used in the following example) — No default gateway c. Select “Use the following DNS server addresses:” and enter the following: — Preferred DNS server (172.20.110.
3 Installing the File Gateway Software This chapter describes how to install and manage the File Gateway server software, and how to create Windows users and groups on the server. The File Gateway software runs on a dedicated File Gateway server. n Make sure you are current with all Windows critical updates. Many Windows critical updates have already been applied in the image on the Avid NEXIS File Gateway server. Do not turn on automatic updates.
Creating Windows Users and User Groups on the File Gateway Server 7. Use the Client Manager to connect to the Avid NEXIS system. Make sure you can see and mount (then unmount) Workspaces to test the connection. (For more information, see the Avid NEXIS Client Installation and User’s Guide.) 8. If the File Gateway server is not in the same VLAN as the Avid NEXIS systems, add the Avid NEXIS IP address or hostname to the list of remote hosts in the Client Manager. 9.
Checking The File Gateway Service (Reference) To create a local group: 1. Right-click Computer and select Manage. The Server Management Window opens. 2. Expand the “Configuration” folder in the left pane. 3. Click “Local Users and Groups.” 4. Right-click Groups and enable New Group. 5. In Group name, type a name for the new group. 6. In Description, type a description of the new group. 7. To add one or more members to the new group, click Add. The Select Users dialog box opens. 8.
Intel Pro 1000 Network Adapter Settings (Reference) Intel Pro 1000 Network Adapter Settings (Reference) The Client Manager software installer configures the Intel Pro 1000 network adapter correctly for the Avid NEXIS environment; you do not need to make any adjustments.
4 Configuring the Server for CIFS Access This chapter describes how to configure the File Gateway server to use Common Internet File System (CIFS) and other Avid NEXIS shared storage hardware. The Avid NEXIS and CIFS clients share traffic on the same network port on the back of the server. Setting the Client Manager Preferences Set up the Client Manager for separate Avid NEXIS and CIFS_FTP Traffic in the Client Manager Preferences.
Adding Users and Setting Permissions 3. Uncheck the CIFS_FTP Traffic port. n Only the Ethernet ports designated for Avid NEXIS traffic must be checked. Uncheck the other network ports. 4. Click Apply. 5. Do both of the following: a. Close the Client Manager Window. This does not stop the Client Manager service. When the Client Manager is running, an icon appears in the Windows system tray. The Client Manager GUI cannot be running on the File Gateway server. You must quit the application. b.
Adding Users and Setting Permissions 3. In the Configuration Editor, move the Bandwidth slider to the bandwidth speed you want available to the users, or type the value in the text box next to the slider. You cannot set separate bandwidth speeds to individual users. 4. Type the user_name in the User Name text box and click Add User. The user name must match the Windows user names created on the File Gateway server.
Adding Users and Setting Permissions 5. With a User Name selected, type or select the name of the workspace you want to be displayed to the client in the Workspace Name text box. 6. In the CIFS Share Name field, enter a name for the shared workspace; it does not have to match the actual workspace name. For example, in the figure above, the CIFS share name WS2 maps to the actual path: \\SRL\workspace2. 7. Click Add CIFS. 8. Continue with “Setting CIFS User Permissions” on page 32.
Mapping Network Workspaces on CIFS Clients Mapping Network Workspaces on CIFS Clients CIFS clients can map multiple network workspaces to their system for a convenient shortcut, like any other network share. To map a workspace to a CIFS client (Windows): 1. Right-click the My Computer icon and select Map Network Drive. 2. In the Open text box, select a drive letter and type the path of the workspace on the corporate domain; for example \\FileGateway_server_name\share_name and click OK. 3.
Mapping Network Workspaces on CIFS Clients 34
5 Configuring the Server for FTP Access This chapter describes how to configure the File Gateway server to share Avid NEXIS workspaces using File Transfer Protocol (FTP). The FTP functionality is done through Microsoft’s Internet Information Services (IIS) and the FTP Service. Avid recommends the following FTP client applications: • Microsoft Expression Web 4 • FileZilla • Core FTP LE • SmartFTP Client For information on configuring Microsoft FTP Server Sites, see http://support.microsoft.
Creating FTP Sites (Virtual Directories) n You cannot use a blank password for the “ftpuser” account. 3. Create the same user name and password as the Avid NEXIS user (“ftpuser”) in the Windows User Accounts on the File Gateway server; see “Creating Windows Users and User Groups on the File Gateway Server” on page 26. This is necessary for the Virtual Workspace configuration later. 4.
Creating FTP Sites (Virtual Directories) 4. Select Internet Information Services (IIS) Manager. 5. Expand the host name. 6. Expand Sites. 7. Make sure the Avid NEXIS FTP Site is started. If not, right-click it and select Manage FTP Site > Start. c Do not modify any settings in the “Blade FTP Share” FTP Site, or its sub-folders. Any changes to the Blade FTP Share could potentially prevent upgrades and client installers from working properly. 8.
Configuring FTP Directory Browsing The Virtual Directory wizard completes and the newly created Virtual Directory is displayed in the Server Manager window under Services and Applications > Internet Information Services (IIS) Manager > FTP Sites > virtual_name > workspace_name. Configuring FTP Directory Browsing To display Avid NEXIS Workspaces as FTP Virtual Directories in a browser, you must configure FTP directory browsing. By default, this is disabled by the Windows Server operating system.
Disabling Anonymous FTP Authentication Disabling Anonymous FTP Authentication You must disable the default “Anonymous Authentication” to prevent automatic connections to the default Avid virtual hostname (“Blade FTP Share”). To disable anonymous FTP Authentication: 1. Open the FTP Authentication page. 2. Disable Anonymous Authentication. Creating a Virtual Host Name The ISIS FTP Share and the File Gateway server FTP Share both use Port 21.
Accessing a Workspace Using FTP 3. In the Connections pane, click the plus sign (+) to expand your File Gateway server name > Sites > and select ISIS FTP Share. 4. In the Actions pane, click Bindings. 5. In the Site Bindings window, select the FTP entry and click Edit. 6. Enter a virtual host name in Host name text box. n This hostname must not match the actual hostname of the System Director. It must be unique in order to share port 21 and not conflict with the Blade FTP Site.
Accessing a Workspace Using FTP Accessing a Workspace from an FTP Client Using a Command Line n The Windows 2008 Storage Server operating system used in the Avid NEXIS File Gateway server does not support the FTP Resume and FTP ReGet commands. To access a workspace from a Windows client: 1. Open a command prompt and type ftp FileGateway_hostname and press Enter. The Command Prompt window opens. 2.
Accessing a Workspace Using FTP For example: ftp://Nexis-FTP.com|user1:MyPaSsWoRd@Nexis-FTP.com Any functionality available in the browser is limited by the browser’s capability. For example, on Safari and Firefox, even if the FTP user has been granted write access, write options such as delete, rename, create file/folder, or move files do not work. This is a browser limitation.
A Dimensions and Weights The Avid NEXIS File Gateway server is rack-mountable in any standard 19-inch video racks using either NEMA or EIA mounting-hole layouts. Dimensions and Weight Specifications The following table provides the dimensions and weight of the File Gateway server and the optional rack components. Make sure the surfaces where you place the equipment can accommodate the equipment’s size and weight.
Uninterruptible Power Supply (UPS) Environmental Specifications Component 1U File Gateway server Operating Temperature Operating Humidity 32°F to 104°F (0°C to 40°C) 5% to 95% (at 38°C) non- –4°F to 140°F condensing (–20°C to 60°C) Storage Temperature Uninterruptible Power Supply (UPS) Avid highly recommends you create a separate derived power system for your Avid NEXIS File Gateway server.
B Recovering the Operating System This section describes the procedures to recover your Avid NEXIS File Gateway server by reinstalling Windows Storage Server 2008 and Avid-specific additions and changes. This procedure restores only the Windows operating system and the hardware drivers. After the operating system recovery is complete, reinstall the File Gateway software separately. The version number of the image is in the C:\IMAGE.TXT file on the root directory of the system drive.
Configuring the System Drive Using Windows 2008 Storage Server Setup The reimaging takes 20 to 30 minutes. 12. A gray screen prompts you to reboot. Type R. Configure the system drive as described in the following section. The Apply Computer Setup message is displayed for 3 to 5 minutes. Configuring the System Drive Using Windows 2008 Storage Server Setup After you recover the Windows Storage Server 2008 R2 operating system, several system parameters are set including a system Disk Check.
C Safety and Regulatory Information Warnings and Cautions c c c c c c c c This equipment is intended only for installation in a RESTRICTED ACCESS LOCATION. Never install equipment if it appears damaged. Disconnect the power cord before servicing unit. Only perform the services explicitly described in this document. For services or procedures not outlined in this document, speak with authorized Avid service personnel. Follow all warnings and cautions in the procedures.
Class A Equipment Class A Equipment This equipment has been tested and found to comply with the limits for a Class A digital device, pursuant to Part 15 of the FCC rules. These limits are designed to provide reasonable protection against harmful interference when the equipment is operated in a commercial environment.
LED Safety Notices Class B Equipment This Class B digital apparatus meets all requirements of the Canadian Interference-Causing Equipment Regulations. Cet appareil numérique de la classe B respecte toutes les exigences du Règlement sur le matériel brouilleur du Canada. LED Safety Notices Avid hardware might contain LED or Laser devices for communication use. These devices are compliant with the requirements for Class 1 LED and Laser Products and are safe in the intended use.
Disposal of Waste Equipment by Users in the European Union declaramos, bajo nuestra sola responsabilidad, que el producto, verklaren onder onze verantwoordelijkheid, dat het product, dichiariamo sotto nostra unica responsabilità, che il prodotto, Product Name(s): File Gateway Server and Software---UP TO ED HARPER Model Number(s): 7020-30088-23---MAY CHANGE...STAY TUNED Product Option(s): This declaration covers all options for the above product(s).
Argentina Conformity environment. For more information about where you can drop off your waste equipment for recycling, please contact your local city recycling office or the dealer from whom you purchased the product. Argentina Conformity Made in USA Australia and New Zealand EMC Regulations Ken Hopkins Avid Technology (Aust) Pty Ltd c/o – Elliot House Suite 810, Level 8 140 Arther St North Sydney NSW – 2060 Japan EMC Regulations Class A Equipment This is a Class A product.
Korean EMC Regulations Korean EMC Regulations Class A Equipment Please note that this equipment has obtained EMC registration for commercial use. In the event that it has been mistakenly sold or purchased, please exchange it for equipment certified for home use. Taiwan EMC Regulations Taiwan EMC Regulations BSMI Class A EMC Warning Warning Statement 1. UV ray radiation - Following statement or equivalent: - Following marking or other equivalent marking: 2.
Taiwan EMC Regulations 3.
Taiwan EMC Regulations Examples are sonic (acoustic), radio frequency, infra-red, ultraviolet and ionizing radiation, and high intensity visible and coherent light (lasers). Examples of measures to reduce risks include: - Limiting the energy level of potential radiation sources - Screening radiation sources - Provision of SAFETY INTERLOCKS - Provision of markings to warn USERS where exposure to the radiation hazard is unavoidable 6.
Taiwan EMC Regulations 10.
Taiwan EMC Regulations The following or similar wording is regarded as suitable: 56
Avid Technical Support (USA) Product Information 75 Network Drive Burlington, MA 01803-2756 USA Visit the Online Support Center at www.avid.com/support For company and product information, visit us on the web at www.avid.