
User's Manual


Media Station|PT Guide42
4 Do one of the following:
• If the Stereo button is visible, click the Ste-
reo button to reveal the Mono button, then
click the Mono button to reveal tracks A1
through A8 in stereo pairs with their se-
lected channels.
– or –
• If the Mono button is already visible, click
the Mono button to reveal tracks A1
through A8 in stereo pairs with their se-
lected channels.
5 Click the channel pop-up menus, and change
all stereo pairs so that tracks alternate top to bot-
tom between channel 1 (CH1) and channel 5
(CH5).
6 Click the Grp 1 button to display the second
group of tracks.
7 Just as you did in the Grp 1 channels, click the
channel pop-up menus in the second group,
and change all stereo pairs so that tracks alter-
nate top to bottom between channel 1 (CH1)
and channel 5 (CH5).
8 Click the Grp 2 button to display Grp 3 and re-
peat as above.
9 Close the Audio Project Settings dialog when
you are finished.
Saving D-Command or D-Control Audio
Project Settings
Once you have modified Audio Project Settings
for optimal usage with D-Command or D-Con-
trol, it is recommended you save these settings
so that they can be retrieved at any time. Other-
wise, you will have to configure these settings
each time you create a new project.
To save your D-Command or D-Control Audio
Project configuration settings:
1 In the Project window, click the Settings tab.
2 Create and open a new settings file by choos-
ing File > New Settings File. An “Untitled” set-
tings file window opens.
3 Drag the Audio Project setting from the
Project window to the untitled settings file win-
dow to copy it.
4 Choose File > Save Copy of File As.
5 In the Save As dialog, type a name for this set-
tings file.
6 Navigate to a location where other users can
easily locate this file. (The recommended loca-
tion is the default Avid Users folder.)
7 Click Save.
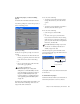
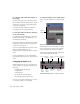
Media Station|PT Audio Project Settings dialog
Channel pop-up menus alternating top to bottom
between channels 1 (CH1) and 5 (CH5)
Channel
buttons