Basics Digi 002® & Digi 002 Rack™ Version 7.
Copyright © 2005 Digidesign, a division of Avid Technology, Inc. All rights reserved. This guide may not be duplicated in whole or in part without the express written consent of Digidesign. Avid, Digidesign, Digi 002, Digi 002 Rack, and Pro Tools are either trademarks or registered trademarks of Avid Technology, Inc. in the US and other countries. All other trademarks contained herein are the property of their respective owners.
Introduction Welcome to the Digi 002 and Digi 002 Rack Basics Guide. This guide is designed to give new users specific methods for accomplishing common tasks with the Digi 002 or Digi 002 Rack desktop audio interface and Pro Tools LE software. Once you are familiar with basic Digi 002 and Digi 002 Rack operation, we recommend that you read the “Working With Pro Tools” tutorial in the Digi 002 and Digi 002 Rack Getting Started Guide.
Getting Sound In & Out of Digi 002 or Digi 002 Rack To hear audio recorded into a Pro Tools session, you will need to connect headphones or an external sound system (such as powered monitors or a home stereo) to Digi 002 or Digi 002 Rack. Sound from Digi 002 and Digi 002 Rack cannot be played through your computer’s speakers or your computer’s sound output. Connecting Headphones There is one headphone jack, a stereo 1/4-inch plug, on the Digi 002 and Digi 002 Rack.
Connecting Audio Inputs Digi 002 and Digi 002 Rack inputs support microphones, guitars, keyboards, and other types of instruments. Line/Inst Inputs 1–4 LINE/ INST LINE/ INST LINE/ INST MIC MIC MIC LINE/ INST MIC 4 3 2 1 48V 48V Mic Inputs 1–4 Four Mic and Line/Inst Inputs (back panel) INPUT 7 INPUT 8 INPUT 5 +4 -10 +4 -10 INPUT 6 +4 -10 +4 -10 Analog Inputs 5–8 Four Analog Inputs (back panel) Digi 002 and Digi 002 Rack have eight analog inputs.
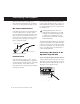
Connecting a Microphone There are several ways to use Digi 002 or Digi 002 Rack with a microphone, depending on the type of microphone and cables you use. Mic Cables and Connectors Some microphone cables use an XLR connector to attach a microphone to an input (such as those on the Digi 002 and Digi 002 Rack); other microphones use a 1/4-inch connector. If you have a choice, use an XLR connector to connect the microphone to the Digi 002 or Digi 002 Rack to yield better results.
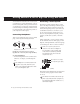
2 Press the Line/Inst and Mic Selector switch (located on the top panel of the Digi 002, and on the front panel of the Digi 002 Rack) for the corresponding input so that it is in the “Mic” (down) position. Line/Inst and Mic Selector switches (Mic position is down) To use a microphone that has a 1/4-inch connector: 1 On the back of the Digi 002 or Digi 002 Rack, plug the 1/4-inch connector from your microphone into one of the Line/Inst inputs.
Connecting Instruments Connecting Instruments to the Digi 002 or Digi 002 Rack Digi 002 and Digi 002 Rack support two types of inputs, which correspond to the signal strengths output by different types of instruments. Instruments such as electric guitar or electric bass usually have a lower level of output than instruments and electronic audio sources such as mixers, samplers, keyboards, turntables, and synthesizers.
To use a keyboard or mixer with Digi 002 or Digi 002 Rack: 1 Plug your keyboard, mixer, or other audio source into any of the Line/Inst inputs or analog Inputs on the back of your Digi 002 or Digi 002 Rack. For stereo inputs, (such as a stereo keyboard or the stereo output from a mixer), use an odd/even pair of inputs. For example, connect the left channel (often the white plug) to Line/Inst 1, and right channel (often the red plug) to Line/Inst 2.
Recording a Pro Tools Session Before you record with the Digi 002 or Digi 002 Rack, you first create a Pro Tools session, then prepare an audio track for recording. To prepare an audio track for recording: 1 Choose Track > New. 2 Specify 1 Mono Audio Track in Samples, if To create a Pro Tools session: 1 Verify the connections between the Digi 002 or Digi 002 Rack and your instrument or microphone. your source is mono, or 1 Stereo Audio Track in Samples, if your source is stereo. 2 Launch Pro Tools.
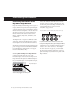
6 From the pop-up menu, select the interface in- put you want to record. For example, select Mic/Line 1 if your audio source is plugged into either the Mic Input 1 or Line/Inst Input 1 jack on the back of the Digi 002 or Digi 002 Rack. Select Mic/Line 1–2 on any stereo audio track when your audio source is stereo. To record an audio track: 1 Click the Track Record Enable button. Record enabling a track in the Mix window 2 Choose Window > Transport to display the Transport window.
Impor ting Audio from a CD To import audio from a compact disc: 1 Launch Pro Tools. 2 Choose File > New Session. 7 Open the Workspace browser by choosing Window > Workspace. The Workspace browser is a window where you can find, audition, and manage your audio files. 3 Set Session Parameters in the New Session dialog as needed, or leave at their default settings. (For details, see the Digi 002 and Digi 002 Rack Getting Started Guide.
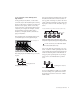
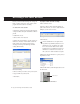
10 Drag the audio file from the Workspace browser to the Track List in the Edit window to import the file to a new audio track. Dragging an audio file from the Workspace browser to the Edit window Track List To play back the new track: 1 In the Transport window, click Return to Zero to go to the beginning of the track. 2 Click Play in the Transport window or press the Spacebar to start playback. 3 Click Stop in the Transport window or press the Spacebar to stop playback.
Creating an Audio CD from a Pro Tools Session Pro Tools does not create audio CDs directly, but you can create stereo audio files from your Pro Tools sessions that can be used by most CD burning software. 2 Choose File > Bounce to > Disk. Bouncing Audio to Disk Use the Pro Tools Bounce to Disk feature to combine all your audible tracks into a single “master” audio file. After the new audio file has been bounced to disk, you can burn it to a CD.
7 If you are changing the sample rate of the bounced file, choose a Conversion Quality setting. (For details, see the Digi 002 and Digi 002 Rack Getting Started Guide.) Pro Tools begins bouncing to disk. Pro Tools bounces are done in real time, so you hear audio playback of your mix during the bounce process (though you cannot adjust it). . 8 Choose “Convert after Bounce,” and click Bounce.
Digi 002 & Digi 002 Rack and MIDI 2 Connect another MIDI cable from the What is MIDI? MIDI (Musical Instrument Digital Interface) data is not audio, and has no sound. MIDI is a way for musical devices to communicate. MIDI is data that can trigger a MIDI device (such as a keyboard or software synthesizer.). MIDI In port of your device to the MIDI Out port on the back panel of the Digi 002 or Digi 002 Rack.
Recording MIDI on an Instrument Track Pro Tools Instrument tracks provide both MIDI and audio capabilities, so you can record MIDI and monitor audio from software and hardware instruments. 3 At the top of the Instrument track in the Mix window, click the track’s MIDI Input selector and assign the device and channel to be recorded, or leave it set to All.
• If you are using an external MIDI device, click the track’s MIDI Output selector (at the top of the Instrument track) and assign the device and channel to receive the MIDI output (the choices will vary depending on the device). 5 If you are using an external MIDI device and connected its audio output to the Digi 002 or Digi 002 Rack for monitoring in Pro Tools, click the Input selector of the Instrument track and choose the corresponding audio input.
8 Play some notes on your MIDI controller and look for the track’s MIDI Velocity meter to move. Remember, MIDI is not audio, and the MIDI Velocity meter is not registering sound output, but MIDI activity. 3 Click Record Enable in the Transport window. Return to Zero Rewind Online Fast Forward Play Go to End Stop Record Enable MIDI Velocity meter Transport window MIDI meter in Instrument track showing MIDI activity 9 Adjust the audio output level of the Instru- ment track with its Volume fader.
Controlling Delay (Latency) During Monitoring Pro Tools LE with Digi 002 or Digi 002 Rack uses your computer for all audio processing, playback, and recording. This causes a small amount of audio delay, or latency. Latency is most obvious when monitoring during recording. You may hear this as a slight delay between when you produce the sound and when you hear the sound through the speakers or headphones. Pro Tools LE for Digi 002 and Digi 002 Rack systems includes Low Latency Monitoring.