HDX Card Installation Guide
Legal Notices This guide is copyrighted ©2011 by Avid Technology, Inc., (hereafter “Avid”), with all rights reserved. Under copyright laws, this guide may not be duplicated in whole or in part without the written consent of Avid.
contents Chapter 1. Welcome to HDX . . . . . . . . . . . . . . . . . . . . . . . . . . . . . . . . . . . . . . . . . . . . . . . . . . . . . 1 HDX Package . . . . . . . . . . . . . . . . . . . . . . . . . . . . . . . . . . . . . . . . . . . . . . . . . . . . . . . . . . . . . . 1 HDX Hardware-Accelerated Pro Tools HD Systems . . . . . . . . . . . . . . . . . . . . . . . . . . . . . . 2 Registration . . . . . . . . . . . . . . . . . . . . . . . . . . . . . . . . . . . . . . . . . . . . . . . . . . . . . . .
Chapter 6. HDX について . . . . . . . . . . . . . . . . . . . . . . . . . . . . . . . . . . . . . . . . . . . . . . . . . . . . . . . . . 39 HDX パッケージ . . . . . . . . . . . . . . . . . . . . . . . . . . . . . . . . . . . . . . . . . . . . . . . . . . . . . . . . . . . . . 39 HDX ハードウェア・アクセラレーター付き Pro Tools HD システム . . . . . . . . . . . . . . . . . . . . . . . . . 40 システム要件と互換性 . . . . . . . . . . . . . . . . . . . . . . . . . . . . . . . . . . . . . . . . . . . . . . . . . . . . . . . . . .
chapter 1 Welcome to HDX Avid ® HDX PCIe cards provide dedicated digital signal processing (DSP) for high-definition digital audio recording, editing, signal processing, mixing, and I/O capabilities with Avid Pro Tools ® HD software and Avid HD audio interfaces and synchronization peripherals. HDX hardware with HD audio interfaces can also be used with Core Audio and ASIO-compatible digital audio software, and supports up to 64 channels of I/O with the first HDX card in your system.
HDX Hardware-Accelerated Pro Tools HD Systems HDX hardware-accelerated Pro Tools HD systems include the following: • Pro Tools HD software (sold separately) • One or more HDX PCIe cards • Power cable for powering the card (included) • HDX TDM cable (multi-card systems only) to connect HDX cards to each other (included) • DigiLink™ Mini cable for connecting HDX cards to audio interfaces (included) • At least one (up to sixteen) of the following Avid HD audio interfaces (sold separately): • HD OMNI • HD I/O •
System Requirements and Compatibility HDX PCIe cards can be installed in any qualified Mac or Windows computer. Avid can only assure compatibility and provide support for hardware and software it has tested and approved. For complete system requirements and a list of qualified computers, operating systems, hard drives, and third-party devices, visit: www.avid.com/compatibility You can test your HDX hardware using Avid DigiTest. For more information, see the Avid DigiTest Guide.
Conventions Used in This Guide All of our guides use the following conventions to indicate menu choices and key commands: Convention Action File > Save Choose Save from the File menu Control+N Hold down the Control key and press the N key Control-click Hold down the Control key and click the mouse button Right-click Click with the right mouse button The names of Commands, Options, and Settings that appear on-screen are in a different font.
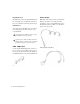
chapter 2 HDX Hardware Overview This chapter describes each component of an HDX hardware accelerated Pro Tools HD system. The number of HDX cards in your system will differ depending on your system configuration. HDX Hardware HDX PCIe Card A single HDX PCIe card provides up to 256 voiceable tracks of direct-to-disk recording and playback, as well as DSP power for mixing and plug-in processing. The HDX card supports up to 24-bit, 192 kHz Pro Tools sessions. DigiLink Mini ports DigiSerial port Figure 1.
DigiLink Mini Ports The HDX card provides two DigiLink Mini ports for connecting up to four HD audio interfaces for up to 64 channels of audio input and output. DigiSerial Port Power Cable HDX PCIe cards require power beyond what the PCIe bus can deliver. A custom power cable (included) is used to connect HDX PCIe cards to the motherboard in your Mac or to a hard drive power source in your PC. The Serial port on the HDX card is for connecting a SYNC peripheral. This connector is an 8-pin mini-DIN.
DigiLink Mini Cables Avid HD Audio Interfaces Use DigiLink Mini cables to connect HD I/O, HD OMNI, and HD MADI audio interfaces to HDX cards. There are five different lengths of DigiLink Mini cables: • 18 ” (0.
Monitoring HD OMNI provides up to four channels of simultaneous analog input from any of several possible analog input connection. • Soft Clip and Curv limiting circuits to protect against clipping on analog input • Front panel Control Room (MAIN/ALT) and Headphone monitoring volume control • 8 channels of analog back panel output using a DB-25 breakout cable (sold separately) with variable output gain • Flexible monitoring with fold-down from all stereo and surround formats (up to 7.
HD I/O Audio Interface Digital I/O HD I/O features exceptionally high quality 24-bit analog-to-digital (A/D) and digital-to-analog (D/A) converters, and supports sample rates of up to 192 kHz. • Up to sixteen channels of 24-bit digital I/O, using AES/EBU, TDIF DB-25, or Optical at sample rates of 44.1 kHz, 48 kHz, 88.2 kHz, 96 kHz, 176.
HD MADI Digital Audio Interface • Front panel clock and SRC indicators HD MADI provides up to 64 channels of digital audio. HD MADI supports the Multichannel Audio Digital Interface (MADI) format and sample rates of up to 192 kHz. HD MADI provides simplified connectivity between your digital audio workstation and MADI-compatible audio equipment, such as routers, digital mixing consoles, and converters. • Front panel signal present LEDs for input and output ` For more information, see the HD MADI Guide.
chapter 3 Installing HDX Cards Install HDX PCIe cards in your computer before installing Pro Tools. For systems with more than one card, connect the cards using the included HDX TDM cables. Once the cards are installed, connect HD audio interfaces. To install cards into an expansion chassis, see the HDX Expanded Systems Guide . Install Pro Tools software only after you have installed your HDX cards and HD audio interfaces.
To install Pro Tools cards in a Mac Pro: 6 Turn off your computer and any peripherals. Leave your computer’s power cable plugged in so the computer is grounded. 7 1 Disconnect all cables attached to the computer (such as hard drives, displays, USB and FireWire devices) except for the power cable. 2 Remove the metal access port covers for the slots you want to use. Remove your computer’s SATA drive trays. If any extra SATA drives are installed, remove them also.
9 Install the first HDX card into the lowest-numbered available PCIe slot in the computer. (See Figure 4 on page 14). Do the following: • Hold the card above the PCIe slot at a slight angle so that the back of the card is higher than the front of the card (where the DigiLink Mini connectors are located on the card). • With the card at an angle, rest the card’s front bracket against the edge of the chassis, where the computer’s slot access port is located.
4 3 2 1 Figure 4.
4 2 1 2 3 4 1 Figure 5.
4 2 1 Figure 6. Connecting the power cable to an installed HDX card 10 If you are installing additional HDX cards (or other cards), install any additional HDX PCIe cards in the remaining consecutive PCIe slots. Otherwise, skip to step 12.
Installing HDX Cards in a Windows Computer This section shows how to install HDX cards in a PC. For the latest slot order and configurations for Windows computers, visit www.avid.com. It is recommended that you have it available for reference before opening the computer and installing Pro Tools hardware. Disabling Driver Signing Warnings Before you install any HDX cards, temporarily disable the Driver Signing warning option for Windows. This expedites and automates much of the installation process.
Figure 7.
Figure 8.
Figure 9. Connecting the HDX card power cable (PC) 9 Connect the power cable to the installed HDX PCIe cards. (See Figure 9 above.) 11 Secure each card in place with the slot access port screws you removed earlier. 10 Check to be sure that all cards are installed in the proper order for your system (this may vary depending on your machine): 12 • Display card for your computer monitor • HDX cards • Host Bus Adapter (HBA) card (optional) 20 HDX Card Installation Guide Close the computer case.
Connecting Multiple HDX PCIe Cards Using HDX TDM Cables In systems that have more than one card, you must connect all the HDX PCIe cards to each other with HDX TDM cables (custom SATA cables). Each HDX card has two ports along the top of the card, labeled IN and OUT. Data communication across multiple cards is achieved by connecting the OUT port of the first card to the IN port of the next card with an HDX TDM cable.
Connecting Audio Interfaces Pro Tools HD supports only one HD OMNI per system. If you are connecting HD OMNI to your system, it is generally recommended that you connect it directly to the first port on the first HDX card in your system. Each Avid HD audio interface provides several different input and output options. For example, HD OMNI supplies up to 8 channels of input and output to your Pro Tools system, HD I/O supplies up to 16 channels of input and output, and HD MADI provides up to 64 channels.
Connecting Loop Sync If you are using two or more HD audio interfaces or a SYNC peripheral, Loop Sync must be connected to maintain proper clock among the devices. To make Loop Sync connections: Connect the Loop Sync Out of each interface to the Loop Sync In of the next interface with the BNC cables included in your I/O packaging. 1 2 Connect the Loop Sync Out of the last inter- face to the Loop Sync In of the primary interface or SYNC peripheral.
12-foot DigiLink Mini cable First HDX card 18-inch DigiLink Mini cable Loop Sync cables Second HDX card Figure 12.
Maximum I/O Configurations Pro Tools HD with HDX cards supports up to a maximum combination of 16 total of the following audio interfaces: • HD OMNI (only one HD OMNI is supported in a single system) • HD I/O (up to 16 HD I/O can be used simultaneously—requires 4 HDX cards) • HD MADI (up to 4 HD MADI can be used simultaneously—requires 4 HDX cards) For examples of connecting multiple I/Os, see Figure 11 on page 23 and Figure 12 on page 24.
26 HDX Card Installation Guide
chapter 4 Configuring Core Audio (Mac OS X Only) Avid Core Audio Driver Capabilities The Avid Core Audio Driver is a multi-client, multichannel sound driver that lets Core Audio–compatible applications record and play back through Pro Tools hardware. Full-duplex recording and playback of 24-bit audio is supported at sample rates up to 96 kHz, depending on your Pro Tools hardware and CoreAudio client application.
Installing the Avid Core Audio Driver The Avid Core Audio Driver is installed by default when you install Pro Tools. The Avid Core Audio Driver can also be installed as a standalone driver on Mac systems that do not have Pro Tools software installed. The installer for the standalone Avid Core Audio Driver is available on the Driver Installers disc that came with your Pro Tools Software package, or from our website (www.avid.com).
Avid Core Audio Manager cannot be accessed under the following circumstances: • When Pro Tools is running Buffer Size You can select from the following buffer sizes (depending on your Avid hardware): • When another application is using Direct IO • 64 samples • 128 samples To ensure proper playback with the Avid Core Audio Driver, launch the Avid Core Audio Manager first, making sure that its status is “Connected.
HW Setup Button Prefs Button The HW Setup button opens the Hardware Setup dialog for your Avid hardware. The HW Setup button is only available when no clients are using the Avid Core Audio Driver. The Prefs button opens the Avid Core Audio Manager Preferences dialog. There are several options available configuring the Manager application. When finished setting these options, click OK to close the Avid Core Audio Manager Preferences window.
Mirror Analog Outs 1 & 2 to Digital Outs (002/003) This option is grayed out for systems using an HDX card. When using 003, 003 Rack, 003 Rack+, Digi 002, or Digi 002 Rack, enable this option to mirror the main outputs through the digital outputs that are selected in the Hardware Setup dialog.
Configuring the Apple Sound Preferences or Apple Audio MIDI Setup (Required for Using Avid Audio Interfaces with Apple iTunes or QuickTime Player) Apple Sound Preferences To configure the Apple Sound Preferences: Launch System Preferences (Apple menu > System Preferences).
Apple Audio MIDI Setup To configure the Apple Audio MIDI Setup: Launch Audio MIDI Setup (located in Home/Applications/Utilities). 1 2 In the Audio Devices window, click the Input tab. Apple Audio MIDI Setup application, Audio Devices Output settings 5 From the Audio Devices list on the left, select HDX. In the Audio Input or Audio Output page, select the Format (sample rate). Note that the input sample rate and output rate are linked.
34 HDX Card Installation Guide
chapter 5 Configuring ASIO (Windows Only) ASIO Driver Capabilities Installing the ASIO Driver The ASIO Driver is a single-client, multichannel sound driver that allows third-party audio programs that support the ASIO Driver standard to record and play back through qualified Avid audio interfaces. The ASIO Driver is installed by default when you install Pro Tools. The ASIO Driver can also be installed as a standalone driver on Windows systems that do not have Pro Tools software installed.
Avid ASIO Control Panel Configuring the Avid ASIO Driver settings can be done using the Avid ASIO Control Panel, which can accessed from compatible third-party ASIO-compatible client applications. Example: Accessing the Avid ASIO Control Panel from Ableton Live To access the Avid ASIO Control Panel from Ableton Live, do the following: 1 Open the Live Preferences. 2 Select the Audio tab.
Buffer Size Advanced Button You may select from the following buffer sizes (depending on your Pro Tools hardware): The Advanced button opens the Hardware Setup dialog for the Avid hardware that you are using. • 64 samples • 128 samples • 256 samples • 512 samples • 1024 samples • 2048 samples Small buffers have the advantage of low latency in the record monitor path. (Latency is the time delay between a signal entering the audio inputs and leaving the outputs during recording.
38 HDX Card Installation Guide
第6章 HDX について Avid® HDX PCIe カードは、高精度デジタル・オーディ オのレコーディング、編集、信号処理、ミキシング、入出 力に対して、専用のデジタル信号処理(DSP)を提供し、 Avid Pro Tools® HD ソフトウェアおよび Avid HD オー ディオ・インターフェース、同期周辺機器に使用できます。 HDX パッケージ HDX パッケージには、以下のものが含まれています: • HDX PCIe カード • HDX TDM ケーブル また、HDX ハードウェアは、HD オーディオ・インター フェースを使用して、Core Audio、ASIO 互換のデジタル・ オーディオ・ソフトウェアにも使用でき、一枚の HDX • HDX PCIe 電源ケーブル(Mac 用) • HDX PCIe 電源ケーブル(PC 用) かし、HDX DSP および複数のカードを使用する構成で • HDX カードをオーディオ・インターフェースに接 続するための 12’ DigiLink™ Mini ケーブル の I/O の拡張は、Pro Tools HD ソフトウェアでのみ可能 • オン
HDX ハードウェア・アクセラレーター付 き Pro Tools HD システム HDX ハードウェア・アクセラレーター付き Pro Tools HD システムには以下が含まれます: • Pro Tools HD ソフトウェア(別売) システム要件と互換性 HDX PCIe カードは、認定された Mac および Windows コンピューターにインストールできます。 Avid は、動作が確認されたハードウェアとソフトウェア に対してのみ互換性の保証とサポートの提供を行ってい ます。 • 1 つ以上の HDX PCIe カード • カード用電源ケーブル(同梱) • HDX カードとカードを相互に接続するための HDX (同梱) TDM ケーブル(マルチカード・システムのみ) • HDX カードをオーディオ・インターフェースに接続す る DigiLink™ Mini ケーブル(同梱) • 以下に挙げる、最少 1 つ(最大 16)の Avid HD オー ディオ・インターフェース(別売)が必要です: • HD OMNI • HD I/O • HD MADI www.avid.
重要なインストールの注意事項 HDX は高性能 PCIe カードです。HDX カードをインス トー ルす るシ ステ ムが、HDX カ ードに 対し て、最 低 275lfm(linear feet per minute)の直接送風量がある ことを確認してください。この要件に満たない場合、ご 使用のシステムおよび HDX カードに致命的な障害を起 す場合があります。十分な送風量が無いことによる障害 は Avid ハードウェアの限定保証の保証対象外です。 適 正 な シ ス テ ム に つ い て は、Avid の ウ ェ ブ サ イ ト 本ガイドで使用される表記規則 本書では、メニュー・アイテムの選び方やマウスの操作 方法を簡略化するために、以下のような方法で表記して います。 表記法 [ファイル] (File)> アクション ファイルメニューから保存を選択する [保存] (Save) Control+N Control キーを押しながら N キーを押す Control- クリック Control キーを押しながらクリックする 右クリック 右側のマウスボタンをクリックする (www.
www.avid.com について Avid のウェブサイト(www.avid.
第7章 HDX ハードウェアの概要 この章では HDX ハードウェアでアクセラレートした Pro Tools HD システムの各コンポーネントについて説明します(拡 。使用する HDX カードの数は、システムの構成により異なります。 張シャーシで最大 7 つのカードが使用できます) HDX ハードウェア HDX PCIe カード HDX PCIe カードは、最大 256 トラックのダイレクト・ディスク・レコーディングとプレイバックを可能にし、さらにミ キシングとプラグイン・プロセッシングに DSP パワーを提供します。HDX カードは、最大 24-bit/192 kHz の Pro Tools セッションに対応しています。 DigiLink Mini ポート DigiSerial ポート 図1 HDX PCIe カード 第 7 章:HDX ハードウェアの概要 43
DigiLink Mini ポート 電源コード HDX カードには 2 つの DigiLink Mini ポートがあり、最 大 4 つの HD オーディオ・インターフェースに接続しま す。これらは、最大 64 のオーディオ・インプット、オー HDX PCIe カードは PCle バスが供給する以上の電力を必 ディオ・アウトプットに接続します。 要とします。カスタム電源ケーブル(同梱)を使用して、 ご使用の Mac のマザーボードまたは、ご使用の PC の ハード・ドライブ電源に HDX PCle カードを接続してくだ さい。 DigiSerial ポート HDX カードのシリアル・ポートは SYNC 同期機器の接続 に使用します。このコネクターは 8 ピンのミニ DIN です。 HDX カードのシリアル・ポートは、 MachineControl の接続には対応していません。 2 つ以上の HDX カードで SYNC 同期機器を使用 する場合、SYNC 同期機器は第一の HDX カード に接続することが必要です。 HDX TDM ケーブル HDX カード電源ケーブル(Mac) 同梱の HDX
DigiLink Mini ケーブル Avid HD オーディオ・インターフェース HDX カードと HD I/O、HD OMNI、HD MADI オーディ Pro Tools(ま た は 認 定 さ れ た サ ー ド パ ー テ ィ の Core Audio 互換または ASIO 互換アプリケーション) でレコード、再生するには、Avid HD オーディオ・イン ターフェースがご使用のシステムの第一 HDX カードの第 オ・インターフェースの接続には DigiLink Mini ケーブル を使用してください。DigiLink Mini ケーブルには 5 種類 の長さがあります: (HD I/O、HD OMNI、HD MADI に • 18”(0.46m) 一ポートに接続されている必要があります。 含まれています) (各 HDX カードに 1 つ含まれています) • 12’(3.6m) • 25’(7.62m)(別売) • 50’(15.25m)、176.
• アナログ入力のクリッピングを防ぐ「ソフトクリップ」 および「カーブ」リミッティング回路 • バックパネルに DB-25 ブレイクアウト・ケーブル(別売) 使用を使用した可変アウトプット・ゲイン付き 8 チャ ンネルのアナログ・アウトプット • TRS を使用した、2 チャンネルのアナログ・バックパ ネル・アウトプット(DB-25 コネクターのチャンネル 1-2 または 7-8 を反映) • フロントパネル・ステレオ 1/4” ヘッドフォン・ジャック デジタル I/O • DB-25 ブレイクアウト・ケーブル(別売)を使用した、 8 チャンネルの AES/EBU アウトプット(最大 192kHz のシングルワイヤ) モニタリング • Pro Tools に、追加ステレオ「キュー」アウトプット・ パス、フロントパネルのヘッドフォン・ジャックから のヘッドフォン・モニタリング用 • フロントパネルのコントロール・ルーム(MAIN/ALT) とヘッドフォンのモニタリング・ボリューム・コント ロール • ステレオ・フォーマットとサラウンド・フォーマット (最大 7.
HD I/O の機能 HD I/O は、Pro Tools のインプットとアウトプットの最 大 16 のディスクリート・チャンネルを提供し、インプッ トとアウトプット用の 4 セグメント LED メーターを搭載 同期(Synchronization) • 追加 HD インターフェースや周辺機器を接続するため の Loop Sync インプットとアウトプット • HD I/O を外部ワードクロック機器と同期するための しています。 外部クロック・インプットとアウトプット アナログ I/O 拡張性 • 優れたアナログのインプットとアウトプットを提供す る 24-bit の D/A コンバーターと A/D コンバーターを搭 載し、Analog In HD I/O カードと Analog Out HD I/O カー ドを使 って サンプ ルレ ート 44.1kHz、48kHz、 88.2kHz、96kHz、176.
HD MADI の機能 • 最大 64 のディスクリート・チャンネルのデジタル入出力 (DigiLink Mini ポートごとに 32 チャンネル)に対応 する、 MADI オプティカル・インプットと同軸イン プット x 2 および MADI オプティカル・アウトプット と同軸アウトプット x 2 • サンプルレート 44.1kHz、48kHz、88.2kHz、96kHz、 176.
第8章 HDX カードをインストールする HDX PCIe カードのインストールは、Pro Tools をイン SATA ドライブ・トレイとドライブ ストールする前に行ってください。複数のカードを使用し たシステムの場合、付属の HDX TDM ケーブルを使用し てカード同士を接続します。カードがインストールできた ら、HD オーディオ・インターフェースを接続します。 PCIe スロット 4 (隠れている) PCIe スロット 3 拡張シャーシへカードをインストールする方法 については、 『拡張システム・ガイド』をご参照く ださい。 PCIe スロット 2 PCIe スロット 1 (ビデオ・カード) Pro Tools software は、HDX カードおよび HD オーディオ・インターフェースのインストール後 に行ってください。Pro Tools ソフトウェアのイ ンストールについて詳しくは、Pro Tools ソフト ウェア・パッケージに同梱されている『Pro Tools インストール・ガイド』をご参照ください。 図2 Mac Pro に HDX カードをインストール する Mac P
Mac Pro に Pro Tools カードをインストールするには: 1 コンピューターおよび周辺機器の電源を切ります。コン ピューターが接地(アース)されるよう、電源ケーブルは 接続したままにします。 2 コンピューターに取り付けられている、電源ケーブル以 外 の ケ ー ブ ル(ハ ー ド デ ィ ス ク、モ ニ タ ー、USB、 FireWire など)をすべて外します。 3 アクセス・パネルが上を向くようにコンピューターを横 にします。 4 コンピューターの背面にある掛け金を使ってコン ピューターのケースを開けます。 5 金属のアクセス・ポート・カバーをシャーシへ固定して いる金具を取り外します。 6 使用するスロットの金属のアクセス・ポート・カバーを 取り外します。 7 コンピューターの SATA ドライブ・トレイを取り外し ます。追加の SATA ドライブがインストールされている 場合は、これらも取り外します。SATA ドライブと SATA ドライブ・トレイの取り外し方については、コンピュー ターの説明書をご覧ください。 カードを持つ前に、電源ケーブルで接続されてい る コン ピ ュー タ
9 HDX カードを、コンピューターの最も小さい番号の PCle スロットへインストールします(52 ページの図 4 を ご参照ください)。 以下のように行います: • PCle スロットの上でカードの後がカードの前 (DigiLink Mini コネクタのある方)より高くなるよ う斜めに持ちます。 • カードを斜めにしたまま、カードの前のブラケット をアクセス・ポートがあるシャーシの端に置きます。 • カードの後を、PCIe スロットの番号が表記されてい る灰色のプラスチックの PCle カード・サポートに、 慎重に差し込みます(53 ページの図 5 を参照してく ださい)。 Mac Pro 「Westmere」搭載マシンでは、十分 に注意して、HDX PCle カードを傷つけないよう に、灰色のプラスチック PCle カード・スロット を押し下げてください。 • カードの PCIe コネクタが下を向いた状態でカード を真っ直ぐ差し込み、カードの PCIe コネクタを PCIe スロットへしっかりと固定します。カードの前 の部品が PCIe カード・サポート(灰色のプラスチッ ク)に接触していな
4 3 2 1 図4 52 Mac Pro のスロット 2 に HDX カードをインストールするには HDX カード・インストール・ガイド
4 2 1 2 3 4 1 図5 HDX カードを灰色のプラスチック PCle カード・サポートに差し込む 第 8 章:HDX カードをインストールする 53
4 2 1 図 6 電源ケーブルをインストールされた HDX カードへ接続する 10 追加 HDX カード(または他のカード)をインストー ルする場合には、追加の HDX PCle カードを連続した残 りの PCle スロットにインストールしてください。そうで 16 コンピューターの本体を閉じます。 ない場合は、ステップ 12 に進んでください。 カードの PCIe コネクタは、カードと金属のアク 11 2 つ以上の HDX PCle カードをインストールする場合 セス・ポート・カバーをシャーシへ固定する金具 を取り付けるまでは完全には固定されません。 には、カードを付属の HDX TDM ケーブルで接続してく ださい。 (58 ページの「複数の HDX PCle カードを HDX TDM ケーブルで接続する」をご覧ください)。 12 電源ケーブルをインストールした HDX PCle カード 。 に接続します (上記図 6 参照) 13 最も小さい番号のスロットから正しい順序でカードが インストールされているかどうか確認します: • コンピューター・モニターのディスプレイ・カード •
Windows コンピューターに HDX カー PC に HDX カードをインストールする ドをインストールする Pro Tools カードをインストールするには: このセクションでは、HDX カードを PC へインストール 1 コンピューターおよび周辺機器の電源を切ります。コン ピューターが接地(アース)されるよう、電源ケーブルは 接続したままにします。 する方法を説明します。 Windows コンピューターの最新のスロット順と 構成については、www.avid.
56 図7 HDX カードの電源ケーブルをハード・ドライブの電源に接続する(PC) 図8 PC に HDX カードをインストールする HDX カード・インストール・ガイド
図9 HDX カード電源ケーブルを接続する(PC) 9 電源ケーブルをインストールした HDX PCle カードに 接続します (図 9 参照)。 10 以下のとおり、正しい順序でカードがインストールさ れていることを確認してください(この順序はマシンによ り異なることもあります) : • コンピューター・モニターのディスプレイ・カード 11 先程取り外したアクセス・ポートのネジで各カードを 固定します。 12 コンピューターの本体を閉じます。 13 オーディオ・インターフェースを接続するには(59 ペー ジの「オーディオ・インターフェイスの接続」を参照して ください) 。 • HDX カード • ホスト・バス・アダプタ(HBA)カード(オプション) 第 8 章:HDX カードをインストールする 57
複数の HDX PCle カードを HDX ケーブルで接続する TDM 複数のカードを使用するシステムの場合は、すべての HDX PCle カー ドを HDX TDM ケーブ ル(カ スタ ム SATA ケーブル)で互いに接続しなければなりません。各 HDX カードの上部には、IN と OUT と表記された 2 つの ポートがあります。カード間のデータ通信は、最初のカー ドの OUT ポートと次のカードの IN ポートを HDX TDM ケーブルで接続することによって可能になります。 HDX PCIe カードを HDX TDM ケーブルで接続する: 1 OUT と表記されている、HDX TDM ケーブルの端を最 初の HDX カードの OUT ポートに接続します。 2 IN と表記されている、HDX TDM ケーブルの端を二番 目の HDX カードの IN ポートに接続します。 3 複数のカードを使用するシステムの場合は、それぞれの カードを前のカードへ接続します。上記のとおり、追加の HDX TDM ケーブルを使用して、追加カードをその前の カードに接続します(HDX TDM ケーブルは各 HD
HD オーディオ・インターフェースを接続するには: オーディオ・インターフェイスの接続 各 Avid HD オーディオ・インターフェースは、さまざま なインプットとアウトプットのオプションを提供します。 たとえば、HD OMNI は Pro Tools システムに最大 8 チャ ンネルの入出力を、HD I/O は最大 16 チャンネルの入出 力を、HD MADI は最大 64 チャンネルを提供します。オー 1 接続しているオーディオ・インターフェースの構成に応 じて、以下のいずれかを行います: • 1 つの HD OMNI または HD I/O を使用している 場合、プライマリ・ポートを HDX カードの DigiLink Mini ポート 1 に、付属の DigiLink Mini ケー ブルで接続します。 ディオ・インターフェースは、直接 HDX カードへ接続す るか、別の HD オーディオ・インターフェースの拡張ポー トへ接続します。 最低 1 つの HD オーディオ・インターフェースが、 Pro Tools HD は、シス テ ムご とに 1 つ の HD OMNI にのみ対応しています。
Loop Sync を接続する 2 台以上の HD オーディオ・インターフェースまたは SYNC 同期機器を使用する場合は、機器を正しく同期させるため Loop Sync を接続する必要があります。 ループ・シンクを接続するには: 1 各インターフェースの[Loop Sync Out]を I/O パッケージに含まれている BNC ケーブルで次のインターフェースの [Loop Sync In]に接続します。 2 最後のインターフェースの[Loop Sync Out]を 1 台目のインタ−フェースまたは SYNC の[Loop Sync In]へ接 続します。 12 フィート DigiLink Mini Loop Sync ケーブル ケーブル 18 インチ DigiLink Mini ケーブル HDX カード 1 枚 図 11 60 HD OMNI と HD I/O の DigiLink 接続とループ・シンク接続 HDX カード・インストール・ガイド
12 フィート DigiLink Mini 第一 HDX カード ケーブル 18 インチ DigiLink Mini ケーブル Loop Sync ケーブル 第二 HDX カード 図 12 HD OMNI と 5 つの HD I/O の DigiLink 接続とループ・シンク接続 第 8 章:HDX カードをインストールする 61
最大 I/O 構成 HDX カードを使用した Pro Tools HD では、以下のオー ディオ・インターフェースの最大 16 までの組み合わせに 対応しています: • HD OMNI(1 つのシステムにつき、1 つの HD OMNI のみ対応) • HD I/O(最大 16 の HD I/O を同時使用可 — 4 枚 の HDX カードが必要) • HD MADI(最大 4 つの HD MADI を同時使用可 — 4 枚の HDX カードが必要) 複数の I/O を接続する例については、60 ページの図 11 と 61 ページの図 12 をご参照ください。 HD オーディオ・インターフェースは、本体の両 側に通気(冷却)用の空間を必要とします。本体 の両側を塞いだり、内蔵のファンを取り外したり しないでください。本体をケースにラックマウント している場合は、システムを起動する前にケースの 蓋や扉を取り外してください。本体が急激に加熱 され、繊細な部品を損傷する原因となります。 Pro Tools HD ソ フ ト ウ ェ ア お よ び HDX ハードウェア・ドライバーのインス トール Avid H
第9章 Core Audio の構成(Mac OS X Avid Core Audio Driver の機能 のみ) CoreAudio Driver の制限 Avid CoreAudio Driver には、以下のような制限があり Avid Core Audio Driver は、マルチクライアント、マル チチャンネル・サウンド・ドライバーです。このドライ バーをインストールすると、Core Audio 互換アプリケー ションで Pro Tools ハードウェアを使用して録音と再生 を実行できます。 使用する Pro Tools ハードウェアと CoreAudio クライア ント・アプリケーションによって、最大 24-bit/96kHz の サンプルレートで、フル・デュプレックスのレコーディン グと再生が可能です。 Avid Core Audio Driver は、最初の HDX カード使用し て、64 チャンネルの I/O を提供します。 ます: Mac Finder でサウンド・ファイルを試聴するのに、 CoreAudio Driver を使用することはできません。サウン ド・ファイルが
Avid Core Audio Driver の イ ン ス トール Pro Tools をイ ンス トー ルす ると、Avid Core Audio Driver が自動的にインストールされます。Avid Core Audio Driver は、Pro Tools ソフトウェアがインストー ルされていない Mac システムにスタンドアロン ドライ バーとしてインストールできます。スタンドアロン Avid Core Audio Driver のインストーラーは、ドライバー・ インストーラー・ディスクに収められており、Pro Tools ソフトウェア・パッケージに付属しています。また、Avid ウェブサイトからもダウンロードできます (www.avid.
以下のような状態では、Avid Core Audio Manager に • 1024 サンプル アクセスすることはできません: • 2048 サンプル • Pro Tools を実行している • 別のアプリケーションが Direct IO を使用している Avid Core Audio Driver のバッファーサイズを変更して も、Pro Tools 側のプレイバック・エンジン・ダイアログ Avid Core Audio Driver で正常に再生するには、 Avid Core Audio Manager を最初に起動し、そ の H/W バッファーサイズの設定値には影響ありません。 のステータスが「接続中」かどうかを確認してく ださい。 Avid Core Audio ハードウェア・バッファーサイズの設定: アプリケーションによる Avid Core Audio Driver への アクセスを防止 アプリケーションを起動する際にアプリケーションが Avid Core Audio Driver にアクセスする前に、Shift キー 1 Avid Core Audio Manage
4 使用している Avid オーディオ・ハードウェアに応じて、 クライアントによる自動起動時に Manager を非表示にする ハードウェア設定ダイアログを設定します。2 つ以上の このオプションを選択すると、最初のクライアント・アプ リケーションが Avid Core Audio Driver にアクセスした HDX カードを接続しているシステムの場合は、最初の HDX カードに接続しているオーディオ・インターフェー 時点で、Manager のパネルが非表示に切り換わります。 スだけを選択し、設定してください。 Manager のパネルを開くには、ドック上の Avid Core Audio Manager のアイコンをクリックします。 最後のクライアント終了時に Manager を自動終了 こ の オ プ ションを選択すると、クライアント・アプリケーションが Avid Core Audio Driver を使用しなくなった時点で、 Manager アプリケーションが自動的に終了します。 ハードウェア設定ダイアログ、(HD I/O の場合) C|24 ステレオ・ルーティングを使用(L/
接続ボタン Avid Core Audio Manager が 起 動 し て い な が ら、 Pro Tools ハードウェアに接続できない場合(Pro Tools サードパーティ製アプリケーション用に HD オーディオ・インターフェイスを設定 する 起動時にハードウェアの接続が解除または無効にされて いる場合など) 、 [接続]ボタンが表示されます。接続する 前に、必ず Pro Tools を終了し、ハードウェアを接続し (Apple GarageBand など)で使用するときは、そのア て電源を入れてください。次に、 [接続]ボタンをクリッ クしてハードウェアを取得します。 プリケーションで利用できるオーディオ環境設定から ハードウェアの設定を行うことができます。 接続ボタンを押す前にアプリケーションが起動し てい て、そ のア プリ ケ ーシ ョン で Avid Core Audio Driver を使用して再生を行う場合、アプリ ケーションを CoreAudio Manager に正しく接 続するにはアプリケーションを終了してから再起 動する必要があります。 終了ボタン [終了]
Apple サウンド環境設定または Apple オーディオ MIDI 設定の構成 4[インプット]をクリックし、サウンド・インプットのデ バイスとして[HDX]を選択します。 (Apple iTunes または QuickTime Player で Avid Audio インターフェースを使用するときに必要) 特定の Core Audio 対応再生アプリケーション(iTunes や QuickTime Player など)で Avid オーディオ・イン タ ー フ ェ ー ス を 使 用 す る に は、Avid Core Audio Manager に加え、サウンド環境設定または Apple オー ディオ MIDI 設定で設定を行う必要があります。ただし、 Core Audio に対応しているクライアント・アプリケー ションの多く(BIAS Peak や Ableton Live など)では、 アプリケーション側から Core Audio のバッファーサイ ズ、および入出力チャンネルを設定できるため、これは不 要です。 Apple サウンド環境設定 Apple サウンド環境設定の設定 1 環境
Apple オーディオ MIDI 設定 Apple オーディオ MIDI 設定を設定するには: 1 オーディオ MIDI 設定を起動します(ホーム / アプリケー 。 ション / ユーティリティ) 2 オーディオ・デバイス・ウィンドウで、[ インプット ] タブをクリックします。 Apple オーディオ MIDI 設定アプリケーション、オーディオ・ デバイス・アウトプット設定 5 左の[オーディオ・デバイス]リストで、[HDX]を選 択します。 Apple オーディオ MIDI 設定アプリケーション、オーディオ・ デバイス・インプット設定 3 左の[オーディオ・デバイス]リストで、[HDX]を選 6 オーディオ・インプットまたはオーディオ・アウトプット・ ページで、フォーマット(サンプルレート)を選択します。 インプットとアウトプットのサンプルレートはリンクし ています。 7[Audio MIDI 設定]>[Audio MIDI 設定の終了]を選 択します。 択します。 4 オーディオ・デバイス・ウィンドウで、[アウトプット] タブをクリックします。 第 9 章:Core Audio の構
70 HDX カード・インストール・ガイド
第 10 章 ASIO の設定(Windows のみ) ASIO ドライバーの性能 ASIO ドライバーのインストール ASIO ドライバーはシングル・クライアントのマルチチャ ASIO ドライバーは Pro Tools と共にインストールされ ンネル・サウンド・ドライバーです。認定された Avid オー ます。ASIO ドライバーは、Pro Tools ソフトウェアがイ ディオ・インターフェースを使って、ASIO ドライバー規 ンストールされていない Window システムに、スタンドア 格対応のサードパーティ製オーディオ・プログラムが、オー ディオの録音と再生を行います。 使用する Avid ハードウェアと ASIO-client プログラム (Cubase、Live、Reason など)によって、最大 16 お よび 24-bit/96kHz サンプルレートで、フル・デュプレッ クスの再生が可能です。 ASIO Driver では、最初の HDX カードで、最大 64 チャ ンネルのインプットとアウトプットが使用できます。 ロン・ドライバーとしてもインストールできます。ASIO ド
4[ASIO Avid Driver]を Audio Devices ポップアップ・ Avid ASIO コントロール・パネル メニューから選択します。 Avid ASIO ドライバーの設定は ASIO コントロール・ 5[Hardware Setup]ボタンをクリックし、Avid ASIO パネルで行えます。コントロール・パネルは、いくつかの サードパーティー製 ASIO 互換クライアント・アプリケー コントロール・パネルをオープンします。 ションからもアクセスできます。 Avid ASIO Driver コントロール・パネルに アクセスする サードパーティ製アプリケーションを開かずに Avid ASIO コン トロール・パネルにアクセスするには: 設定の例、Ableton Live 8 詳細は、ASIO クライアント・プログラムに付属してい るマニュアルをご参照ください。 以下の状況では、Avid ASIO コントロール・パネルにア クセスできません: • Pro Tools の実行中。 • Avid ASIO ドライバーをサポートしないオーディオ・ ASIO ドライバ
バッファーサイズ 以下のバッファーサイズから選択できます(使用している Pro Tools ハードウェアによる): 詳細ボタン [詳細]ボタンは使用している Avid ハードウェアの[ハー ドウェア設定]ダイアログを開きます。 • 64 サンプル • 128 サンプル • 256 サンプル • 512 サンプル • 1024 サンプル • 2048 サンプル バッファーサイズを小さく設定すると、レコード・モニ ター時のレイテンシーを軽減できるという長所があり ます(レイテンシーとは、オーディオ・インプットに入る 信号からレコーディング中にアウトプットを出るまでの 時間の遅れを指します )。 これに対して、バッファーサイズを大きくすると、再生 時とレコーディング時の両方で、ASIO ドライバーで、 オーディオ信号のドロップ・アウトが少なくなるという長 所があります [ハードウェア設定]ダイアログ、(HD I/O の場合) ハードウェア設定ダイアログについて詳しくは 『Pro Tools リファレンス・ガイド』をご覧くだ さい。 いくつか ASIO 対応オーディオ・プログラムでは、操作
74 HDX カード・インストール・ガイド
appendix a Compliance Information Environmental Compliance Disposal of Waste Equipment by Users in the European Union Proposition 65 Warning This product contains chemicals, including lead, known to the State of California to cause cancer and birth defects or other reproductive harm. Wash hands after handling. Perchlorate Notice This symbol on the product or its packaging indicates that this product must not be disposed of with other waste.
EMC (Electromagnetic Compliance) Avid declares that this product complies with the following standards regulating emissions and immunity: • FCC Part 15 Class B • EN55022 Class B • EN55024 Class B • AS/NZS CISPR 22 Class B • CISPR 22 Class B FCC Compliance for United States Australia and New Zealand EMC Regulations Canadian Compliance This Class B digital apparatus complies with Canadian ICES-003. Cet appareil numérique de la classe B est conforme à la norme NMB-003 du Canada.
Safety Compliance Safety Statement This equipment has been tested to comply with USA and Canadian safety certification in accordance with the specifications of UL Standard UL60950-1, 2nd Edition/IEC60950-1, 2nd Edition and Canadian CAN/CSA C22.2 No. 60950-1-07; 2007 2nd Ed. Avid Technology, Inc. has been authorized to apply the appropriate NRTL marks on its compliant equipment. For use only with UL Listed ITE Equipment. Warning 9) Do not defeat the safety purpose of the polarized or grounding-type plug.
安全性コンプライアンス 安全性ステートメント 本製品は、試験の結果、UL 規格の仕様である UL60950-1, 2nd Edition / IEC 60950-1 2nd Edition およびカナダの CAN/CSA C22.2 No.60950-1-07, 2007, 2nd Edition に従って米国およびカナダの安全認 証に適合しています。Avid Technology Inc.
Avid Technical Support (USA) Product Information 2001 Junipero Serra Boulevard Daly City, CA 94014-3886 USA Visit the Online Support Center at www.avid.com/support For company and product information, visit us on the web at www.avid.