
Specifications


Chapter 12: Basic Audio Recording 173
Pro Tools LE Systems
The Digi 002, Digi 002 Rack, and Digi 001 in-
clude S/PDIF and ADAT digital options.
The Mbox includes only the S/PDIF digital op-
tion.
All digital outputs are active at all times, so you
can actually send digital audio to different digi-
tal devices simultaneously at mix time.
Recording from Digital Sources
To record from a digital source with Pro Tools (in
this example, from a DAT recorder):
1 Connect the digital output of the DAT re-
corder to the appropriate digital input of your
audio hardware.
2 If you want to start a new session with a dif-
ferent sample rate, choose File > New Session,
and select the sample rate. Click Save.
3 Make sure to specify the format (digital) of the
inputs of the audio interface you will be using.
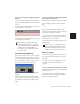
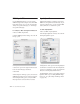
Choose Setups > Hardware Setup, choose the au-
dio interface, and select the format for the ap-
propriate channel pair. Some Digidesign I/O
units, such as Digi 001, only have two channels
(Ch 1–2) that can be set for analog or digital.
Also, if your audio hardware supports different
digital formats (such as AES/EBU and S/PDIF),
select the digital format you will use.
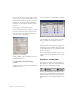
4 For HD systems, choose Setups > Hardware
Setup and select the appropriate Clock Source
connected to the appropriate I/O audio inter-
face; or use the Session Setup window to select
the appropriate Clock Source.
5 Click OK to close the Hardware Setup dialog.
6 Choose File > New Track and specify 1 Stereo
Audio Track, then click Create.
7 Assign the Input Selectors for the track to the
appropriate inputs. Since this is a digital-do-
main transfer, you don’t need to worry about in-
put levels.
8 In the Mix window, click the track’s Output
Selector and assign a stereo hardware output.
– or –
In the Edit window, with I/O view enabled, use
the track’s Output Selector to assign a hardware
output.
9 In the Operations menu, deselect Destructive
Record, Loop Record, QuickPunch and Track-
Punch.
10 In the Transport window, click Return to
Zero so the start and end times are cleared. This
ensures that you’ll start recording from the be-
ginning of the track.
11 In the Mix or Edit window, record enable the
new audio track by clicking its Record Enable
button.
12 Click Record in the Transport window. When
you are ready to begin recording, click Play.
13 Start playback on the DAT deck.
14 When the material from the DAT has fin-
ished, click Stop in the Transport window.
After a Digital Transfer
After you have finished recording digitally, set
the Clock Source pop-up menu in the Session
Setup window back to Internal. Otherwise,
Pro Tools will not switch back to its own inter-
nal clock and will not record or play audio prop-
erly. Failure to switch back to Internal sync typ-
ically results in pitch problems (fast or slow
For more information on configuring your
particular Pro Tools system for recording
from a digital source, see your Getting
Started Guide.