
Specifications


Pro Tools Reference Guide186
2 Put Pro Tools in normal Nondestructive
Record mode. In the Operations menu, deselect
Destructive Record, Loop Record, and Quick-
Punch.
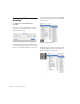
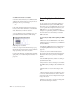
3 Select Operations > Loop Playback. When
Loop Playback is enabled, a loop symbol appears
in the Play button.
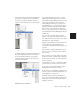
4 Record enable the MIDI track by clicking its
Record Enable button. Make sure no audio
tracks are record enabled.
5 In the Transport window, click the MIDI
Merge button so it becomes highlighted.
6 Disable Wait for Note and Countoff in the
Transport window.
7 Select Operations > Link Edit and Timeline Se-
lection.
8 With the Selector, drag in the track’s playlist
until the selection encompasses the loop range.
For other methods of setting the record range,
see “Setting Punch/Loop Points” on page 168.
9 To hear track material up to the start point of
the loop, enable and set the pre-roll time. For
details, see “Setting Pre- and Post-Roll” on
page 170.
10 Click Record in the Transport window. When
you are ready to begin recording, click Play.
The Record button flashes during the pre-roll.
When the start point is reached, Pro Tools be-
gins recording. When the end point is reached,
Pro Tools loops back to the start point and con-
tinues playing and recording.
11 Play some notes on your MIDI controller.
Newly recorded MIDI data appears as a region in
the record track. On each successive take, re-
corded material shows up in the region, without
replacing material from previous takes.
12 If you want to switch to a new record track,
press Control (Windows) or Command (Macin-
tosh), and press the Up/Down Arrow keys to
record enable the previous or next MIDI track.
13 When you have finished recording, click
Stop in the Transport window.
The newly recorded MIDI data appears as a MIDI
region in the track’s playlist, and in the MIDI
Regions List.
Loop Playback enabled