
Specifications


Pro Tools Reference Guide198
To record online using TrackPunch and TrackInput
switching:
1 Choose Setup > Peripherals, and make sure the
SYNC I/O is the selected synchronization pe-
ripheral, and is communicating with Pro Tools.
2 Choose Windows > Session Setup, and do the
following:
• Select a Clock and Positional reference.
• If you want Pro Tools to be the time code
master, enable Using SYNC/USD. This op-
tion is located in the Generator controls in
the Time Code Settings section of the Ses-
sion Setup window.
3 If you are controlling Pro Tools via 9-pin pro-
tocol, do the following:
• Click the Machine Control tab to display
the Machine Control page of the Peripher-
als dialog.
• Configure Remote 9-pin Deck Emulation
mode settings (see the MachineControl
Guide for details).
• Click OK to close the Peripherals dialog.
4 Configure your master synchronizer as re-
quired to control Pro Tools track Record and In-
put switching through P2 commands. See the
documentation for your controller for more in-
formation.
Enabling TrackPunch Mode
Before you can enable individual audio tracks
for TrackPunch recording, TrackPunch mode
must be enabled in the Pro Tools transport.
To enable TrackPunch mode:
1 Make sure Pro Tools is not recording or play-
ing back (the Transport is stopped).
2 Do one of the following:
• Select Operations > TrackPunch.
• Start-click (Windows) or Control-click
(Macintosh) the Transport Record button
to cycle through available Record modes
until TrackPunch mode is selected (a “T”
indicates TrackPunch mode).
• Press Control+Shift+T (Windows) or Com-
mand+Shift+T (Macintosh).
Consult the manufacturer of your controller
for the most recent machine profiles and up-
dates available for Pro Tools support.
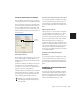
Transport Record with TrackPunch mode enabled