
Specifications


Chapter 23: MIDI Editing 357
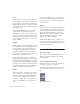
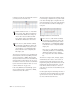
3 Click the note icon for the Custom Note Du-
ration pop-up menu, and select a note duration.
The note icon changes to show the selected note
value.
Setting the Grid Value
When inserting MIDI notes, the Grid Value de-
termines the duration of each note, or other
characteristics, based on the Pencil tool shape
(see “The Pencil Tool” on page 355).
To set the Grid value for MIDI editing:
1 Set the Main Time Scale to Bars:Beats (see “Set-
ting the Main Time Scale” on page 234).
2 From the Grid Value selector, select a note
value (such as 1/4, 1/8, or 1/16).
3 Verify the default session meter and tempo
(see “Setting the Default Meter” on page 153
and “Setting the Default Tempo” on page 153).
Inserting MIDI Notes
In addition to recording and importing MIDI
into Pro Tools, you can manually insert MIDI
notes using the Pencil tool.
To insert a MIDI note:
1 Set the MIDI track to Notes view.
2 Select the Pencil tool and make sure it is set to
Freehand. The cursor will change to the Pencil
when located over the playlist area of a MIDI
track in Note view.
3 To insert quarter notes on the beat, set the
Time Scale to Bars:Beats, and set the Edit mode
to Grid and the Grid value to quarter notes
(0|1|000).
4 Move the Pencil into the playlist area for the
MIDI track. Use the Edit window’s Ruler and the
track’s mini-keyboard to locate the pitch and
time location you want.
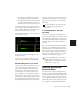
When using the Pencil, the Current Cursor dis-
play in the Options Bar provides information
about its time location.
Custom Note Duration pop-up menu
For more information on Grid mode, see
“Grid” on page 225.
Pencil tool set to Freehand
Current Cursor display