
Specifications


Chapter 28: Automation 457
the EQ type in the 1-band EQ plug-in) that pro-
vide more than two discrete steps over their op-
erational range. AutoMatch has no effect on
these controls.
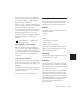
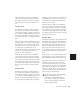
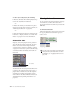
AutoMatch Indicators
There are triangular AutoMatch indicators at the
bottom left of each channel strip in the Mix
window. When lit, these indicate the direction
you need to move a fader in order to match the
original automation level of that fader.
Setting the Automation Buffer
Size
Pro Tools lets you specify the size of the mem-
ory buffer used to write automation. If you are
working on a large session or writing a very large
number of automation moves, you may want to
increase this value.
To set the Automation Buffer size:
1 Choose Setups > Preferences and click Auto-
mation.
2 For the option “Amount of memory to reserve
for automation recording,” enter a value be-
tween 200 and 20,000K (Pro Tools 6.4) or be-
tween 200 and 3000K (Pro Tools 6.3 and below).
The default value for a new session is 200K.
3 Relaunch Pro Tools for this change to take ef-
fect.
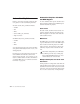
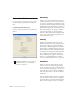
About Processing Bandwidth
Meters in the System Usage window indicate
how much of your system’s processing power is
being used in processing audio, and when writ-
ing and playing back automation. In
Pro Tools LE, these meters show System Activity
and CPU Processing Activity; on Pro Tools TDM
systems, they show System Activity, PCI Bus Ac-
tivity, CPU Processing Activity, Disk Activity
(Pro Tools 6.x only), and TDM Time Slot usage.
As these meters approach their limits, recording
or playback of automation data may be affected.
If CPU or PCI Activity are high, a System error
may occur. If System Activity is high, Pro Tools
may miss playback of some of your automation
data during particularly dense periods of activ-
ity, such as while using the Bounce to Disk com-
mand.
Triangular AutoMatch indicators on a channel strip
AutoMatch indicator
Meters in the System Usage window (TDM shown)
For more information, see “Bounce to Disk”
on page 482.
Processing
meters