
User Manual


Table Of Contents
- Contents
- Part I: Introduction to Pro Tools
- Part II: System Configuration
- Chapter 5: Pro Tools Systems
- Pro Tools Software
- Pro Tools | Ultimate Software with Pro Tools | HDX Hardware
- Pro Tools | Ultimate Software with Pro Tools | HD Native Hardware
- Supported Pro Tools HD Audio Interfaces
- Playback, Recording, and Voice Limits with Pro Tools | Ultimate Software
- Pro Tools HD Audio Interface Features
- Additional Pro Tools Hardware Options
- Additional Pro Tools HD Hardware Options
- Pro Tools Software Options
- Avid Application Manager
- Chapter 6: I/O Setup
- Pro Tools Software Signal Paths
- I/O Setup Pages
- I/O Setup Signal Path Controls
- I/O Setup Buttons
- I/O Setup Options
- Customizing I/O Settings
- Configuring Hardware in I/O Setup
- Signal Path Routing for Audio Input
- Signal Path Routing for Audio Output
- Creating New Paths
- Creating New Sub-Paths
- Editing Paths
- Assigning Paths to Hardware I/O
- Valid Paths and Requirements
- Configuring Busses
- Downmix and Upmix Output Busses to Outputs
- I/O Settings Files
- Session or Project Interchange and I/O Mapping
- I/O Settings and the Playback Engine
- Organize Track I/O Menus By Preference
- I/O Setup in Session Notes
- Pro Tools Session Templates and I/O Settings
- Chapter 7: System Setup
- Starting Up or Shutting Down Your System
- Checking a Pro Tools | HDX or Pro Tools | HD Native System with DigiTest
- Configuring Pro Tools Software System Settings
- Configuring MIDI Setup
- Configuring Hardware Settings in Pro Tools
- Configuring Pro Tools | HDX and Pro Tools | HD Native Hardware Settings
- System Usage
- Chapter 8: Preferences
- Chapter 9: Peripherals
- Chapter 10: Configuring MIDI
- Chapter 5: Pro Tools Systems
- Part III: Sessions, Projects & Tracks
- Chapter 11: Sessions and Projects
- Sessions and Projects
- Signing In and Out of Your Avid Master Account
- Dashboard Window
- Bit Depths and Sample Rates
- Mixed Audio File Formats
- Interleaved Multichannel and Multi-Mono Audio Files
- Session Files and Folders
- Pro Tools Projects
- Creating a New Session or Project from a Template
- Creating a New Blank Session or Project
- Opening a Recent Session or Project
- Opening Any Session
- Opening a Session
- Opening a Session or Project with Plug-Ins Deactivated
- Saving Sessions and Projects
- Save Copy In
- Save As New Version
- Revision History
- Saving a Session as a Project
- Saving a Project as a Session
- Session Templates
- Project and Session Metadata
- Project Notes
- Closing a Session or Project
- Renaming Projects
- Remove Local Cache
- Deleting Projects
- Restore Project from Cloud
- Open Revision History
- Backup to Cloud
- Project Collaboration Invitations in the Dashboard
- Quitting or Exiting Pro Tools
- Chapter 12: Pro Tools Main Windows
- Chapter 13: Tracks
- Track Types
- Track Channel Strips in the Mix Window
- Track Controls and Indicators in the Edit Window
- Edit Window Views
- Track Level Meters
- Adjusting Track Width
- Creating Tracks
- Track Views
- Setting Track Views in the Edit Window
- Track Height
- Tracks List
- Track Name Right-Click Menu
- Assigning Audio Inputs and Outputs to Tracks
- Track Priority and Voice Assignment
- Assigning MIDI Inputs and Outputs to Tracks
- Soloing and Muting Tracks
- Making Tracks Inactive
- Color Coding for Tracks, Clips, Markers, and Groups
- Chapter 14: Track Presets
- Chapter 15: Grouping Tracks
- Chapter 16: The Clips List
- Chapter 17: Workspace Browsers
- Performance and Transfer Volumes
- Databases
- Workspace Browser Layout and Tools
- Working with Items in Workspace Browsers
- Indexing Workspace Databases
- Workspace Browser Menu
- Workspace Right-Click Menu
- Workspace Browser Panes and Display
- Column Data
- Selecting Items
- Moving, Copying, Duplicating, and Removing Items
- Set Column Metadata Values for Multiple Selected Files in Workspace Browsers
- Searching Items
- Soundbase and Tags
- Searching Based on Tags
- Adding and Editing Tags
- Waveforms
- Elastic Audio Files in the Workspace
- Previewing Audio in Workspace Browsers
- Preview Controls and Indicators
- Preview Modes
- Linking and Relinking Files
- Transfer Files
- Missing Files
- Relink Window
- Catalogs
- Task Manager Window
- Chapter 18: Artist Chat Window
- Profile Setup
- Contacts
- Notifications
- History
- Projects
- Chat
- Filtering Chat and Project Messages
- Editing Chat or Project Messages
- Emoticon and Notations Panel
- Pinning or Unpinning Items in the Projects and Chat Lists
- Leaving a Project or Group Chat
- Move to or Restore from Artist Chat History
- Remaining Signed In to your Avid Account Offline
- Availability for Participation
- Chapter 19: Track Collaboration
- Sharing Projects and Collaborating
- What is Shared?
- What is Not Shared?
- Project Ownership
- Start Collaboration
- Track Collaboration Tools in the Edit Window
- Track Collaboration Tools in the Transport Window
- Global Track Collaboration Tools
- Track Collaboration Track View in the Edit and Mix Windows
- Track Collaboration Controls
- Track Ownership
- Conflicts Between Track Changes and the Cloud
- Track Cloud Synchronization Indicator in the Tracks List
- Conductor Ruler Collaboration Controls
- Chapter 20: Importing and Exporting Session Data
- Importing and Exporting Data to and from a Session or Project
- Audio Conversion on Import
- Importing Files with Drag and Drop
- Importing Audio Files and Clips Using the Import Audio Command
- Importing Audio from Audio CDs
- Importing ACID and REX Files
- Importing Multichannel Audio Files from a Field Recorder
- Import Options and Preferences
- Exporting Audio
- Importing MIDI Files
- Exporting MIDI Files
- Exporting Sibelius Files
- Importing Session Data
- Import Session Data Dialog
- Importing AAF and OMF Sequences
- Import Options when Importing AAF or OMF Sequences
- Import Sequence from Media Production
- Media Composer | Software Export Options for Audio and Video Mixdowns
- Audio File Format Compatibility Issues
- Exporting Pro Tools Tracks as AAF or OMF Sequences
- Exporting Pro Tools Tracks as MXF Audio Files
- Export Options when Exporting to AAF or OMF Sequences
- Export Selected Tracks to Sequence in Production Management
- Export Selected Tracks as New Session or Project
- Exporting Session Information as Text
- Export Session Information as Text Options
- Importing and Exporting Clip Group Files
- Chapter 21: File and Session Management and Compatibility
- Audio File Management
- WAV File Compatibility
- Sharing Projects Offline
- Sharing Sessions Created on Different Computer Platforms
- Sharing Sessions Created on Different Pro Tools Systems
- Opening Pro Tools Ultimate Sessions in Pro Tools
- Sharing Sessions Created on Different Pro Tools Software Versions
- Language Compatibility
- Chapter 11: Sessions and Projects
- Part IV: Playback and Recording
- Chapter 22: Playing Back Track Material
- Chapter 23: Record Setup
- Record Setup Overview
- Configuring Pro Tools Hardware I/O for Recording
- Connecting a Sound Source
- Recording with a Click
- Setting the Session Meter and Tempo
- Record Modes
- Configuring Default Names for Audio Files and Clips
- Assigning Hardware I/O on a Track
- Record Enabling Tracks
- Working with Hard Drives for Recording
- Selecting a Record Input Monitoring Mode
- Setting Monitor Levels for Record and Playback
- Reducing Monitoring Latency
- Chapter 24: Audio Recording
- Chapter 25: MIDI Recording
- Recording from MIDI Devices
- Enabling Input Devices
- MIDI Thru
- MIDI Input Filter
- Input Quantize
- Wait for Note
- MIDI Merge/Replace
- Configuring MIDI or Instrument Tracks for Recording
- Recording MIDI and Instrument Tracks
- MIDI Input Display
- MIDI Punch Recording Over a Specified Range
- Loop Recording MIDI
- MIDI Step Input
- Recording System Exclusive Data
- Recording Audio from a MIDI Instrument
- Retrospective Record for MIDI
- Chapter 26: Punch Recording Modes
- Part V: Editing
- Chapter 27: Editing Basics
- Chapter 28: Edit Modes and Tools
- Edit Modes
- Shuffle Mode
- Slip Mode
- Spot Mode
- Grid Mode
- Edit Tools
- Zooming Options
- Zoom Buttons
- Zoomer Tool
- Zoom Preset Buttons
- Zoom Toggle
- Zooming with a Scroll Wheel
- Using the Trim Tools
- Trim Tool
- Time Compression/ Expansion Trim Tool
- Scrub Trim Tool
- Loop Trim Tool
- Tandem Trimming
- Using the Selector Tool
- Using the Grabber Tools
- Using the Smart Tool
- Using the Scrubber Tool
- Numeric Keypad Set to Shuttle
- Using the Pencil Tool
- Edit/Tool Mode Keyboard Lock
- Chapter 29: Making Selections
- Chapter 30: Editing Clips and Selections
- Creating New Clips
- Healing Separated Clips
- Trimming Clips
- Nudging Clips
- Layered Editing
- Quantizing Clips to Grid
- Editing Stereo and Multichannel Tracks
- Consolidating Clips
- Compacting an Audio File
- Processing Audio with AudioSuite Plug-Ins
- TCE (Time Compression and Expansion) Edit To Timeline Selection
- Rating Clips
- Chapter 31: Fades and Crossfades
- About Crossfades and Curves
- Fade Dialogs
- Fade and Crossfade Preferences
- Fade Presets
- Creating Fades at the Beginnings and Ends of Clips
- Creating a Crossfade
- Using AutoFades
- Creating Fades and Crossfades in Batches
- Manually Adjusting Fade Shapes in Fade Windows
- Adjusting the Start and End Points of a Crossfade
- Adjusting Fade Shapes with the Smart Tool in the Edit Window
- Changing Fade Shapes in the Edit Window
- Fades Options in the Edit Selection Right-Click Menu
- Moving and Nudging Fades and Crossfades
- Separating Clips that Include Fades or Crossfades
- Trimming Clips that Include Fades or Crossfades
- Fade Boundaries and Shapes Displayed in Automation View
- Chapter 32: Playlists
- Working with Playlists
- Track Compositing
- Playlists View
- Matching Alternate Clips
- Matching Criteria Options
- Selecting Alternate Takes on Tracks
- Automatically Create New Playlists when Loop Recording
- Expanding Alternate Takes to New Playlists or Tracks
- Expanding Alternate Channels to New Playlists or Tracks
- Target Playlist
- Track Compositing Keyboard Shortcuts
- Chapter 33: Beat Detective
- Beat Detective and Source Material
- Uses for Beat Detective
- Beat Detective Requirements
- The Beat Detective Window
- Beat Detective Modes
- Defining a Beat Detective Selection
- Beat Detective Analysis
- Calculating Tempo with Beat Detective
- Generating Beat Triggers
- Editing Beat Triggers
- Generating Bar|Beat Markers with Beat Detective
- DigiGroove Templates
- Separating Clips with Beat Detective
- Conforming Clips with Beat Detective
- Edit Smoothing
- Detection (Normal) and Collection Mode
- Part VI: MIDI
- Chapter 34: MIDI Editing
- MIDI Editing Options
- Setting the Grid Value
- Using the Pencil Tool
- Inserting MIDI Notes
- Inserting a Series of Notes
- Manually Editing MIDI Notes
- Using the Grabber Tools
- Time Compression/ Expansion Trim Tool Functionality on MIDI Clips
- Continuous Controller Events
- Keyboard Shortcuts for Navigating MIDI
- Patch Select (Program and Bank Changes)
- System Exclusive Events
- Note and Controller Chasing
- Offsetting MIDI Tracks
- Stuck Notes
- Remove Duplicate Notes
- MIDI Real-Time Properties
- Real-Time Properties Settings
- Real-Time Properties on Tracks and Clips
- Writing Real-Time Properties to Tracks or Clips
- Real-Time Properties In the MIDI Event List
- Display of Real-Time Properties Effects
- Chapter 35: MIDI Editors
- Chapter 36: Score Editor
- Opening the Score Editor Window
- Edit Tools
- Default Note Duration
- Default Note On Velocity
- Play MIDI Notes When Editing
- Link Timeline and Edit Selection
- Mirrored MIDI Editing
- Double Bar
- Cursor Location
- Grid
- Score Editor Window Target
- Score Editor Window Menu
- Tracks List
- Page Controls
- Score Editor Zoom Controls
- Notation Display Track Settings
- Score Setup
- Editing Notes
- Score Editor Right-Click Menu
- Key Changes
- Meter Changes
- Chord Symbols and Diagrams
- Exporting Scores
- Printing Scores
- Chapter 37: MIDI Event List
- Chapter 34: MIDI Editing
- Part VII: Arranging
- Chapter 38: Time, Tempo, Meter, Key, and Chords
- Timebase Rulers and Conductor Rulers
- Main Time Scale
- The Sub Counter
- Tick-Based Timing
- Tick- and Sample-Based Timebases
- Song Start Marker
- Tempo
- Graphic Tempo Editor
- Editing Tempo Events in the Tempo Editor
- Changing the Linearity Display Mode
- Tempo Operations Window
- Identify Beat Command
- Meter Events
- Time Operations
- Change Meter
- Insert Time
- Cut Time
- Move Song Start
- Renumbering Bars
- Key Signatures
- Chord Symbols
- Extract Chords From Selection
- Chapter 39: Memory Locations
- Chapter 40: Arranging Clips
- Placing Clips from the Clips List on to Track Playlists
- Working with Multiple Items from the Clips List
- Placing Clips at the Edit Insertion Point
- Aligning Clips with the Edit Insertion Point
- Arranging with Transparent Clip Overlays
- Moving Clips with the Grabber Tools
- Layered Editing
- Snapping to the Preceding or Next Clip on a Track
- Arranging Clips in Shuffle Mode
- Arranging Clips in Slip Mode
- Spotting Clips
- Arranging Clips in Grid Mode
- Replacing Audio Clips
- Sync Points
- Shift Command
- Locking Clips
- Muting/Unmuting Clips
- Stripping Silence from Clips
- Inserting Silence
- Duplicating Clips
- Repeating Clips
- Chapter 41: Clip Loops and Groups
- Clip Looping
- Creating Looped Clips
- Unlooping Clips
- Editing Looped Clips
- Clip Groups
- Creating Clip Groups
- Ungrouping Clips
- Regrouping Clips
- Multitrack Clip Groups
- Clip Groups on Tick-Based Tracks
- Editing Clip Groups
- Fades and Crossfades on Clip Groups
- Clip Groups and Clip Gain
- Importing and Exporting Clip Group Files
- Chapter 38: Time, Tempo, Meter, Key, and Chords
- Part VIII: Processing
- Chapter 42: AudioSuite Processing
- Chapter 43: Clip Gain and Clip Effects
- Chapter 44: Elastic Audio
- Example Elastic Audio Workflow
- Elastic Audio Tracks
- Disabling Elastic Audio Tracks
- Elastic Audio Track Controls
- Elastic Audio Track Views
- Elastic Audio Analysis
- Real-Time and Rendered Elastic Audio Processing
- Elastic Audio Plug-Ins
- Editing in Warp View
- Warping Audio
- Editing in Analysis View
- Elastic Properties
- Elastic Properties Window
- Elastic Audio Clip-Based Pitch Shifting
- AudioSuite Processing and Elastic Audio Clips
- Moving Elastic Audio Between Tracks
- Approximate Waveforms
- Elastic Audio Preferences
- Chapter 45: Committing, Freezing, and Bouncing Tracks
- Chapter 46: Event Operations
- Chapter 47: HEAT
- Part IX: Mixing
- Chapter 48: Basic Mixing
- Mixing Concepts
- Metering and Calibration
- Signal Flow by Track Type
- Audio Tracks and Signal Flow
- Auxiliary Input Tracks and Signal Flow
- Master Fader Tracks and Signal Flow
- Instrument Tracks and Signal Flow
- VCA Master Tracks
- Inserts
- Configuring Inserts View in the Mix and Edit Windows
- HEAT
- Stereo Pan Depth
- Views in the Mix and Edit Windows
- Audio Input and Output Paths
- Sends
- Configuring Sends View in the Mix and Edit Windows
- Sends View Options
- Editing Sends in the Mix and Edit Windows (Individual Send Views)
- Bus Interrogation Options
- Output Windows for Tracks and Sends
- Output Meters
- Signal Routing for Monitoring and Submixing
- Delay Compensation
- Dither
- Using an Ethernet Control Surface with Pro Tools
- Using a MIDI Control Surface with Pro Tools
- Chapter 49: Plug-In and Hardware Inserts
- Types of Inserts
- Viewing Inserts
- Making Inserts Inactive
- Inserting Plug-Ins on Tracks
- Plug-In Menu Organization
- Plug-in Insert Search
- Default EQ and Dynamics Plug-Ins
- Plug-In Favorites
- Moving and Duplicating Plug-In and Hardware Inserts
- Plug-In Windows
- Opening Plug-In Windows
- Using Plug-In Window Controls
- Editing Plug-In Controls
- Plug-In Automation and Safe Modes
- Side-Chain Input
- Plug-in Bus Outputs
- Plug-In Presets
- Plug-In Settings Dialog
- Plug-In Mapping
- Bypassing Plug-Ins
- Linking and Unlinking Controls on Multi-Mono Plug-Ins
- Using Hardware Inserts
- Chapter 50: Automation
- Automation Overview
- Automation Playlists
- Automation Modes
- Automation Preferences
- Viewing Automation
- Indication of Automation in Track View and Automation Lane Selectors
- Writing Automation
- Automating Sends
- Automating Plug-Ins
- AutoMatching Controls
- Priming Controls for Writing Automation in Latch Mode
- Enabling and Suspending Automation
- Deleting Automation
- Thinning Automation
- Drawing Automation
- Editing Automation
- Cutting, Copying, and Pasting Automation
- Glide Automation
- Trimming Automation
- Writing Automation to the Start, End, or All of a Track or Selection
- Writing Automation to the Next Breakpoint or to the Punch Point
- Guidelines for “Write To” Commands
- Overwriting or Extending Mute Automation
- Creating Snapshot Automation
- Previewing Automation
- Capturing Automation
- VCA Master Track Automation
- Coalescing VCA Automation
- Chapter 51: Mixdown
- Chapter 48: Basic Mixing
- Part X: Surround
- Chapter 52: Pro Tools Setup for Surround
- Chapter 53: Multichannel Tracks and Signal Routing
- Chapter 54: Surround Panning and Mixing
- Chapter 55: Mixing to Dolby Atmos
- Dolby Atmos Overview
- Installing and Configuring Dolby Atmos Software and Hardware
- 7.0.2 and 7.1.2 Surround Formats in Pro Tools
- Configuring the Network Connection for Pro Tools and a Dolby Atmos Renderer
- Pro Tools Restrictions when Mixing to Dolby Atmos
- Configuring Session Setup for Dolby Atmos
- Configuring the I/O Setup for Dolby Atmos
- Mixing Bed Material
- Mapping Busses to Objects
- Track Object Output Assignment
- Monitoring Object Audio when not Connected to a Renderer
- Object View in the Edit and Mix Windows
- Object Controls
- 7.0.2, 7.1.2, and Object Panner
- Object/Bus Toggle Automation
- Auto-Height Overrides Height Automation Option
- Coalesce Pan Guide Automation
- Duplicating Object Track Pan Automation and Dolby Atmos Panner Plug-in Automation
- Object Controls Mix Attribute for Grouped Tracks
- Importing Object-Related Track Data from Another Session
- Import ADM files
- Dolby Atmos PEC/DIR Recorder Workflow Example
- Chapter 56: Ambisonics
- Part XI: Sync and Video
- Chapter 57: Working with Synchronization
- Pro Tools Synchronization Options
- Session Setup Window
- Format Displays and Controls in the Session Setup Window
- SYNC Setup and Timecode Offsets in the Session Setup Window
- Timecode Settings in the Session Setup Window
- Preparing to Work with SMPTE
- Configuring Pro Tools for SMPTE
- Pull Up and Pull Down
- Effect of Using Pull Up or Pull Down
- Generating Timecode
- Using MIDI Machine Control
- Enabling MIDI Machine Control in Pro Tools
- MMC Transport Settings
- Setting Minimum Sync Delay
- Remote Track Arming
- Spotting Clips to SMPTE Frame Locations
- The Spot Dialog
- Capturing Timecode
- Auto-Spotting Clips
- Using the Trim Tools in Spot Mode
- Time Stamping
- Identifying a Synchronization Point
- Troubleshooting SMPTE Synchronization
- Speed Correction for Film, NTSC Video, and PAL Video
- Chapter 58: MachineControl
- MachineControl Requirements
- Cables and Connections
- Connecting Machines
- Starting Up Your System
- MachineControl Communication Modes
- Setting Up Machine Control
- Serial Deck Control Mode
- Configuring Serial Deck Control (Overview)
- Configuring a MachineControl Device for Deck Control
- Preferences for Serial Deck Control Mode
- Session Setup Window and MachineControl
- Additional Pro Tools MachineControl Commands
- Selecting Pro Tools or the Machine as the Transport Master
- Playback in Serial Deck Control Mode
- Remote Track Arming
- Configuring Track Arming
- Creating a Track Arming Profile
- Arming Tracks Remotely for Layback
- Remote 9-Pin Deck Emulation Mode
- Configuring Remote 9-Pin Deck Emulation Mode
- Preferences for Remote 9-Pin Deck Emulation Mode
- Playback in Remote 9-Pin Deck Emulation Mode
- Recording in Remote 9-Pin Deck Emulation Mode
- Track Arming in Remote 9-Pin Deck Emulation Mode
- Using a Paddle Device in Local Mode
- Connecting a Supported Third-Party Paddle Device to Your Pro Tools System
- Allow Track Arm Commands in Local Mode Preference
- Configuring Ports for a Deck and a Supported Third-Party Paddle Device
- Deck Control Key Commands
- Machine IDs
- 9-Pin Cable Pinouts
- Chapter 59: Working with Field Recorders in Pro Tools
- Field Recorder and Production Workflow Terminology
- Supported Field Recorder Audio Files and Metadata
- Displaying Field Recorder Metadata in Pro Tools
- Workspace Support for Field Recorder Metadata
- Field Recorder Workflows
- Ensuring Metadata of Source Files Have Been Preserved
- Receiving Source Files
- Importing Source Files into Pro Tools
- Designating Field Recorder Tracks
- Displaying Multichannel Files from a Field Recorder in the Clips List
- Selecting a Matching Field Recorder Channel to Replace a Clip
- Expanding Matching Field Recorder Channels to New Tracks
- Determining the Method of Expanding Matching Field Recorder Channels to New Tracks
- Film Workflow
- Video and Fully Non-Linear Workflows
- Chapter 60: Working with Video in Pro Tools
- Avid Video Engine (AVE)
- QuickTime Movie Support in Pro Tools
- Before Starting Your Project
- Pro Tools Video Preferences
- Video Tracks
- Main Video Track
- Video Track Controls and Indicators
- Video Track Settings
- Locking Video Tracks
- Video Engine Rate
- Importing Video into Pro Tools
- Configuring Video Import Options
- Importing Audio from a QuickTime Video Clip
- Video Clips
- Showing or Hiding Video Clips in the Clips List
- General Video Editing
- Renaming Video Disk Files
- Video Clip Groups
- Using the Video Window
- Browsing Video in the Video Universe Window
- Playback of High-Definition Video
- Optimized Video Playback
- Tips for Optimizing Video Playback
- Compensating for Video Monitoring Delays
- Playing Video to an External Monitor Using a Video Peripheral
- Bouncing the Video Track to a QuickTime Movie
- Chapter 57: Working with Synchronization
- Part XII: Satellite Systems
- Chapter 61: Satellite Link
- Chapter 62: Pro Tools Video Satellite
- Chapter 63: Avid Video Satellite
- Video Output Options
- Supported Video Resolutions
- Avid Video Satellite Workflows
- Using a Video Satellite in a MediaCentral | Production Management Environment
- Connecting Pro Tools and a Video Satellite
- Matching Media Composer and Pro Tools Settings in a Video Satellite System
- Linking or Unlinking Pro Tools and a Video Satellite
- Capturing Audio and Video with a Video Satellite System
- Re-Digitizing an Existing Sequence
- Digitizing from an EDL
- Laying Back Audio and Video to Tape
- Index
Pro Tools Reference Guide906
To define a clip sync point:
1 Enable Slip mode (see “Edit Modes” on
page 599).
2 Do one of the following:
• With the Selector tool, click at the point in the
clip where you want the sync point.
• Press the Down Arrow key while playing back.
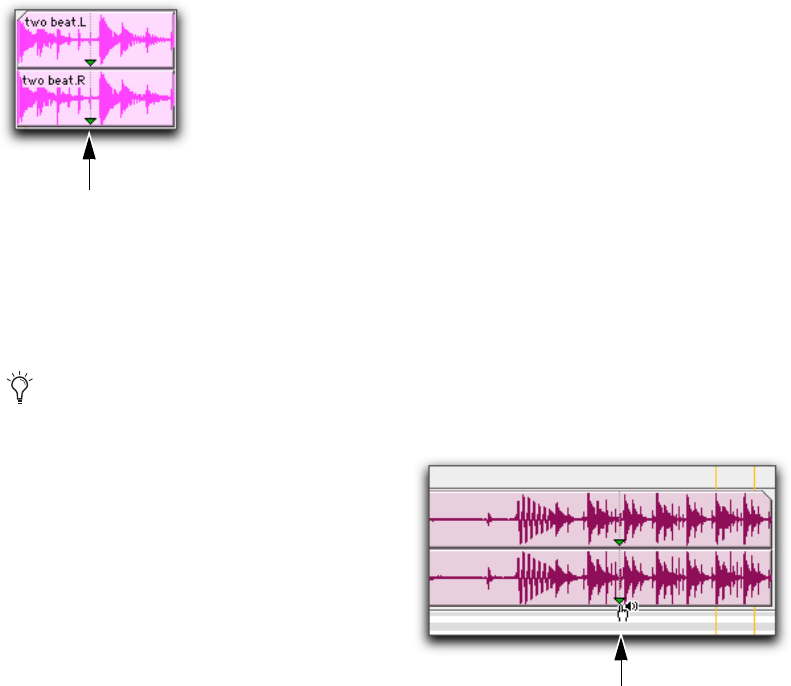
3 Choose Clip > Identify Sync Point. A small down
arrow appears at the bottom of the clip, with a
vertical, light gray line indicating the location of
the sync point.
To change the location of a sync point:
With the Selector tool, click at a point in a clip
and choose
Clip > Identify Sync Point. The new
location is identified as the sync point for the
clip.
Removing Sync Points
To remove a sync point, do one of the following:
Select the entire clip and choose Clip >
Remove Sync Point
.
Choose the Time Grabber tool, then Option-
click (Mac) or Alt-click (Windows) the sync
point to delete it.
Displaying Sync Points
Sync points in audio clips may displayed or
hidden.
To disable the display of sync points in audio clips:
Deselect View > Clip > Sync Point.
To enable the display of sync points in audio clips:
Choose View > Clip > Sync Point.
Dragging Sync Points
You can drag a sync point to another position in the
audio clip.
To set the sync point by dragging:
1 If you want the sync point to snap to the current
Grid value, enable Grid mode (see “Edit
Modes” on page 599).
2 Select the Time Grabber tool.
3 Drag the sync point to a new location.
Scrubbing Sync Points
While viewing an audio waveform can be a good
way to set a sync point, a waveform display may
not always reveal the desired spot in the audio ma-
terial. By scrubbing while moving the sync point
over an audio waveform, you can listen for the ex-
act location to place the sync point.
Sync Point
You can also move the location of a sync
point by dragging it (see “Dragging Sync
Points” on page 906).
Scrubbing a Sync Point (cursor)