Avigilon Camera Installation Tool User Guide Version 4.
Copyright © 2013 Avigilon. All rights reserved. The information presented is subject to change without notice. No copying, distribution, publication, modification, or incorporation of this document, in whole or part, is permitted without the express written permission of Avigilon. In the event of any permitted copying, distribution, publication, modification, or incorporation of this document, no changes in or deletion of author attribution, trademark legend, or copyright notice shall be made.
Table of Contents What is the Avigilon Camera Installation Tool?..................................................................... 1 Using the Installation Tool ...................................................................................................... 2 Zooming and Panning a Video .................................................................................................................. 3 Using the Zoom Tools .............................................................................
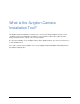
What is the Avigilon Camera Installation Tool? The Avigilon Camera Installation Tool allows you to connect and configure Avigilon cameras for your surveillance system. The Installation Tool allows you to preview the camera video, adjust the video image, and define how the camera connects to the network. A copy of the Installation Tool is available online from the Avigilon website. You do not need a license to use the Installation Tool.
Using the Installation Tool Once a camera has been connected to the local network or directly to the computer running the installation, you can use the Avigilon Camera Installation Tool to configure the cameras for use in your surveillance system. 1. Open the Installation Tool. o o Double-click the Avigilon Camera Installation Tool shortcut on your desktop. From the Windows Start menu, select Programs > Avigilon > Avigilon Camera Installation Tool.
Using the Installation Tool 6. Click Compression and Image Rate to configure the camera's video compression level and image rate for transmitting video through the network. See Compression and Image Rate for more information. 7. Click Connect Camera to configure another camera. In the Camera Connection dialog box, select a camera from the left pane and click Connect. Zooming and Panning a Video The zoom and pan tools allow you to focus on specific regions in a camera video.
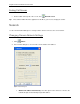
Avigilon Camera Installation Tool User Guide Ending Full Screen Tip: On the toolbar at the top left of the screen, click End Full Screen. The toolbar is hidden when the application is idle. Move your mouse to display the toolbar. Network Use the camera Network dialog box to change how the camera connects to the server network. Changing Camera Network Settings 1. Click Network. 2. In the Network dialog box, select how the camera obtains an IP address: Figure A.
Using the Installation Tool The camera will attempt to obtain an address from a DHCP server. If it cannot, the camera will default to addresses in the 169.254.x.x range. o Use the following IP address: select this option to manually assign a static IP address for the camera. Enter the IP Address, Subnet Mask and Gateway you want the camera to use. 3. Select the Control Port for connecting to the camera. This port is also used for manually discovering the camera on the network. 4.
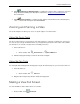
Avigilon Camera Installation Tool User Guide Figure A. Image and Display dialog box 2. In the Image and Display dialog box, use the Zoom controls to adjust the camera's zoom position. 3. If the camera has a built-in auto focus feature, you can select the Continuous Focus option to enable the camera to focus itself whenever the scene changes. 4. To manually focus the camera, select Open in the Iris drop down list then use the Focus buttons to focus the camera.
Using the Installation Tool image rate. Iris You can allow the camera to control the iris by selecting Automatic, or you can manually set it to Open or Closed. IR Cut Filter You can allow the camera to control the infrared cut filter by select Automatic, or set the camera to Color or Monochrome mode.
Avigilon Camera Installation Tool User Guide light. You can allow the camera to control the white balance by selecting Automatic, or select Custom and manually set the Red and Blue settings. 6. Click Apply to Cameras... to apply the same settings to other cameras of the same model. 7. Click OK. Compression and Image Rate Use the camera Compression and Image Rate dialog box to change the camera's compression and image quality settings for sending image data over the network.
Using the Installation Tool The Bandwidth area gives an estimate of the bandwidth used by the camera with the current settings. Adjust the settings as required. Note: For cameras capable of maintaining multiple streams, the settings in this dialog box only affect the primary stream. 2. In the Format drop down list, select the preferred streaming format. 3. In the Image Rate bar, move the slider to select the how many images per second (ips) you want the camera to stream over the network. 4.
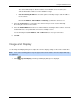
Upgrading Camera Firmware Once an Avigilon camera is connected to the Camera Installation Tool, new firmware can be automatically downloaded and installed. If there is new firmware available for the camera, the following message appears as the camera connects to the Camera Installation Tool: Figure A. Upgrading camera in the Camera Installation Tool Once the camera upgrade is complete, the message box disappears and the camera video will display after a couple seconds.
For More Information Visit Avigilon at http://www.avigilon.com/ for additional product documentation. Avigilon Training Center The Avigilon Training Center provides free online training videos that demonstrate how to set up and use the Avigilon Surveillance System. Register online at the Avigilon Partner Portal site to begin: http://avigilon.force.com/login Support For additional support information, visit http://avigilon.com/#/support-and-downloads/.
Avigilon Camera Installation Tool User Guide 12