
Manual

Avigilon Control Center System Integration Guide with Hirsch Velocity
6
Velocity Alarm Configuration
Alarms are predefined by the Velocity software and can be linked to multiple devices in the
Velocity system. You must be familiar with the names of all the devices that are connected to the
alarms because the device names are required as part of the integration setup.
One way to help identify the alarms that are to be mapped in the Avigilon Hirsch Gateway is to
add a custom description for the alarms you want to use.
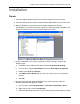
1. In the Velocity software, select Console > Customization.
2. Select Alarms from the tree in the left pane.
3. In the Customized Value column, enter new alarm descriptions.
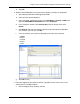
4. Next, set Velocity to display custom descriptions.
a. Open the Velocity Service Control Manager and select Settings....
b. Select Advanced from the left pane then select the Enable event level
description customization check box.
c. Click OK.
NOTE: Do not change the Enable event level description customization setting after alarms have
been mapped in the integration or the alarms may not synchronize properly.
Avigilon Alarm Configuration
Alarms are manually created in the Avigilon Control Center Client software. Create the Avigilon
alarms you want mapped to the alarms in the Velocity software, then assign the required
cameras and settings for the alarm.
1. In the Avigilon Control Center Client software, select Tools > Setup then select the
Avigilon Server to define the alarm on.
2. On the server Setup dialog box, click Alarms.
3. On the Add Alarm dialog box, click Add.
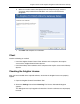
4. On the Select Alarm Trigger Source page, select External Software Event from the
Alarm Trigger Source drop down list and click Next.
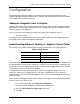
5. On the Select Linked Cameras page, select the cameras to link to this alarm, and set
the Pre-Alarm Record Time and the Recording Duration. Click Next.
6. Select the groups or users who should receive alarm notifications, then click Next.
7. (Optional) If you would like to trigger an action when an alarm is acknowledged, select
the Activate selected digital output(s) on alarm acknowledgement check box.
a. Select the digital outputs to be activated and specify the duration.
b. Select the Require user confirmation before activating digital output check
box if users need to confirm the alarm before the digital output action is initiated.
c. Click Next.