
Operation Manual


30
3° INSTALLATION INSTRUCTIONS
Before using your wine cellar
Remove the inner and outer packaging.
Before connecting the cellar to the electrical socket, leave it in position for 24 hours. This will reduce the
possibility of malfunction of the refrigeration circuit due to transport.
Clean the inside using a soft cloth and lukewarm water.
Using your wine cellar:
Your wine cellar must be positioned in a room with an ambient temperature between + 16 and +32°C.
If the ambient temperature is higher or lower, the performance of your appliance may be affected and it may not
be possible to obtain temperatures between 5 and 18 degrees.
Installing your wine cellar
This wine cellar is designed for free-standing or built-in installation.
Position it in a place with sufficient strength to support its weight when loaded. To ensure that it is level,
adjust the height of the feet underneath.
To get the best from your appliance with the lowest energy consumption, do not place the appliance
close to a heat source (heater, cooker, etc.), do not expose it to direct
sunlight, and do not place it in a
room which is too cold.
Connect the cellar to a single socket, leaving a 10 cm gap between the back of the cellar and the wall.
Be careful to support it, so that your wine cellar is perfectly level. (Use of a spirit level is recommended).
This will prevent any movement due to instability, causing noise and vibration, and will ensure that the
door seals perfectly.
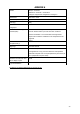
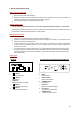
Control panel
“ ” Button
Lighting control button
“ ” Button
On/Off switch
“DISPLAY”
Electronic temperature display
“ ” Button
+ Temperature setting button.
“ ” Button
- Temperature setting button.
“RUN”
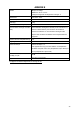
Power indicator
“LIGHT” Button
Lighting control button
“POWER” Button
On/Off switch
“DISPLAY”
Electronic temperature display
“UP” Button
+ Temperature setting button.
“DOWN” Button
- Temperature setting button.
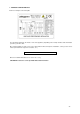
AV7X(-IX)
AV21SX(-IX)/AV51SX(-IX)/PRO51C/AV41SXDP(-IX)