
Operation Manual


42
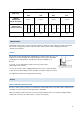
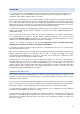
MULTI PURPOSE WINE CELLAR
DOOR TYPE
GLASS
265 315
PLAIN
265 315
AMBIENT
TEMPERATURE
RANGE TO RESPECT
0-35°C
0-35°C
0-35°C
0-35°C
TEMPERATURE
SETTING AVAILABLE
17°
7
18°
8
19°
9°
17°
7
18°
8°
19°
9°
17°
7
18°
8°
19°
9°
17°
7
18°
8°
19°
9°
WINTER SYSTEM ?
Yes
Yes
Yes
Yes
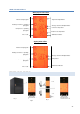
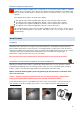
UNPACKING :
Depending on the models, remove the transport pallet on which your wine cellar is placed by removing the
two screws securing it to the frame at the rear of the device. Remove all the wedging or protection
elements present inside.
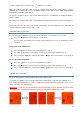
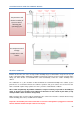
LEVELS
Be careful to wedge and adjust the horizontality of your wine cellar. (The use of a
bubble level is recommended). This will avoid any movement due to instability,
generating noise and vibrations, and will ensure the perfect tightness of
the door.
To do this, use the adjustable feet at the front of your wine cellar
(depending on the models).
You can also lean the device slightly backward to "force" the condensate water
to flow (2/3 mm), which will prevent the formation of all kinds of deposits (scales).
The adjustment is made by screwing and unscrewing.
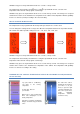
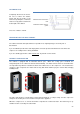
SPACE
FREE STANDING INSTALLATION
Be sure to leave a space of at least 3 cm between the wall and the back of your wine cellar to allow the free
circulation of air. This device is not designed to be embedded.
Make sure that the surface area where you are going to install the device can support its weight and the
weight of its contents (a 75 cl wine bottle = 1.3 kg on the average).