
User`s manual


E-24
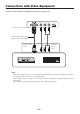
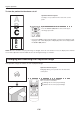
ON/STANDBY
LAMP/COVER
TEMP
FREEZE OFF
FREEZE
PORTRAIT
INPUT
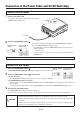
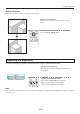
ON/STANDBY
LAMP/COVER
TEMP
FREEZE OFF
FREEZE
PORTRAIT
INPUT
Up Down
ON/STANDBY
LAMP/COVER
TEMP
FREEZE OFF
FREEZE
PORTRAIT
INPUT
ON/STANDBY
LAMP/COVER
TEMP
FREEZE OFF
FREEZE
PORTRAIT
INPUT
ON/STANDBY
LAMP/COVER
TEMP
FREEZE OFF
FREEZE
PORTRAIT
INPUT
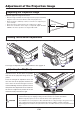
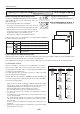
Adjustment of the Projection Image
Adjust the projection image to the screen.
Adjusting the Projection Image
• Whentheimageisshiftedtotheleftorright,movetheprojectorhorizontally.
(Alignthecenterofthescreenwiththecenteroftheprojectorlens.)
• Whentheimageisshiftedupordown,usethetiltfoottoadjustthepro-
jector vertically.
• Whentheimageisslanted,turntheleftorrighttiltfoottoadjust.
• When there is distortion in the shape of a trapezoid, adjust with KEY-
STONE of the menu operations. See Pages E-36 and 42.
Making Focus/Zoom Adjustments
Turn the focus ring/zoom lever of the projection lens and adjust the projection image.
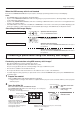
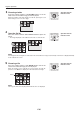
Adjusting the Tilt (Slant)
Adjustment of the tilt foot allows the position
and slant of the projection image to be ad-
justed.
Press the left-right tilt adjustment lever and
raise the front of the projector. Release the
lever when the desired height has been
reached. Rotating the lowest portion of the tilt
foot permits ne adjustments to be made. The
tilt foot are lengthened by rotated to the left
and shortened by rotated to the right.
The image size depends on the projected distance. See page E-17.
Right angle
CAUTION
• Donotlengthenthetiltfootononlyonesidewhichwouldplacetheprojectoronanextremeslant.Doingso
could result in the projector slipping or falling over and could cause an accident or breakdown.
• Whenmovingtheprojector,besuretoreturnthetiltfoottotheoriginalposition.
• Theventilationholesontheprojector’ssidesandbottomtakeincoolingairusingastrongsuctionforce.If
cloth or paper get stuck to them, the internal temperature will rise, leading to accidents or damage.
• Dependinguponthematerialoftheplacementlocation,therubberfeetmaysoilontheplacementsur-
face.