sports flying redefined (Plug N Fly ) Please read this manual carefully before operating this plane.
CONTENTS Introduction 1 Specifications 1 Contents Of Box 2 Required To Complete Model 2 Assembly 3-6 Setting Up Your Model 7-9 Model Flying Precautions 10 Pre-flight Checks 10 Flying Your Zazzy 11 Zazzy TIPS 12 Spare Parts Listing 13 Trouble Shooting 14 Notes 15-16
sports flying redefined INTRODUCTION The Avios Zazzy is a sport aerobatic model intended to be a pilot’s first introduction to a low wing model. A large tapered wing, combined with a long, generously sized tail gives the Zazzy docile enough flight characteristics for newer pilots, while still agile enough to keep even veteran pilots on their toes. This model is meant to be your “go-to” model with its easy setup, and great flight characteristics.
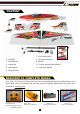
CONTENT 2 5 4 3 1 6 8 11 10 7 9 1. Main wing 7. 12x6 Carbon prop 2. Fuselage 8. Tail wheel assembly 3. Horizontal tail 9. Spinner 4. Vertical tail 10. Control accessories/hardware 5. Landing gear 11. Instruction Manual 6. Wing spar tube REQUIRED TO COMPLETE MODEL: In its ‘Plug n Fly’ format the Zazzy will still require some additional electronic components to get it ‘flight ready’ Avios recommends the products below for optimum performance and great value. Available at hobbyking.
sports flying redefined ASSEMBLY 1. Begin assembly by locating the fuselage and wing tube joiner. Insert the wing tube into the hole in the fuselage. It may be necessary to move the ESC or servo wires to stop any interference with the wing tube. The wing tube simply slides in, it is not glued. 2. Insert the right wing panel to the fuselage. The built in PCB connector will automatically connect the aileron servo to the fuselage. Next insert the left wing.
4. Insert vertical fin into horizontal stabilizer. Then carefully fit it to the fuselage. It is designed to key together and align automactically. Secure tail to fuselage with two coarse thread screws. Sizes listed in diagram below. 5. Install tail wheel unit. First attach plastic tail wheel arm to the rudder with two 2x13mm screws. Next attach metal bracket to fuselage with two 3x17mm machine screws. Last, using a 3x10mm coarse thread screw to attach the rudder to the tail wheel bracket.
sports flying redefined 6. Attach landing gear to fuselage with four 4x12mm machine screws. Landing gear should look swept back. This will give proper ground handling and correct fitment of wheel pants. After securing the screws, attach foam cover piece with glue, or clear tape to make removal later easier 7. Wheel pants are attached to the landing gear leg first with a 3x12mm machine screw. Then insert wheel into wheel pant, and screw in 4x37mm axel screw that also helps secure the fairing.
8. Install spinner backplate to motor shaft, then propeller, washer and finally secure it with the included 12mm nut. Lastly, attach the spinner cone to the back plate with two 3x10mm screws Note: It is recommended that you balance the prop and spinner before installing for optimum performance and efficiency. Congratulations, basic assembly of your Zazzy is now complete. Please perform a final check on all screws, bolts and components, ensuring all are secure and firmly in place.
sports flying redefined SETTING UP YOUR MODEL: 1. With your receiver installed and all servos plugged into their corresponding channels, connect the flight battery to the ESC to power up the electronics. With the model now armed, ensure all servos are centered and all control surfaces are level. If not, adjust by turning the control clevis’s by hand accordingly until the control surfaces are level as shown. Note: For safety reasons, it is advised that this is done with the prop removed from the model.
3. The Zazzy handles very well in flight and that’s not down to good design alone, but a good pre-flight set-up too. Before you fly your Zazzy please follow the recommended settings below for optimum handling and performance.. Control throws: 15-30mm 10-20mm Elevator 95-100mm 10-20mm Rudder 15-30mm Aileron 10-20mm 10-20mm *Elevator ‘low rates’ 10mm ‘high rates’ 20mm in either direction from neutral. *Rudder ‘low rates’ 15mm ‘high rates’ 30mm in either direction from neutral.
sports flying redefined 95-100mm 5. The center gravity(CG) for the Zazzy is approximately 95-100mm from the leading edge of the wing. Using the recommended Turnigy Graphene 3000mah 65C 4S lipo, the correct CG can be attained quite easily due to the ample battery space. If using larger capacity batteries, you may need to shift the battery backwards more to attain the correct CG. CG 95-100mm when measured from the leading edge of the wing at the root. Measure with the model inverted.
MODEL FLYING PRECAUTIONS ● Select your flight area carefully. Always choose an open space that is unobstructed from trees and buildings and away from crowed areas. Avoid flying in area’s with roads, electric/telephone poles/wires and water near by or within close proximity to full size air traffic. ● Do not fly this model in poor weather. High winds, low visibility, inclement temperatures, rain and storms are to be avoided. ● Never attempt to catch this model whilst in flight.
sports flying redefined FLYING YOUR ZAZZY Before flying make sure you have followed closely the set-up guidelines on pages 7 through 10. Start by taxiing on the ground a little to get use to the handling. Be sure to always taxi with full up elevator held in and gentle use of throttle. This will keep the model tracking steady and true. For take off you'll want to hold in some right rudder to counter the rotational torque on the initial roll out.
ZAZZY TIPS ● To further improve ground handling, espeically on rougher grass surface, unscrew and rotate the landing gear 180 degrees and remove the wheel spats. This will not only give additional prop clearance, but also reduce the chance of the model tipping over onto its nose when landing. ● For optimum flight performance and model longevity, it is highly recommend that you always fly with a balanced prop. The supplied prop should be balanced, but it is always good to check first.
sports flying redefined SPARE PARTS LISTING Fuselage: Main Wing set: Horizontal tail: 9306000220-0 9306000216-0 9306000217-0 Vertical tail: Canopy Cowl: 9306000218-0 9306000215-0 9306000219-0 Main landing gear: Wheel Pants Rear WheelSet: 9306000222-0 9306000226-0 9306000223-0 Spinner set: 12x6 Propeller AeroStar 2820 900kv 9306000221-0 9499000077-0 Accessories: 9306000224-0 13 9306000225-0
TROUBLE SHOOTING: Problem Cause Solution 1. Battery is not fully charged. 2. Transmitter battery low. 3. Motors not connected. Motor does not turn 4. The motor is damaged. 5. Receiver is not bound to Tx. 1. Charge the batteries. 2. Install a full charged battery. 3. Check for connection between the ESC and motor. 4. Replace motor. 5. Consult Radio manual and go through bind procedure again. 6. ESC in set-up mode. 6. Hold model and move throttle to full position then back down to idle.
sports flying redefined 15
16
hobbyking.