USER’S MANUAL MANUEL DE L’UTILISATEUR MANUAL DEL USUARIO WD50UK4550
CONTENTS Important Safety Instructions 2 Safety Information 3 Preparation 4 What's Included 4 Front View 5 Rear View 6 Installing the Stand 7 Removing the Stand for Wall-Mounting 7 Remote Control 8 Connecting External Devices 9 Customizing TV Settings 10 Initial Setup 10 Navigating the Setup Settings 11 Apps 12 Media 13 Viewing Photos 13 Playing Movie 14 Playing Music 14 Source 15 Setup 15 System 16 Channel 18 Support 18 Lock 19 Picture 20 Network 21 Audio
IMPORTANT SAFETY INSTRUCTIONS • Read these instructions – All the safety and operating instructions should be read before this product is operated. • Keep these instructions – The safety and operating instructions should be retained for future reference. • Heed all warnings – All warnings on the appliance and in the operating instructions should be adhered to. • Follow all instructions – All operating and use instructions should be followed.
SAFETY INFORMATION To ensure reliable and safe operation of this equipment, please carefully read all the instructions in this user guide, especially the safety information below. Electrical Safety • The TV set should only be connected to a main power supply with voltage that matches the label at the rear of the product. • To prevent overload, do not share the same power supply socket with too many other electronic components.
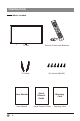
PREPARATION What's Included TV Set Remote Control with Batteries Six Screws (M4x25) TV Stand User Manual User Manual En 4 Quick Connect Guide Quick Connect Guide Warranty Card Warranty Card
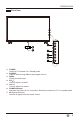
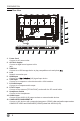
PREPARATION Front View 1. POWER Switch the TV between On / Standby mode. 2. SOURCE Press to select among different input signal sources. 3. MENU Display the main menu. 4. CH / Press to select a channel. 5. VOL +/Press to adjust the volume. 6. POWER Indicator Illuminate blue when the TV is turned on. Illuminate red when the TV is in standby mode. 7. IR (Infrared Receiver) Receive IR signals from the remote control.
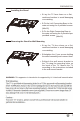
PREPARATION HDMI3 AUDIO 10 COMPONENT 900 Rear View OPTICAL LA N HDMI2 HDMI1 VG A PC AUDI O 1. Power Cord Connect to AC power outlet. 2. OPTICAL Output Connect a digital sound system to this jack. 3. USB Port Connect to a USB storage device to play compatible movie and photo 4. LAN Network connection port. 5. HDMI Input Connect to a (HD) signal input device. 6. VGA Input Connect to a computer or other devices with a VGA interface. 7. PC AUDIO Input Connect to a computer audio output. 8.
PREPARATION Installing the Stand • 1.Lay the TV face down on a flat, cushioned surface to avoid damaging or scratching. • 2. Fix the Left Connecting Base to the main unit using the 3 provided screws. (M4x25) • 3. Fix the Right Connecting Base to the main unit using the 3 provided pcs provided screws. (M4x25) Removing the Stand for Wall-Mounting • 1. Lay the TV face down on a flat, cushioned surface to avoid damaging or scratching. • 2.Untighten the 6 pcs screws holding the stand assembly and remove them.
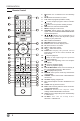
PREPARATION Remote Control 1. 2. 3. 4. 5. 6. 7. 8. 9. 10. 11. 12. 13. 14. 15. 16. 17. 18. 19. 20. 21. 22. 23. 24. 25. 26. 27. 28. 29. 30. 31. 32. En 8 : Switch the TV between On and Standby mode. MUTE: Mute and restore TV sound. 0~9: Select a program.(ATV/DTV mode) : Enter multiple program channel number such as 2-1. : Return to the previous viewing channel. APP: Press to select the desired APP. MENU: Display the main menu.
CONNECTING EXTERNAL DEVICES En 9
CUSTOMIZING TV SETTINGS Initial Setup • Connect the power cord to the power socket after you have completed all the physical connections. At this stage, the TV will enter Standby Mode and the red LED indicator will illuminate. button on the main unit or on the remote control to • In Standby Mode, press the turn the TV on. The red LED indicator will turn blue. • The first time you turn the TV on, it will go into the Setup Wizard. Press buttons to select your desired mode and press OK to confirm.
CUSTOMIZING TV SETTINGS Navigating the Setup Settings • Press the MENU button to display the main menu. buttons to select Setup menu and then press • Use and select the available menu.
CUSTOMIZING TV SETTINGS Apps Toon Goggles VUDU • Press the MENU button on the main unit or on the remote control to display the to enter the streaming and use to select the desired Apps. Then press APP and press OK button to view. Or press the hotkey on the remote control to enter the APP directly. Netflix Pandora Toon Goggles Enjoys TV shows & movies streamed instantly over the Internet. Free personalized radio that offers effortless and endless music enjoyment and discovery.
CUSTOMIZING TV SETTINGS Media • Press the MENU button on the main unit or on the remote control, then press to select Media, and use to enter the media and use to select the desired option. NOTE:Portable storage devices( USB disk or Hard disk) should be inserted. Viewing Photos buttons to select Photos and then select the • After entering Media, press disk type to enter. Then use / buttons to navigate in the picture folder to select the desired photo, then a subscreen will pop up.
CUSTOMIZING TV SETTINGS Playing Movie • After entering Media, press buttons to select Movie and then select the disk type to enter. Then use / buttons to navigate in the movie folder to select the desired video, then a subscreen will pop up. Press OK button, when √ appears on the top left, press to display the video. Playing Music music 1.mp3 guqin.mp3 music • After entering Media, press buttons to select Music and then select the disk type to enter.