
User Guide

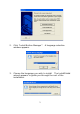
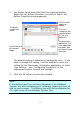
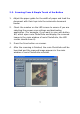
Table Of Contents
- 1. Installing the Button Manager
- 2. Scanning From the Button
- 2.1. Checking the Button Configurations Before Scanning
- 2.2. The Default Button Settings
- 2.3. Scanning From A Simple Touch of the Button
- 2.4 Performing Continuous Scan From the Flatbed
- 3. Configuring the Buttons
- 3.1. A Glance of the Button Properties Window
- 3.2. Choosing New Settings For A Button
- 3.3. Choosing a Proper File Format
- 3.4 Adding A New Destination Application
- 3.5 Deleting A Current Destination Application
- 3.6 Creating A New Scan Configuration
- 3.7 Deleting A Current Scan Configuration
- 3.8 Selecting Options For a Button
- 3.9 Removing a Blank Page
- 3.10 Setting the Power Saving Mode
- 3.11 Saving and Loading Profiles
- 3.12 Solving A Problem
- Index

2.3. Scanning From A Simple Touch of the Button
1. Adjust the paper guide for the width of paper and load the
document with their tops into the automatic document
feeder.
2. Check the number on the LED screen to ensure if you are
selecting the proper scan settings and destination
application. (For example, if you want to scan with button
#4, which open roxio PhotoSuite and display the scanned
image in the main window of roxio PhotoSuite, the LED
screen should show 4).
3. Press the Scan button on scanner.
4. After the scanning is finished, the roxio PhotoSuite will be
launched and the scanned image appears in the main
window of roxio PhotoSuite as below.
7