
User Guide

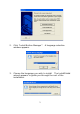
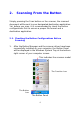
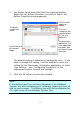
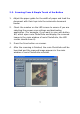
Table Of Contents
- 1. Installing the Button Manager
- 2. Scanning From the Button
- 2.1. Checking the Button Configurations Before Scanning
- 2.2. The Default Button Settings
- 2.3. Scanning From A Simple Touch of the Button
- 2.4 Performing Continuous Scan From the Flatbed
- 3. Configuring the Buttons
- 3.1. A Glance of the Button Properties Window
- 3.2. Choosing New Settings For A Button
- 3.3. Choosing a Proper File Format
- 3.4 Adding A New Destination Application
- 3.5 Deleting A Current Destination Application
- 3.6 Creating A New Scan Configuration
- 3.7 Deleting A Current Scan Configuration
- 3.8 Selecting Options For a Button
- 3.9 Removing a Blank Page
- 3.10 Setting the Power Saving Mode
- 3.11 Saving and Loading Profiles
- 3.12 Solving A Problem
- Index

2. The Button Panel shows the first five scanning buttons.
Right-click the button (function) you wish to check, the
Button Properties window appears.
The scan
settings for the
selected button.
(in this case
button #1).
The destination
application. (This
is the application
that opens after
you have finished
scanning.)
The file format of
the scanned
image.
The button
number and
name.
Click to select
options or
setting.
The default setting is indicated in highlighted color. If you
wish to change the setting, use this window to reset the
setting for the file format, destination application, or other
scan settings. See “Configuring the Button” in the
subsequent section to reset the settings.
3. Click the OK button to leave the window.
Note:
If the Button Panel has not been displayed in the Windows
System Tray after restarting your computer, please just turn off
and on your scanner. The Button icon will then be displayed on
the right corner of the Windows System Tray.
5