
User Guide

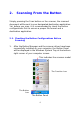
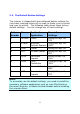
Table Of Contents
- 1. Installing the Button Manager
- 2. Scanning From the Button
- 2.1. Checking the Button Configurations Before Scanning
- 2.2. The Default Button Settings
- 2.3. Scanning From A Simple Touch of the Button
- 2.4 Performing Continuous Scan From the Flatbed
- 3. Configuring the Buttons
- 3.1. A Glance of the Button Properties Window
- 3.2. Choosing New Settings For A Button
- 3.3. Choosing a Proper File Format
- 3.4 Adding A New Destination Application
- 3.5 Deleting A Current Destination Application
- 3.6 Creating A New Scan Configuration
- 3.7 Deleting A Current Scan Configuration
- 3.8 Selecting Options For a Button
- 3.9 Removing a Blank Page
- 3.10 Setting the Power Saving Mode
- 3.11 Saving and Loading Profiles
- 3.12 Solving A Problem
- Index

6
2.2. The Default Button Settings
The scanner is shipped with preconfigured button settings for
your basic scanning tasks such as scan-to-folder, scan-to-email,
and scan-to-printer. The following table shows these factory
default settings. You can change any of these settings.
Button
Number
Name Destination
Application
Preset Scan
Settings
1 Archive
Folder B&W@200 dpi, A4,
TIFF
2 E-mail Microsoft
Outlook Express
Gray@200 dpi, A4,
JPEG
3 Print Printer B&W@300 dpi, A4
4 PDF Acrobat Reader B&W@200 dpi, A4,
PDF
5 DjVu Document
Express
B&W@300dpi, A4,
DjVu
6 Scan roxio
PhotoSuite
Color@100 dpi, A4,
JPEG
7 Paint Microsoft Paint Color@100 dpi, A4,
BMP
8 OCR Document
Express
B&W@300dpi, A4,
TIFF
Note:
To accurately use the default settings, you need to install the
necessary software applications such as roxio PhotoSuite or
Document Express, or Adobe Acrobat Reader before installing
the scanner driver.