
User`s manual


21
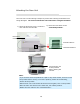
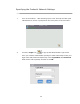
4. Click Login since the machine is shipped with no specific login name and
password and then the web page will be automatically updated to contain full
options.
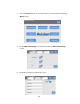
5. Click each item on the menu to enter relevant value. For details on each
setting, please refer to the subsequent section, Summary of the Web Pages.
Note:
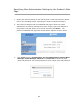
9 The Configuration, Account Management, Address Book Manager,
Folder Manager, Shortcut are blocked by login name and password. Click
Login to enter the detailed settings since the machine is shipped with no
specific password. You can create a password later and write it in your notes
in case you may forget it.
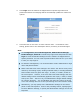
9 For effective management, it is recommended to create administrator’s login
name and password later.
9 Please note that some of the settings in the “Menu” can also be set by users
while they are making copies, sending individual mails, or sending individual
files to folder when they press the “Copy”, “E-mail”, or “Folder”, button on
the control panel. However, if the users fail to set these settings, then the
default settings will be automatically applied to the copier, e-mails, or folder
sent by the users. That is to say, the administrator assigns default settings
for common functions. Yet, an individual user also has a chance to set his
or her own settings when he or she is performing one of the function modes.
9 Alternatively, you may specify more administrator settings on the control
panel via the soft keyboard. Refer to the preceding section, Specifying the
Product’s Network Settings, to specify the administrator settings via the soft
keyboard.