
Installation manual
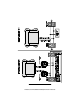


Power and Ground Connections
I
CAUTION : Do not plug in the system fuses until the final step
below.
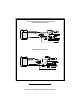
1. Connect the 18 ga RED wire to one end of a supplied 20 amp fuse
assembly.
2. If the vehicle parking lights are positive trigger, connect the RED/WHITE
wire to one end of the other supplied 20 amp fuse assembly.
3. Connect the BLACK wire to the 10 mm ring terminal.
4. Connect the 10 ga RED wire to one end of both 30-amp fuse assemblies.
5. Connect the other ends of the 18 ga RED and RED/WHITE wire fuse
assemblies to the 10 mm ring terminal.
6. Connect the other end of the 10 ga RED wire fuse assembly to the other
10 mm ring terminal.
7. Remove the (+) and (-) battery bolts. Do not disconnect the battery clamps.
8. Connect the empty fuse assemblies to the (+) battery terminal.
9. Connect the BLACK wire to the (-) battery terminal.
10. Inspect all wiring. Make sure all wires are connected correctly.
11. Install the 5 amp fuse in the 18 ga RED wire fuse assembly.
12. Install the 20 amp fuse in the RED/WHITE wire fuse assembly.
13. Install the two 20 amp fuses in the 10 ga RED wire fuse assemblies.
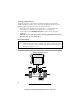
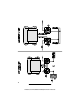
Mandatory RPM Programming
In order to remote start the vehicle engine and prevent over-grinding of the
starter motor, the engine RPM must be programmed into the system memory.
The AviStart has a built-in piezo beeper for audible programming confirmation.
1. Start the engine with the ignition key. Let the engine warm up until it
reaches a normal idle RPM (typically 700-900 RPM).
2. Turn the ignition key “OFF.”
3. Start the engine with the ignition key.
4. Within 10 seconds of starting the vehicle, begin flicking the valet switch
on then off 9 times (counting the piezo beeps).
NOTE: Stop on the 9th beep. See the “Programming Table for System
Features” on page 18.
5. Press and hold the remote START button.
6. The parking lights will flash two times to confirm the RPMs have been
memorized.
7. Release the START button.
16
AviStart 3001 Installation Manual, Revision B 100199