AVM BlueFRITZ! AP-X This manual and the software it describes are protected by copyright. AVM grants the non-exclusive right to use the software, which is supplied exclusively in what is known as object code format. The licensee may create only one copy of the software, which may be used exclusively for backup use. AVM reserves all rights that are not expressly granted to the licensee.
Contents 1 General Remarks 9 1.1 This Is BlueFRITZ! AP-X . . . . . . . . . . . . . . . . . . . . . . . . . . . . . . . . . . . . 9 1.2 Package Contents . . . . . . . . . . . . . . . . . . . . . . . . . . . . . . . . . . . . . . . 10 1.3 Installation Requirements . . . . . . . . . . . . . . . . . . . . . . . . . . . . . . . . 11 1.4 The BlueFRITZ! AP-X Connectors . . . . . . . . . . . . . . . . . . . . . . . . . . . 11 1.5 LEDs BlueFRITZ! AP-X . . . . . . . . . . . . . . . . . . . . . . . . . . .
34 4.1 Removing Software in Windows XP . . . . . . . . . . . . . . . . . . . . . . . . . 34 4.2 Removing Software Components in Windows Me/98 . . . . . . . . . . 35 4.3 Removing Software in Windows 2000. . . . . . . . . . . . . . . . . . . . . . . 36 5 Configuring BlueFRITZ! AP-X 38 5.1 FRITZ!X Functions . . . . . . . . . . . . . . . . . . . . . . . . . . . . . . . . . . . . . . . 38 5.2 Factory Settings . . . . . . . . . . . . . . . . . . . . . . . . . . . . . . . . . . . . . . . . 41 5.
7.3 Going Online with FRITZ!web . . . . . . . . . . . . . . . . . . . . . . . . . . . . . . 65 7.4 Multiple Subscriber Numbers (MSNs) for the FRITZ! Modules. . . . 67 7.5 ISDN and the Internet with Windows System Services . . . . . . . . . 67 7.6 Ready to Receive on Standby. . . . . . . . . . . . . . . . . . . . . . . . . . . . . . 69 8 Information, Updates and Support 72 8.1 Sources of Information. . . . . . . . . . . . . . . . . . . . . . . . . . . . . . . . . . . 72 8.2 Updates. . . . . . .
Safety Instructions 6 z Do not open the housing of BlueFRITZ! AP-X. The device contains hazardous components and should only be opened by authorized repair technicians. z All terminal equipment that is connected to the BlueFRITZ! AP-X must be approved for operation in public telephone networks in the European Union. z Never let liquids get inside the BlueFRITZ! AP-X. Otherwise, electric shocks or short circuits may result. z Do not install BlueFRITZ! AP-X during an electrical storm.
Typographical Conventions The following highlighting and icons are used to designate important information: Highlighting The following highlighting is used in this manual. Highlighting Function Example: Quotation marks Keys, buttons, icons, tabs, menus, commands “Start / Programs” or “Enter” Capital letters Path and file names in running text SOFTWARE\INFO.PDF or README.
Symbols The following icons are used in the manual: The hand indicates important instructions that must be observed to avoid malfunctions. FRITZ! marks useful hints to assist you in working with the product. The Telephone Keypad The following symbols are used in explaining how to configure and operate BlueFRITZ! AP-X using a tone-dialing telephone: 0...9 Numeric keys s Star key R Hold or Flash key r Pound sign key Instructions for Operation at the Telephone 8 M Dial a number.
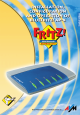
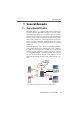
General Remarks 1 General Remarks 1.1 This Is BlueFRITZ! AP-X BlueFRITZ! AP-X is a combined PBX (Private Branch Exchange) extension and ISDN-Controller in one. This intelligent combination allows you to connect both your computer and your analog telephone equipment to the ISDN line. This means you can continue using your existing analog equipment, such as telephones, answering machines and fax machines, and enjoy a multitude of ISDN features.
Package Contents For detailed information about the Bluetooth profiles supported and their application potentials, please see the section “Bluetooth Profiles” on page 20. Thanks to the BlueFRITZ! AP-X PBX and the FRITZ! communication software, all the connected computers can use ISDN applications such as file transfer, telefax (Group 3), answering machine functions, PC telephony, and Internet services.
Installation Requirements 1.
LEDs BlueFRITZ! AP-X 1.
Connectors 1.6 Connectors BlueFRITZ! AP-X uses the following connectors: RJ45 plug RJ12 plug USB connector Series A USB connector Series B The ISDN cable supplied with BlueFRITZ! AP-X has an RJ45 connector at each end. The power cord also has a RJ45 connector at one end. Analog terminal devices are connected to BlueFRITZ! AP-X by means of RJ12 connectors.
Cables 1.7 Cables BlueFRITZ! AP-X is connected to ISDN by plugging the ISDN cable into the ISDN Network Terminator (NT). The ISDN cable has an RJ45 connector at each end. The computer is connected to BlueFRITZ! AP-X with the computer cable. The flat, rectangular connector is a Series A connector. It connects to your computer's USB port. If the computer is connected to a USB hub, the Series A connector is plugged into the hub. The square plug is a Series B connector.
Features 1.9 Features With BlueFRITZ! AP-X you can take advantage of many ISDN convenience features and functions.
Convenience Features Convenience Features 16 z Three Multiple Subscriber configurable per extension z Call pick-up z Call bumping for 2-channel Internet connections z Least Cost Routing (LCR) z Call transfer z Automatic outside dialing option z Call Rejection on Busy (Busy on Busy) z Dialing Restrictions z SMS in fixed network (with terminal devices offering SMS support) z Do Not Disturb z Caller list z Call forwarding over the second B channel z Internal call diversion z Call
Audible Signals 1.10 Audible Signals The following diagrams illustrate the duration and intervals of the various handset tones and ring patterns of the BlueFRITZ! AP-X extension telephones. Time in seconds 0 1 2 3 4 5 6 Audible Signals Ring Busy signal Internal dial tone External dial tone Positive confirmation Neg.
Hardware Installation 2 Hardware Installation This chapter describes the hardware installation. This involves connecting BlueFRITZ!AP-X to the ISDN line and the power supply, connecting analog terminal equipment to the PBX extensions, and connecting BlueFRITZ! AP-X to the computer. 2.1 Preparations for Installation BlueFRITZ!AP-X can be installed on any suitable horizontal or vertical surface. The unit should be installed in a dry, dustfree location out of direct sunlight.
Connecting Analog Terminal Equipment to BlueFRITZ!AP-X BlueFRITZ!AP-X does not have an on/off switch. The “Power” LED remains on continuously. 2.3 Connecting Analog Terminal Equipment to BlueFRITZ!AP-X BlueFRITZ!AP-X has been tested and CE-certified in accordance with European Union directives. Any analog telecommunication devices with CE certification can be connected to its extensions.
Connecting a PC to BlueFRITZ!AP-X: Without a Cable 2.4 Connecting a PC to BlueFRITZ!AP-X: Without a Cable To establish a wireless connection from the computer to ISDN, two Bluetooth devices are needed: one connected by a cable to the ISDN line, and another installed in the computer. Bluetooth then provides the wireless link between the two devices. The device installed in the computer is the Bluetooth client. The device connected to the ISDN line is the ISDN access point.
Bluetooth Profiles The following summary presents an overview of the Bluetooth profiles supported: CIP The ISDN CIP profile (Common ISDN Access Profile) controls the computer during Bluetooth connections so that it works as if a conventional ISDN adapter were installed. With CIP all ISDN services familiar from the terrestrial network can be used without restriction. PAN The PAN profile establishes a wireless LAN between the Bluetooth devices. This LAN uses the protocols known from the Internet (TCP/IP).
Connecting a PC to BlueFRITZ!AP-X: With a Cable SPP The Serial Port Profile (SPP) simulates a serial interface in the computer and allows two terminal devices to establish a bit-serial connection. 2.5 Connecting a PC to BlueFRITZ!AP-X: With a Cable BlueFRITZ!AP-X has a built-in ISDN-Controller. Together with the communications software FRITZ!, this ISDN-Controller permits the use of ISDN applications such as faxing, file transfer and Internet services.
Software Installation 3 Software Installation BlueFRITZ! AP-X can be installed in the operating systems Windows XP, Windows Me, Windows 2000 Professional and Windows 98. If you want to use ISDN from a computer connected over Bluetooth, you can do so without installing the software for BlueFRITZ! AP-X. However, if you want to configure the PBX or modify the Bluetooth properties of BlueFRITZ! AP-X, you must install FRITZ!X on the computer. To install FRITZ!X, run the file SETUP.
Installing the Driver Software in Windows XP z the FRITZ!X Configuration Software If you have already installed individual software components, such as FRITZ!, read the instructions in section “Installing Individual Software Components” on page 33. The section “Where to Find What After Installation” on page 32 explains where to find the individual software components on your computer after installation. Please note that only one CAPI driver may be installed on your computer.
Installing the Driver Software in Windows Me 5. Depending on the driver signature options configured on your computer, the next window may display a message about the Windows logo test. Answer the question with “Continue Anyway”. 6. The next window informs you that the drivers have been updated successfully. Click “Finish” to close the installation program. This concludes the installation of the BlueFRITZ! AP-X PBX. AVM BlueFRITZ! AP-X is now ready for immediate operation.
Installing the Driver Software in Windows 2000 8. Next you will be prompted to reboot the computer. Click “Yes”. The computer will be restarted automatically. This concludes the installation of the BlueFRITZ! AP-X PBX. AVM BlueFRITZ! AP-X is now ready for immediate operation. Then a message appears reporting that the FRITZ! communications software can be installed. Click the “Install” button, and skip ahead to the section “Installing the Communications Software FRITZ!” on page 29. 3.
Installing the Driver Software in Windows 2000 4. After the driver included with Windows 2000 has been installed, you must next update the driver using the setup program supplied on the installation CD. Insert the installation CD and run the program SETUP.EXE in the WINDOWS.2K folder. The installation program for BlueFRITZ! AP-X starts. 5. In its sign-on window, select your language and click “Continue”. 6. In the next dialog, select “Update” and confirm by clicking “Continue”. 7.
Installing the Driver Software in Windows 98 3.5 Installing the Driver Software in Windows 98 Windows 98 includes an ISDN Configuration wizard. However, this Wizard only performs the configuration procedure for a previously installed AVM ISDN NDIS WAN CAPI driver. The Wizard cannot be used to install ISDN hardware and software correctly, nor to set up an ISDN connection. Proceed as follows to install the driver software: 1. After connecting BlueFRITZ! AP-X, start your computer. 2.
Installing the Communications Software FRITZ! 7. Next, the sign-on window of the installation program for BlueFRITZ! AP-X appears. Specify the folder in which the driver software of BlueFRITZ! AP-X is to be installed on your computer. 8. As a final step of the driver software installation, a message box is displayed showing the configuration of BlueFRITZ! AP-X. Click “Next”. 9. Next you will be prompted to reboot the computer. Click “Yes”. The computer will be restarted automatically.
Installing the AVM ISDN CAPI Port Driver Outside Line Access Enter your outside dialing prefix (the digit you must dial to obtain an outside line, usually “0”). Minimum length of external numbers Enter the minimum number of digits that external numbers have. For example, if extension numbers in your PBX have three digits, enter “4”.
Installing the Configuration Software FRITZ!X z MSN On the “MSN” settings page, you can enter a specific MSN to be used for outgoing connections over the two virtual modems “AVM ISDN Internet (PPP over ISDN)” and “AVM ISDN RAS (PPP over ISDN)”. This can be useful for keeping track of online costs. More information is available in the Online Help once you have installed the AVM ISDN CAPI Port Driver. z Ports On this settings page you can assign specific COM ports to the virtual modems.
Errors During Installation: What to Do 3. In the next dialog, enter the area code of your location and confirm by clicking “Continue”. The program files are now copied to your hard disk. 4. Click “Finish” to close the installation program. This concludes the software installation for BlueFRITZ! AP-X. Restart your computer. 3.
Installing Individual Software Components z The “BlueFRITZ! AP-X Setup” program allows you to permanently activate or deactivate data compression with CAPI SoftCompression X75/X42. In Windows XP and 2000, a program group is created for BlueFRITZ! AP-X only when the BlueFRITZ! AP-X configuration software is installed. This program group is named “AVM”. Shortcuts to the FRITZ! modules are found in the “FRITZ!” program group.
Removing Software Components 4 Removing Software Components The steps required to remove the software vary depending on your computer’s operating system. See the section below that describes uninstallation in your operating system. 4.1 Removing Software in Windows XP Proceed as follows to remove the BlueFRITZ! AP-X driver software in Windows XP: 1.
Removing Software Components in Windows Me/98 – AVM FRITZ! – AVM FRITZ!X – AVM ISDN CAPI Port 4. Select the software component you want to remove. 5. Click the “Change/Remove” button. All of the selected component’s files and settings are deleted from your computer. 6. Repeat this process to remove another software component of BlueFRITZ! AP-X. This completes the uninstallation of the selected components. 4.
Removing Software in Windows 2000 Rebooting the computer concludes the uninstallation. 4.3 Removing Software in Windows 2000 Proceed as follows to remove the BlueFRITZ! AP-X driver software in Windows 2000: 1. Open the system properties of Windows by clicking through “Start / Settings / Control Panel / System” and select the “Device Manager” button on the “Hardware” settings page. 2. In the “Network adapters” section of the Device Manager, select the “BlueFRITZ! AP-X” entry. 3.
Removing Software in Windows 2000 All of the selected component’s files and settings are deleted from your computer. 6. Repeat this process to remove another software component of AVM BlueFRITZ! AP-X. This completes the uninstallation of the selected components.
Configuring BlueFRITZ! AP-X 5 Configuring BlueFRITZ! AP-X The FRITZ!X configuration software is provided for convenient configuration of your BlueFRITZ! AP-X. Use this program to adapt your telecommunications system to your individual needs and avoid more complicated programming by telephone. 5.1 FRITZ!X Functions All available commands of the configuration software are provided in the “Settings”, “Bluetooth”, “Charges”, “Telephony”, “LCR” and “Update” menus. The individual menus are presented below.
Bluetooth Bluetooth On the settings pages of the “Bluetooth” menu command you have the option of changing the features of BlueFRITZ! AP-X as an Access Point. The settings made here affect primarily the administration and control of the Bluetooth client. If no changes are made to these settings, any Bluetooth client can log in to the Access Point. The only requirement is that the user must know the passkey printed on the sticker on the bottom of the ISDN Access Point Housing and in the Quick Start manual.
Charge per unit Connections This list registers all clients currently connected to the Access Point. The clients are shown with their Bluetooth address. The list displays the parameters of the Bluetooth connection: duration, transmitter power, field intensity, link quality, error rate, number of packets sent and number of bytes sent. Click the “Update” button to update the list. Version This settings page contains the version number of the application started when you click the “Bluetooth” command.
Update Update Use this menu to update the PBX software (firmware) to keep your PBX up with the latest technology. 5.2 Factory Settings Your BlueFRITZ! AP-X telecommunications system is ready for operation with the factory settings. The following settings are configured upon delivery: z The Bluetooth passkey will be reset to the value printed on the sticker on the bottom of the device base. z No Multiple Subscriber Numbers (MSNs) are assigned to the individual extensions.
Starting the Configuration Program z Dialing restrictions are disabled for all extensions. z Connected Line Identification Presentation (COLP) is enabled for all extensions. z The 16 kHz charge-unit pulse is disabled for all extensions. z The Quick-Dial memory of the PBX is empty. 5.3 Starting the Configuration Program Start the configuration software by selecting “Start / (All) Programs / AVM / FRITZ!X”.
Assigning Names to the Extensions The following sections explain how to go about configuring the settings. Perform the settings in the order presented here. H Have ready the documents in which your ISDN provider supplied the Multiple Subscriber Numbers (MSNs) for your ISDN line. Assigning Names to the Extensions Two extensions are available on the BlueFRITZ! AP-X PBX. You can enter a description for each extension. 1. Select the “General” settings page in the “Settings” menu. 2.
Entering MSNs Entering MSNs Your ISDN provider supplied 3 to 10 numbers for your ISDN line. These numbers are known as Multiple Subscriber Numbers (MSNs). The Multiple Subscriber Numbers facilitate the direct dialing of connected devices like telephones, answering machines or fax machines. A terminal device can only be dialed directly when it has been assigned its own MSN. Before assigning the MSNs to individual extensions, you must first tell the FRITZ!X software which MSNs are available.
Advanced Settings 2. You have already assigned the MSNs to the extensions. The MSN entered in the list field labeled “1st MSN” is automatically the number used for outgoing calls. If there is no entry in the “MSN 1” field, this extension will be defined as the “Main MSN” and outgoing number of your ISDN line. 3. If you want an extension to be limited to outgoing calls only, activate the “only for outgoing calls” option. 4. As a final step, click “Apply” to implement the changes on the PBX. 5.
Configuring Call Forwarding To assign different features to the extensions, proceed as follows: 1. Select the “Extension Properties” settings page in the “Settings” menu. 2. Activate the features desired for each extension. 3. As a final step, click “Apply” to implement the changes on the PBX. Configuring Call Forwarding This kind of call forwarding lets you forward calls for an extension either to a different extension or to an external line.
Configuring Call Forwarding Configuring Call Forwarding With call forwarding you can forward incoming calls for one Multiple Subscriber Number (MSN) to an external line. This means that calls are forwarded depending on which MSN of your line was dialed. Ask your ISDN provider whether “Call Forwarding” is available on your ISDN line. Enabling call forwarding is subject to charges. 1. Select the “Call Forwarding” settings page in the “Settings” menu. 2.
Updating the PBX Software 2. The CARDWARE\\FIRMWARE folder contains a file with the suffix EXE. Load this file to your computer. From the AVM Internet server 1. Go to the AVM web site: http://www.avm.de/en 2. Click “Download”. 3. Under “Product Finder:”, choose BlueFRITZ! AP-X and under “Operating System:” your operating system. Click “Send”. 4. Click “Start download” in the “Firmware” section.
Restoring Factory Settings Do not disconnect BlueFRITZ! AP-X from the computer during a firmware update, and do not unplug the BlueFRITZ! AP-X power cord! If the firmware update is interrupted, your BlueFRITZ! AP-X may become unusable! In that case, repeat the update procedure. A message indicates that the update has been completed successfully. The PBX is then reset and its new version number is displayed.
Operating BlueFRITZ! AP-X 6 Operating BlueFRITZ! AP-X This chapter describes the use of features available on BlueFRITZ! AP-X extension telephones. Some of the functions described cannot be performed by pulse-dialing telephones. For details, see the section “BlueFRITZ! AP-X and Pulse-Dialing” on page 62. 6.1 Dialing External Calls Dialing external calls with automatic outside dialing N Pick up the handset.
Dialing Internal Calls The CLIR sequence described above must be dialed before each call for which your outgoing Caller ID is to be suppressed. To activate CLIR permanently, see the configuration program's Online Help. This feature must be enabled on the line by your ISDN provider. 6.2 Dialing Internal Calls Dialing internal calls with automatic outside dialing N Pick up the handset. You hear the external dial tone immediately, since the extension is set for automatic outside dialing.
Transferring Calls 6.3 Transferring Calls The “Call Transfer” function allows you to transfer an active call to the second BlueFRITZ! AP-X extension. To do so, proceed as follows: Call 1 You are talking to Caller No.1. P R Press the Hold button. Caller No. 1 is now on hold. M To announce the call to another internal user, dial her or his extension number. Call 2 You can now talk with the other internal user. P O To transfer the original call to the other internal extension, simply hang up the handset.
Consultation / Hold 6.5 Consultation / Hold The “Consultation / Hold” feature allows you to hold a current call to allow consultation with a second conversation partner. You then may the consult someone else at your workplace or dial a second call. The party on hold does not hear the second conversation. Once you have finished the consultation, you can return to the original connection. To place a call on hold and then reactivate it, proceed as follows: Call No. 1 You are talking to Caller No.1.
Call Holding 6.6 Call Holding Whenever you have one active connection and one caller on hold, you can switch from one call to the other as often as you want using the Hold button. To alternate between two connections, proceed as follows: Call No. 1 You are talking to Caller No. 1. P R Press the Hold button. Call No. 1 is now on hold. M To dial a second call, simply dial either the desired extension number or the outside line access “0” followed by the desired external number. Call No.
Three-Party Conference Call 6.7 Three-Party Conference Call BlueFRITZ! AP-X allows you to hold telephone conferences with two other people at once. Two external and one internal party, or two internal and one external party can conduct a conference call with each other. You can set up a three-party conference as follows: N Pick up the handset. M Dial the external number of the first party. Talk. R Press the Hold button.
Call-back on Busy 6.8 Call-back on Busy When you dial a number and it is busy, activate this feature. As soon as the line is free, your telephone will ring for 20 seconds as it would for an incoming call. When you pick up your handset, the number of desired party will be dialed automatically. This feature is supported for both external and internal connections. Note that this feature must be enabled for your line by your ISDN provider.
Call-back on No Response 6.9 Call-back on No Response This function can be used when you dial a number and the party does not respond. Once the party can be reached again and conducts a call from her or his phone, this function recognizes when this conversation is ended. When the subscriber you dialed hangs up, your telephone rings for 20 seconds, as it would for an incoming call. When you pick up your handset, the number of the desired party is automatically dialed again.
External Transfer 6.10 External Transfer With this ISDN feature you can connect two external parties with each other, when one connection has been active and the other has been on hold. Then you can end your own connection while the other two parties continue their conversation. You can also connect external parties from a three-party conference. (Please see the instructions in the file CONFGTEL.PDF on the BlueFRITZ! AP-X CD for further details.
Picking Up Calls from Another Extension 6.11 Picking Up Calls from Another Extension The pickup function allows you to respond to a call ringing on another extension at your own phone. N Pick up the handset. s09 Dial the sequence shown at left. P The call will be picked up. You are now connected to the caller. This function can also be used to pick up incoming calls that have already been accepted by an answering machine at another number.
Tracing You will hear an acknowledgement tone to indicate that the call has been successfully suspended. If you hear the failure tone, this may indicate that you made a mistake, or that the Suspend/Resume feature is disabled. It is also possible that the Suspend ID you chose may already be in use. Q After the acknowledgement tone, the connection is suspended. You can hang up the handset. The call O remains suspended at the ISDN provider’s local switch for two minutes.
Using Keypad Messages 6.14 Using Keypad Messages BlueFRITZ! AP-X offers the “keypad” function. This function allows ISDN services and features to be controlled by entering characters and strings on the telephone keypad. These keyboard entries are called keypad messages. Keypad sequences allow you to use ISDN services and features that may not be included directly in BlueFRITZ! AP-X. Ask your ISDN provider for the specific keypad messages to access ISDN features.
BlueFRITZ! AP-X and Pulse-Dialing 6.15 BlueFRITZ! AP-X and Pulse-Dialing Only some of the features of BlueFRITZ! AP-X can be used with a pulse-dialing telephone.
FRITZ!: Internet and ISDN Software 7 FRITZ!: Internet and ISDN Software FRITZ! is the gateway to the entire world of ISDN communication: surfing the Internet, sending faxes, transmitting data and much more. This software grants you freedom of connectivity, allowing communication not only with remote partners equipped with an ISDN line, but also connections to analog lines. 7.
Blocking Numbers with ISDNWatch In the FRITZ! Address Book you can save all the information needed to dial up connections with all of the program modules. The Address Book can be opened from any FRITZ! module. For comprehensive information about FRITZ!, see the Online Help. 7.2 Blocking Numbers with ISDNWatch ISDNWatch is a program that supports you by monitoring your ISDN connections.
Going Online with FRITZ!web 7.3 Going Online with FRITZ!web With BlueFRITZ! AP-X and the FRITZ!web module you can go online fast for easy surfing. You can explore the World Wide Web, exchange e-mail and enter chat rooms. A wizard simplifies access to the Internet and helps you to manage your Internet connections and settings: z Select the “Connect to the Internet” button in the wizard and open a web browser to establish a connection to the Internet using the pre-configured Internet connection.
Clearing Idle Connections Automatically (Timer Bar) Clearing Idle Connections Automatically (Timer Bar) In the FRITZ!web settings you can specify how many seconds the line is allowed to remain idle before the existing connection to the Internet is automatically cleared down. An example: Suppose you have loaded a Web page in your browser. While you are reading, no further data is requested over the Internet connection.
Multiple Subscriber Numbers (MSNs) for the FRITZ! Modules 7.4 Multiple Subscriber Numbers (MSNs) for the FRITZ! Modules To receive fax and data calls with FRITZ!, it is not necessary to assign distinct Multiple Subscriber Numbers (MSNs) to FRITZ!datadata and FRITZ!fax, since FRITZ!fax answers calls with the service indicator for “voice” telephony, while FRITZ!data responds only to calls with the “data” service indicator. However, FRITZ!fax and FRITZ!fon both use the “voice” service indicator.
Internet Access Through the AVM ISDN NDIS WAN CAPI Driver Internet Access Through the AVM ISDN NDIS WAN CAPI Driver AVM ISDN NDIS WAN CAPI Driver is automatically installed along with the operating systems Windows XP and 2000. The Dial-Up Networking connection for the NDIS WAN CAPI Driver is located in the “Network Connections” area of the Windows Control Panel.
BlueFRITZ! AP-X as a Virtual Modem BlueFRITZ! AP-X as a Virtual Modem The AVM ISDN CAPI Port Driver allows you to use an ISDNController as if it were a modem. The ISDN CAPI Port Driver generates a number of virtual modems in your system. The virtual modems are pre-configured so that they can be used immediately in most conventional implementations without any further configuration required. The modem settings can be customized using AT commands.
Does the Computer Support ACPI? Does the Computer Support ACPI? Use the following checklist to determine whether your computer supports ACPI: z You work with Windows XP, Me or 2000. z Windows XP: ACPI-capable components are listed under “System devices” on the “Device Manager” settings page accessed from the “Hardware settings” page (“start / Control Panel / Performance and Maintenance / System / Hardware”).
Always ready with “PC Wake-up” Always ready with “PC Wake-up” Please note the following to keep BlueFRITZ! AP-X and FRITZ! ready to receive at all times in standby operation. z Deactivate the “Hibernation” option. The “PC Wake-up over ISDN” command is not available when the system is hibernating. z For an incoming call to “wake up” the computer from standby, at least one ISDN application must indicate to the CAPI driver that it is ready to receive. Make sure that a suitable application is started.
Information, Updates and Support 8 Information, Updates and Support AVM provides numerous sources of information to assist you if any questions or problems arise. Here you will find the important information you need, in the form of manuals, updates and support. In many cases problems which arise during operation can be resolved by installing the current Microsoft Service Pack for your operating system. The current service pack can be obtained directly from Microsoft. 8.
Documentation z Help for FRITZ! In all FRITZ! modules you can open the detailed Online Help by pressing “F1” or clicking the Help button. z The FRITZ! manual A printed version of the manual is included in the BlueFRITZ! AP-X package, and a PDF version is in the folder on the CD called \SOFTWARE\INFO. If you need to install the Acrobat Reader to read the PDF file, you can do so using the installation program included in the SOFTWARE\INFO folder on the CD.
Updates 8.2 Updates New drivers and software updates for your AVM BlueFRITZ! AP-X are available for downloading free of charge from AVM’s Internet site or the AVM Data Call Center (ADC). Internet To download updates from the Internet, please enter the following URL: www.avm.de/en/download Driver software for AVM BlueFRITZ! AP-X can be downloaded from this location. The AVM FTP server can also be used to download current driver software.
Assistance from AVM Support 8.3 Assistance from AVM Support Please take advantage of the information sources described above before you contact AVM support. AVM’s Support team is at your service with direct help when problems arise, during installation, the initial configuration and your first steps in operating the AVM BlueFRITZ! AP-X. The support desk can be reached by e-mail or by fax. AVM Support then will contact you to assist in solving your problem. You will receive an e-mail or a fax.
Assistance from AVM Support The following information should be included in your fax: z An e-mail address or fax number at which you can be reached. z Your name and address. z The operating system you are using, such as Windows 2000 or Windows 98.
Index A ACPI 69 assigning names to extensions 43 AT commands 69 AVM Data Call Center (ADC) 47 AVM ISDN CAPI Port Driver installation 30 AVM ISDN TAPI Services for CAPI 68 AVM support 72 B BlueFRITZ! AP-X general information 9 Bluetooth 9, 20, 23 Bluetooth passkey 20, 39 Bluetooth profiles 14, 20 CIP 21 CTP 21 DUN 21 PAN 21 SPP 22 C cables 14 call picking up 59 suspend/resume 59 call bumping 66 call diversion over the second B channel 46 via the central exchange 47 call forwarding 47 call holding 54 call t
I PBX 9 PC wake-up 71 PC Wake-up over ISDN 69 pickup 59 preparations for installation 18 pulse-dialing telephones 62 information sources 72 installation hardware 18 software components 33 installation prerequisites 11 installing FRITZ!X 31 installing the driver software in Windows 2000 26 in Windows 98 28 in Windows Me 25 in Windows XP 24 Internet with FRITZ!web 65 R removing software components S K keypad messages 61 L Least Cost Routing (LCR) 40 LEDs 12 line analog terminal equipment cables 18 19
Declaration of CE Conformity The manufacturer AVM GmbH GmbH Address Alt-Moabit 95 D-10559 Berlin herewith declares that the product Product BlueFRITZ! AP-X Type Wireless ISDN-Controller complies with the following directives: z 1999/5/EC: R&TTE Directive: Telecommunications Terminal Equipment and Satellite Earth Station Equipment z 89/336/EEC EMC Directive: Electromagnetic Compatibility z 73/23/EEC Low Voltage Directive: Electrical equipment designed for use within certain voltage limits Th
Drilling Template 80 BlueFRITZ! AP-X